


About
Crochet Ladybug, Beret and Scarf Set
I have made this set for my Step daughter Bec', it will be her birthday on the 24.04.
I wrote my own beret pattern, as I wanted to use 2 strands of 8 ply yarn for extra thickness (16 ply). You can use any old type of beret pattern available.
I have supplied a free pattern for the Beret and Scarf here.
Enjoy!!!!!
-
 Miss Captain Cosplay favorited Ladybug Beret & Scarf Set
22 Apr 08:46
Miss Captain Cosplay favorited Ladybug Beret & Scarf Set
22 Apr 08:46
-
 lmstash favorited Ladybug Beret & Scarf Set
30 Sep 13:42
lmstash favorited Ladybug Beret & Scarf Set
30 Sep 13:42
-
 Belle favorited Ladybug Beret & Scarf Set
29 Jul 08:18
Belle favorited Ladybug Beret & Scarf Set
29 Jul 08:18
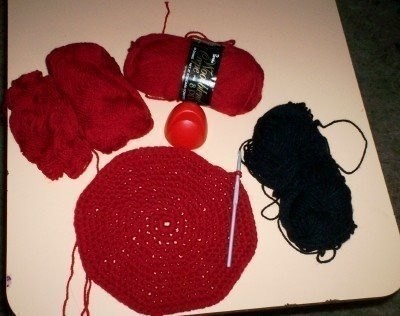
You Will Need
-
Step 1
<u>Ladybug Beret</u>
Stitch used is US sc
Special instructions
Beret and Peak are made by using 2 strands of yarn together, which gives you a 16 ply Beret
Do not join rounds
The use of a stitch marker between roundsAlternate increase’s for a more rounded effect, such as, sc then increase, increase then sc.
Instructions are given for only for sc then increase.Size is for small adult head
-
 Step 2
Beret, working with 2 strands of red yarn and a size 5.00mm hook
Ch 4, sl st to form a ring
8 sc into ring (8 sc)
2 sc in each sc around (16 sc)
1 sc in next sc, 2 sc in next sc, repeat to end of the round (24 sc)
1 sc in next 2 sc, 2 sc in next sc, repeat to end of round (32 sc)
1 sc in next 3 sc, 2 sc in next sc, repeat to end of round, (40 sc)
1 sc in next 4 sc, 2 sc in next sc, repeat to end of round (48 sc)
1 sc in next 5 sc, 2 sc in next sc, repeat to end of round (56 sc)
work 1 sc in each sc around (56 sc)
1 sc in next 5 sc, 2 sc in next sc, repeat to end of round (56 sc)
1 sc in next 6 sc, 2 sc in next sc, repeat to end of round (64 sc)
1 sc in next 7 sc, 2 sc in next sc, repeat to end of round (72 sc)
1 sc in next 8 sc, 2 sc in next sc, repeat to end of round (80 sc)
work 1 sc in each sc around (80 sc)
1 sc in next 9 sc, 2 sc in next sc, repeat to end of round (88 sc)
1 sc in next 10 sc, 2 sc in next sc, repeat to end of round (96 sc)
work 1 sc in each sc around (96 sc)
1 sc in next 10 sc, 2 sc in next sc, repeat to end of round (96 sc)
1 sc in next 11 sc, 2 sc in next sc, repeat to end of round (104 sc)
This should give you an approximate width of 10 inches in diameter, if you want a wider beret, keep increasing in the above manner to get your width. If puckering occurs, work a row with out increases. -
 Step 3
Work 1 round of sc in back loops only
Decrease rounds are the reverse of the increase rounds
1 sc in next 11 sc, sc 2 sc together, repeat to end of round (96 sc)
1 sc in next 10 sc, sc 2 sc together, repeat to end of round (88 sc)
1 sc in next 9 sc, sc 2 sc together, repeat to end of round (80 sc)
1 sc in next 8 sc, sc 2 sc together, repeat to end of round (72 sc)
1 sc in next 7 sc, sc 2 sc together, repeat to end of round (64 sc)
1 sc in next 6 sc, sc 2 sc together, repeat to end of round (56 sc)
1 sc in next 5 sc, sc 2 sc together, repeat to end of round (48 sc) Stop decreasing here (row 26) for a medium sized beret
1 sc in next 4 sc, sc 2 sc together, repeat to end of round (40 sc)
work next 5 rows in sc, with 2 strands of black, without decrease or length desired. Fasten off -
 Step 4
Peak for beret
Using 2 strands of black and size 5.00 mm hook
Ch 2
work 4 sc into 2nd ch from hook, ch 1 and turn
2 sc in each sc across, ch 1 turn (8 sc)
1 sc in next sc, 2 sc in next, repeat to end, ch 1 and turn (12 sc)
1 sc in next 2 sc, 2 sc in next, repeat to end, ch 1 and turn (16 sc)
keep increasing in this manner until you have 28 sc or width desired. Fasten off
Attach peak to beret, sew in all loose ends.The back split is worked with a single strand of black yarn in sc through the red beret with a size 4.00 mm hook.
-
 Step 5
Feelers are sewn in black as pictured.
-
Step 6
Make a face on the peak.
Make 2 small dots, using a single strand of black and using size 4.00 mm hook.
Work 4 sc into a ring, do not join,
work 2 sc into each sc around (8 sc), fasten off leaving a length for sewing.Make 2 large dots, using a single strand of black and using size 4.00 mm hook.
Work 4 sc into a ring, do not join,
work 2 sc into each sc around (8 sc),
work 1 sc in next sc, 2 sc in next sc around (8 sc) fasten off leaving a length for sewing.Attach dots head.
Sew in all loose ends. -
Step 7
<u>Ladybug Scarf</u>
Stitches used are US sc and dc
Scarf is worked beginning at neck part, then the lady bugs are attached to both ends of the neck part.
Instructions given are for a scarf approx 55 inches in length. Using 4 lady bugs on each end of the scarf (8 ladybugs in total)
Turning ch 3 is counted as the first dc in every row -
Step 8
Neck part
Holding 2 strands of black together and using 5.00 mm hook
Ch 15
work 1 dc in 4th ch from hook and in each ch across, ch 3 and turn (13 dc)
work 1 dc in next dc across, ch 3 and turn (13 dc)
repeat row 2 until you get 31 rows in total, or length desired. Fasten off and weave in ends. -
 Step 9
Easy ladybug, less sewing
Holding 2 strands of red yarn together and using 5.00 mm hook
You can either make a magic circle to begin, or a ch 2 then sc into the 2nd ch from the hook. The magic ring gives you a beginning that is closed tightly.
Do not join rounds.Work 6 sc into ring
2 sc in each sc around (12 sc)
1 sc in next sc, 2 sc in next sc, repeat around (18 sc)
1 sc in next 2 sc, 2 sc in next sc, repeat around (24 sc)
1 sc in next 3 sc, 2 sc in next sc, repeat around (30 sc)
1 sc in next 4 sc, 2 sc in next sc, repeat around (36 sc)
1 sc in next 5 sc, 2 sc in next sc, repeat around (42 sc)
sl st to join. -
 Step 10
Head is worked as a half circle
Holding 2 strands of black and using 5.00mm hook
work 3 sc into ring, ch 1 and turn
2 sc into each sc to end, ch 1 and turn (6 sc)
1 sc in next sc, 2 sc in next sc, repeat across (9 sc) fasten off
Attach head to body.The back split is worked in sc through the red body.
Using a single strand of black and a size 4.00 mm hook attach yarn to the centre area of the head closest to the red body, sc evenly down the length of body.
Black spots are made in 2 sizes; the smaller is attached to the upper body and the larger to the lower body.
Make 2 small dots, using a single strand of black and using size 4.00 mm hook.
Work 4 sc into a ring, fasten off leaving a length for sewing.Make 2 large dots, using a single strand of black and using size 4.00 mm hook.
Work 4 sc into a ring, do not join, work 2 sc into each sc around (8 sc), fasten off leaving a length for sewing.Attach dots to body. Sew eyes into head.
-
Step 11
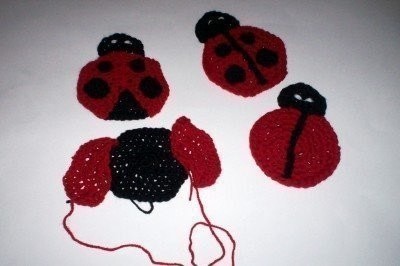
<u>Single strand Ladybug more sewing .</u>
Made in 4 parts using a single strand of yarn and a size 4.00 mm hook
Black body
Work 6 sc into ring
2 sc in each sc around (12 sc)
1 sc in next sc, 2 sc in next sc, repeat around (18 sc)
1 sc in next 2 sc, 2 sc in next sc, repeat around (24 sc)
1 sc in next 3 sc, 2 sc in next sc, repeat around (30 sc)
1 sc in next 4 sc, 2 sc in next sc, repeat around (36 sc)
1 sc in next 5 sc, 2 sc in next sc, repeat around (42 sc)
sl st to join.Black head
Work 3 sc into ring, ch 1 and turn
2 sc into each sc across, ch 1 and turn (6sc)
1 sc into next sc, 2 sc into next sc, repeat to end ch 1 and turn (9 sc)
1 sc into next 2 sc, 2 sc into next sc, repeat to end ch 1 and turn (12 sc)Attach head to body.
Red Wings, make 2
Work 3 sc into ring, ch 1 and turn
2 sc into each sc across, ch 1 and turn (6sc)
1 sc into next sc, 2 sc into next sc, repeat to end ch 1 and turn (9 sc)
1 sc into next 2 sc, 2 sc into next sc, repeat to end ch 1 and turn (12 sc)
1 sc into next sc 3, 2 sc into next sc, repeat to end ch 1 and turn (15 sc)
1 sc into next sc 4, 2 sc into next sc, repeat to end ch 1 and turn (18 sc)
1 sc into next sc 5, 2 sc into next sc, repeat to end (21 sc)
Fasten off leaving a medium sized tail for sewing on 1st wing and a longer tail for sewing on the 2nd wing.Attaching wings (face wings together so tails meet each other) firstly using smaller tail for sewing, sew wings together from the sewing tail to the centre circle of the wing only, cut yarn.
Attach wings to the body using the longer tail, begin at the top centre of the body, sew around the outer part of the first wing then up into the upside down v shaped part of the wing, then the outer part of the wing to where you began, finishing off sewing down the centre join of the wing. (Wings attached to the body.)Black spots are made in 2 sizes; the smaller is attached to the upper body and the larger to the lower body.
Make 2 small dots, using a single strand of black and using size 4.00 mm hook.
Work 4 sc into a ring, fasten off leaving a length for sewing.Make 2 large dots, using a single strand of black and using size 4.00 mm hook.
Work 4 sc into a ring, do not join, work 2 sc into each sc around (8 sc), fasten off leaving a length for sewing.Attach dots to body. Sew eyes into head
I attached my ladybugs heads facing upwards, the very top of the head was sewn to the very bottom of the body.
See pictures for more detail.


great job!!
great job!!
CO + K User