


About
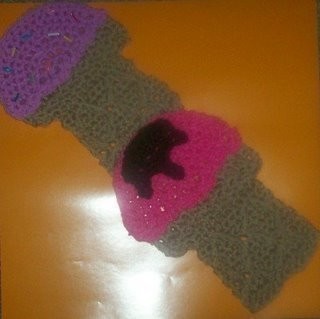
Crochet Ice-Cream Cone Scarf Pattern
It takes about 30 minutes to make one of these cones, thats not including the making up (sewing).
If you do not want the cones to go all the way around your neck, you can use the neck part of the ladybug scarf I made.
The Ice-cream cone Scarf
Make as many cones needed for the length you require
US abbreviations used through-out pattern
Materials
Size 5.00 mm hook (H/8) and 4.00mm hook (G/6)
8 ply and 12 ply yarn used (Light worsted and worsted weight yarn)
Colours needed
Cone colour of your choice, for full length scarf about 200 grams or more
Nice bright colours for ice-cream (good stash buster here)
Small amounts of chocolate or dark brown for chocolate topping
Stitches used
FPTR
SC
Stitch patterns used
Diamond stitch
Griddle st
-
 Galaxie A. favorited Ice Cream Cone Scarf
28 Dec 23:05
Galaxie A. favorited Ice Cream Cone Scarf
28 Dec 23:05
-
 Step 1
I tried various stitch patterns for the cone and came up with this one, the stitch diagram I had was for 38 sc, so I had to reduce it and change the pattern slightly to finally come up with the shape I liked.
-
Step 2
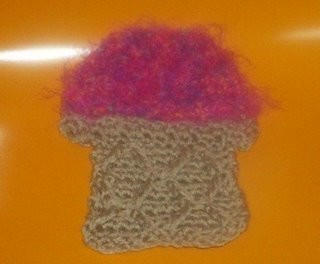
Cone
Diamond st worked for the cone
Size 5.00 mm hook and worsted weight yarnSc 13
Sc in 2nd ch from hook and in each ch across, ch 1 and turn (12 sc)
1 sc in each sc across, ch 1 turn (12 sc)
Repeat above row 1 more timesc in first 2 sc, work fptr around post of first sc of the 3rd row below (not the very edge sc), skip next 4 sc of the 3rd row below, work fptr around the next sc of the 3rd row below, skip next 2 sc from the last sc made, sc in the next 4 sc, work fptr in the next sc in the 3rd row below, skip next 4 sc of the 3rd row below, work fptr in the next sc of the 3rd row below, skip next 2 sc from the last sc made, sc in the next 2 sc, ch 1 and turn
Work 3 rows of sc, chaining 1 to turn
work fptr around the top of the fptr in the 3rd row below, skip first sc, sc in next 4sc, work fptr around the top of the fptr on 3rd row below, skip next 4 sc on the 3rd row below, work fptr around the top of the fptr on the 3rd row below, skip next 2 sc from the last sc made, sc in the next 4 sc, fptr around the top of the fptr on the 3rd row below, leave last sc un worked, ch 1 and turn
SC in both loops of the unworked sc an the fptr, (i.e.: sc both together), sc in each sc across, ch 1 and turn (12 sc)
Work 2 more rows of sc, chaining 1 to turnRepeat the first pattern row, working the fptr into the top of the fptr of the 3rd row below. Fasten off
-
 Step 3
Top of the Cone, worked onto the last row of the lower part of the cone
Griddle st worked for top part of the coneCh 2, working in front loops only, work 1 sc into the first sc, of the last row worked,
1 sc in each sc across, ch 3 and turn (12 sc, 4 ch and 1 turning ch)
1sc in 2nd ch from hook, 1 dc in next ch, *1sc in next sc, 1 dc in next sc,* repeat to end including final 2 ch, ch 1 and turn (you will end with a 1 dc in the final ch, you will have 16 pattern stitches and a ch1 to turn)*1 sc in the next dc, 1 dc in the next sc*, continue in this way across, ch 1 and turn
Repeat above row 1 more time fasten off. -
Step 4
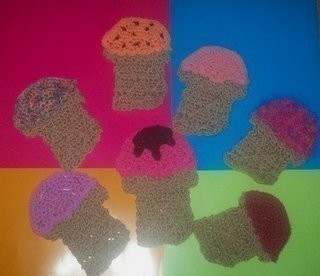
Ice cream scoop
If you are using scrap yarn, use the hook size relevant to the yarn
Size 4.00mm for 8 ply, 5.00mm for 12 ply , you may need to add an extra increase row to the thinner ply yarn.
Ch 2
Work 3sc into 2nd ch from hook. Ch 1 and turn (3 sc)
Work 2 sc in each sc across, ch 1 and turn (6 sc)
Work *1 sc in next sc, work 2 sc in next sc* repeat to end, ch 1 and turn (9 sc)
Work *1 sc in next 2 sc, work 2 sc in next sc* repeat to end, ch 1 and turn (12 sc)
Work *1 sc in next 3 sc, work 2 sc in next sc* repeat to end, ch 1 and turn (15 sc)
Work *1 sc in next 4 sc, work 2 sc in next sc* repeat to end, ch 1 and turn (18 sc)
Work *1 sc in next 5 sc, work 2 sc in next sc* repeat to end, ch 1 and turn (21 sc)
Work 1 sc in each sc across; do not turn (21 sc)
Working across the bottom part of the scoop, work this way evenly across, *3 sc in one space, sl st in next space* to end, fasten off leaving a long tail for sewing -
 Step 5
Making up the ice-cream cone
Sew in all loose ends of the cone, sew ice-cream scoop to the top of the cone (you may have to slightly stretch or gather the ice-cream scoop) -
 Step 6
Chocolate topping
Work the first 5 rows of the ice-cream scoop (15 sc)
Working across the bottom part of the chocolate topping, make the chocolate drips
(you may have to wing it a little here)
1 sc in space, 1 sc in next space, ch 3, 1 sc in 2nd ch from hook and in next ch, 1 sc in the same 1sc space, 1 sc in the next 2 spaces,1 sc in the next space, ch 4, 1 sc in 2nd ch from hook and in the next 2 ch, 1 sc in the same ch 1 space, 1 sc in the next 2 spaces, 1 sc in next space, ch 3, 1 sc in 2nd ch from hook and in next ch, finish off with a 1 sc in next space, fasten off leaving long thread for sewing. -
 Step 7
There are various ways to decorate the ice-cream scoop
Sew or crochet, chocolate chips.
Sew or crochet, coloured sprinkles
Add a cherry or a stick of chocolate flake (a couple rows of sc in brown should do the trick)I had some hollow spaghetti type plastic that I could sew thread through and attach to the ice-cream scoop, by hand sewing.
-
 Step 8
These will all need to be blocked before sewing together


im going to have to learn to crochet so i can make myself one for fall