


About
Brighten up your outfit this summer with a home made geisha flower hair clip.
Watch the video tutorial for this project <a href="/blog/blog.php?id=93">here</a>.<br><br>
<u>Other People's Versions:</u><br>
<a href="/photos/crafty/geishaflowers/jeanne1.jpg"><img src="/photos/crafty/geishaflowers/jeanne1.jpg" class="photodot" width="100"></a><br>
<a href="/photos/crafty/geishaflowers/jeanne2.jpg"><img src="/photos/crafty/geishaflowers/jeanne2.jpg" class="photodot" width="100"></a><br>
<a href="/photos/crafty/geishaflowers/jeanne3.jpg"><img src="/photos/crafty/geishaflowers/jeanne3.jpg" class="photodot" width="100"></a><br>
<div align="right"><a href="http://squishykittie.blogspot.com/">- Jeanne</a></div><br>
<a href="mailto:cat@catmorley.com">Show off your version?</a>
Tags
-
 Key West Witch favorited Geisha Flowers
12 May 16:06
Key West Witch favorited Geisha Flowers
12 May 16:06
-
 Jasmin favorited Geisha Flowers
01 Oct 13:43
Jasmin favorited Geisha Flowers
01 Oct 13:43
-
 VillainousNinja added Geisha Flowers to Jewelry/Accessory
20 Oct 01:03
VillainousNinja added Geisha Flowers to Jewelry/Accessory
20 Oct 01:03
-
VillainousNinja added Geisha Flowers to Cute & Easy
16 Aug 23:50
-
 Edward M. favorited Geisha Flowers
24 Sep 06:34
Edward M. favorited Geisha Flowers
24 Sep 06:34
-
 Conner W. added Geisha Flowers to fashion
10 Feb 01:48
Conner W. added Geisha Flowers to fashion
10 Feb 01:48
-
Conner W. favorited Geisha Flowers
10 Feb 01:48
-
 Chachee.rayna added Geisha Flowers to Sew, Sew!
11 May 19:41
Chachee.rayna added Geisha Flowers to Sew, Sew!
11 May 19:41
-
 Andrea favorited Geisha Flowers
08 May 02:21
Andrea favorited Geisha Flowers
08 May 02:21
-
 Penny F. added Geisha Flowers to Accessories
28 Apr 10:09
Penny F. added Geisha Flowers to Accessories
28 Apr 10:09
-
 Step 1
Make yourself a square template out of paper. My template measure 2" by 2" but you can make yours larger or smaller depending upon how you want your flower to look. Draw out eight squares on to the felt using a pencil or chalk and cut them out.
-
 Step 2
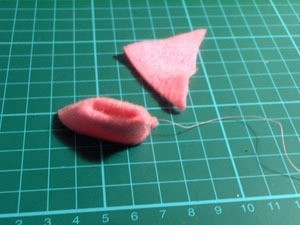
Take a felt square and pinch it together in the middle.
-
 Step 3
Snip the bottom of the square off.
-
 Step 4
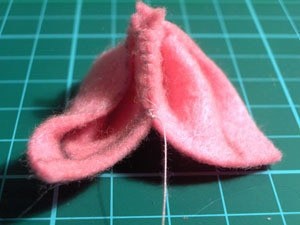
Take a needle and thread and stitch together so the pinched petal shape is secured.
-
 Step 5
Take another square and repeat the previous steps. You will now have a cluster of two petals stitched together at the top.
-
 Step 6
Stitch down the center between the two petals, stitch together until about half way down.
-
 Step 7
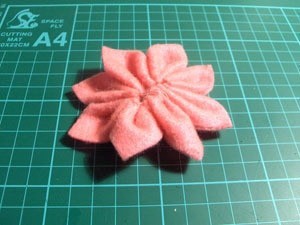
Repeat the previous steps to make 3 more petal clusters. Begin stitching the clusters together in the same way.
-
 Step 8
When finished, stitch the opening in the center of the flower together.
-
 Step 9
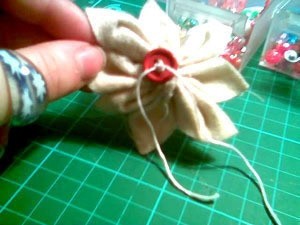
Decorate the flower with buttons and beads. Attach a button to the front with embroidery thread leaving the ends to hang out at the front. Make sure you have left long tails at each side.
-
 Step 10
Attach beads to the end of each tail tieing a secure knot to ensure that the beads wont fall off. Sew a clip on to the back and put in your hair, on you handbag or anywhere you like.


Versions


Posted by
Alexis W.

Posted by
Clem : )


Posted by
SilverFilmRoses


Esa super cute tu florecita geisha!!
Adorable!