


About
How to tie a butterfly knot, convertible to a flower knot ^^
This is a very simple knot but it's truly decorative ^^
In the main photo there is the butterfly knot with a bell, in the second photo there is the flower knot.
-
 Susana F. added Flower/Butterfly Knot to techniques
18 Jan 18:44
Susana F. added Flower/Butterfly Knot to techniques
18 Jan 18:44
-
 Ethan S. favorited Flower/Butterfly Knot
10 May 10:35
Ethan S. favorited Flower/Butterfly Knot
10 May 10:35
-
 russ t. favorited Flower/Butterfly Knot
24 Apr 08:40
russ t. favorited Flower/Butterfly Knot
24 Apr 08:40
-
 Connie G. favorited Flower/Butterfly Knot
27 Jun 05:44
Connie G. favorited Flower/Butterfly Knot
27 Jun 05:44
-
 lunatica favorited Flower/Butterfly Knot
18 Feb 19:31
lunatica favorited Flower/Butterfly Knot
18 Feb 19:31
-
 parker.kelly.3 favorited Flower/Butterfly Knot
25 Nov 16:28
parker.kelly.3 favorited Flower/Butterfly Knot
25 Nov 16:28
-
 Jess <3 favorited Flower/Butterfly Knot
18 Sep 23:15
Jess <3 favorited Flower/Butterfly Knot
18 Sep 23:15
-
 The Mad Hattress favorited Flower/Butterfly Knot
26 Jun 00:50
The Mad Hattress favorited Flower/Butterfly Knot
26 Jun 00:50
-
 KnotMe entered their project Flower/Butterfly Knot to Glue Contest
21 Apr 16:54
KnotMe entered their project Flower/Butterfly Knot to Glue Contest
21 Apr 16:54
-
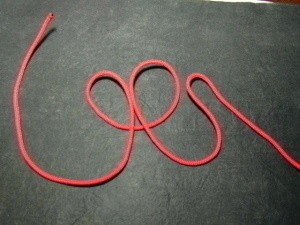
 Step 1
Find a cord. The lenght depend on the type of the cord and on how big you want the knot ^^
-
 Step 2
Take the center of the cord and pass it under the rest of the cord.
-
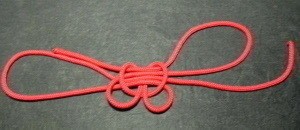
 Step 3
A vision of the ensemble.
-
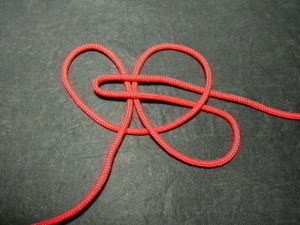
 Step 4
Take one end and double it...
-
 Step 5
...pass it under...
-
 Step 6
...pass it on...
-
 Step 7
...then pass it under again.
We have knotted one wing on the left and one little wing on the right. -
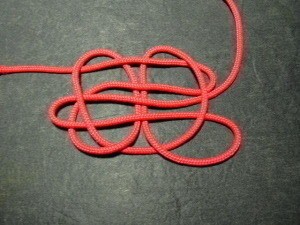
 Step 8
Just do the same with the other end: double it, pass it under...
-
 Step 9
...pass it on...
-
 Step 10
...then pass it under again.
The knot is done, we have to tie it tight. -
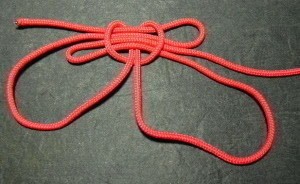
 Step 11
We start from the beginning: pull down the two little wings to tighten the center of the knot.
-
 Step 12
The center is now tight, then we can pull the two wings on the left and on the right...
-
 Step 13
...and then...
-
 Step 14
... pull the end of the cord.
Following these steps, adjust the knot as you want. -
 Step 15
This is the butterfly shape, with the little wing smaller than the wings on the left and right.
-
 Step 16
This is the flower shape, with the wings of the same measure.
You can join the ends (with a knot or cutting and joining the ends with the glue) to make the fifth petal. -
Step 17
The last step is to spread a drop of glue on the retro of the knot.


For the first time just have patience and make attention on the under-and-up...then you'll remember it without the tutorial ^^
x