About
A stylish way to carry the essentials - phone, id, cash, & lip gloss!
This pretty little wallet is just the right size to carry your phone, id, and some cash. Perfect for when you don't want to lug your purse around with you.
-
 Ms Dorito added Embroidered Felt Phone & Card Case to sew craft
12 Jun 18:12
Ms Dorito added Embroidered Felt Phone & Card Case to sew craft
12 Jun 18:12
-
 Blaza1141 favorited Embroidered Felt Phone & Card Case
03 May 23:25
Blaza1141 favorited Embroidered Felt Phone & Card Case
03 May 23:25
-
 Cake Eater Sarah favorited Embroidered Felt Phone & Card Case
20 Nov 06:19
Cake Eater Sarah favorited Embroidered Felt Phone & Card Case
20 Nov 06:19
-
 Sweet Little Sparrow entered her project Embroidered Felt Phone & Card Case to Singer Christmas Contest
15 Nov 01:15
Sweet Little Sparrow entered her project Embroidered Felt Phone & Card Case to Singer Christmas Contest
15 Nov 01:15
-
 Kichiru added Embroidered Felt Phone & Card Case to Lovely things ♥
31 Oct 12:36
Kichiru added Embroidered Felt Phone & Card Case to Lovely things ♥
31 Oct 12:36
-
 acquacri favorited Embroidered Felt Phone & Card Case
27 Oct 05:32
acquacri favorited Embroidered Felt Phone & Card Case
27 Oct 05:32
-
 Ana favorited Embroidered Felt Phone & Card Case
18 Oct 19:09
Ana favorited Embroidered Felt Phone & Card Case
18 Oct 19:09
-
Sweet Little Sparrow published her project Embroidered Felt Phone & Card Case
20 Jun 04:04
-
 Step 1
Just a couple of notes before we get started:
1. I decided to sew the entire thing by hand, but you could absolutely use your sewing machine to assemble it. Sometimes though, I just like to have a project that I can work on while I’m sitting on the couch watching back-to-back episodes of Dexter on Netflix. Just sayin’…
2. I wanted to make sure the main inside pocket was really sturdy since I was planning to keep my phone in there, so I decided to use a double layer of felt. Since the outside pocket is just for cards I thought a single layer would be fine. Honestly though, as long as the felt you’re using is nice and thick and a good quality (sometimes the inexpensive stuff can stretch out over time) I think a single layer for both pockets would be fine. To do it this way, just eliminate layer E entirely.
Ok, so gather your materials.
-
 Step 2
Cut out the following pieces:
1 – 6″ x 6″ square of felt in body color, corners rounded (piece A)
1 – 6″ x 3″ rectangle of felt in lining color, corners rounded (piece B)
1 – 6″ x 2 1/2″ rectangle of felt in body color (piece C)
2 – 6″ x 3″ rectangles of felt in body color (pieces D & E)*Adjust the size of the pieces to fit your phone and/or whatever else you plan to use your new wallet for.
-
 Step 3
Embroider your design onto piece A before you start assembling the wallet. That way, you don’t have to worry about keeping the back of your embroidery work neat because it will be hidden between the layers. I used lazy daisy stitches for the larger flowers and leaves of the stems, straight stitches for the little flowers, and stem stitch for the stems.
Sew pieces D & E together along the top edge, either by hand or machine.
-
 Step 4
Running stitch joining pieces D & E.
-
 Step 5
Pieces D & E.
-
 Step 6
Layer pieces, starting with piece A at the bottom of the stack, followed by the now joined together D & E pieces, and finally piece C on top.
-
 Step 7
This is what the layers should look like at this point.
-
 Step 8
Sew the backing for the female half of the magnet closure to piece C.
-
 Step 9
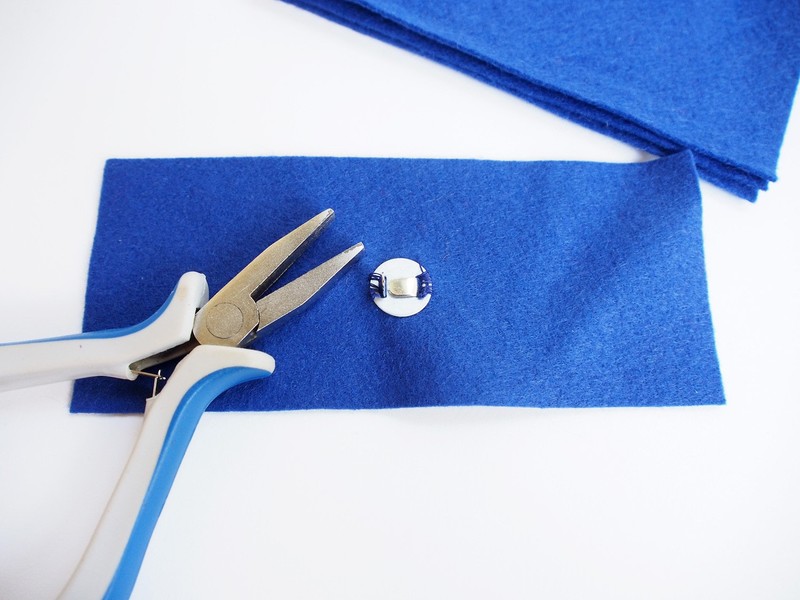
Slip front of female half of the magnet closure through the front side of piece C, poking the tabs through the fabric (cut little slits with a sharp scissors if necessary, being careful not to cut through your stitches). Bend both tabs flat, using a pair of pliers if necessary.
-
 Step 10
Front view of the female side of the magnet closure after it has been attached to piece C.
-
 Step 11
Line up piece B (flap lining) and mark the position of the magnet closure with a pin.
-
 Step 12
Repeat the steps described above to attach the male half of the magnet closure to piece B.
-
 Step 13
Line up piece B over piece A, matching up the edges.
-
 Step 14
Assemble all of the pieces and make sure the edges are lined up as neatly as possible. Secure layers with a pin or pins.
-
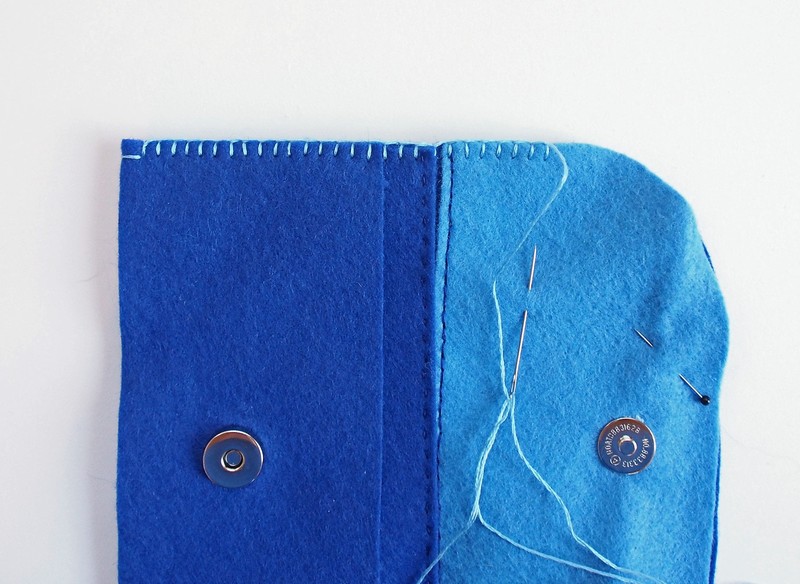
 Step 15
Blanket stitch around the entire edge, securing all of the layers together.
-
 Step 16
Continue blanket stitching around the edge of the top flap.
-
 Step 17
Sew through all layers, starting each stitch in front about 1/4″ from the edge. Once you’ve passed your needle from front to back, bring thread up from the back and through the loop of the last stitch.
-
 Step 18
Pull thread taut (but not so tight that it distorts the fabric).
-
 Step 19
Top view of blanket stitched edge.
-
 Step 20
Finished!