


About
Reversible - Perfect for Criminals
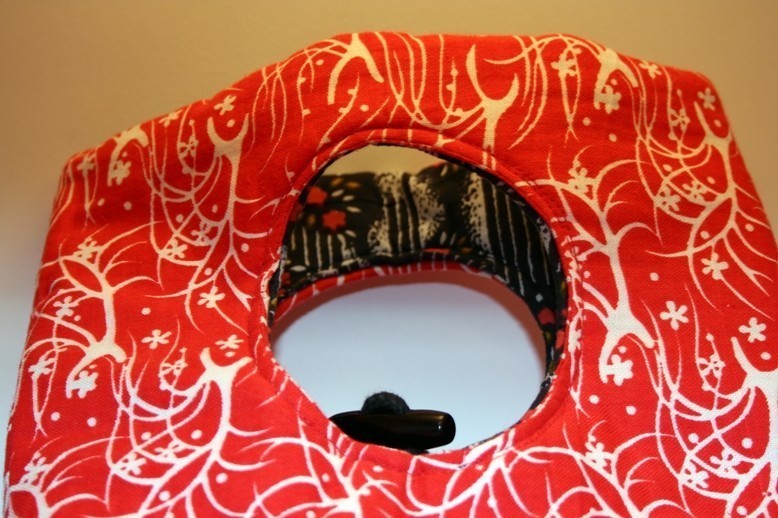
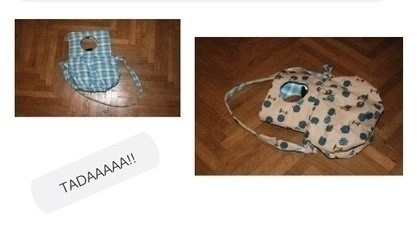
I want to show you: my reversible cut-out handle bag!
I am really in love with the fabrics, they just brighten up my day whenever i use this bag! The strap is removable, so i can attach it to both sides or wear the whole thing without it!
It fits a A4-writing pad (don't know paper standards in the US). The cut-out handle part is pretty stiff, i used heavyheavyweight-interfacing. When there are no big papers or books in, the handlepart is just floppy which i like a lot!
Please click the images for original size! Still to small? PM me ;)
I'm sorry for that, but there are too much pictures for making steps for each one. I have written this tutorial for another board originally.
Any specific questions? PM me!
-
 Kay T. favorited Cut Out Handle Bag
11 Nov 08:54
Kay T. favorited Cut Out Handle Bag
11 Nov 08:54
-
 Kiyokobarbara K. favorited Cut Out Handle Bag
16 Jul 22:57
Kiyokobarbara K. favorited Cut Out Handle Bag
16 Jul 22:57
-
 Angel C. favorited Cut Out Handle Bag
26 May 02:30
Angel C. favorited Cut Out Handle Bag
26 May 02:30
-
Eruanna J. favorited Cut Out Handle Bag
15 Dec 16:19
-
Ashley G. added Cut Out Handle Bag to Bags
08 Jun 21:46
-
 So favorited Cut Out Handle Bag
31 May 19:33
So favorited Cut Out Handle Bag
31 May 19:33
-
 Tracy C. favorited Cut Out Handle Bag
29 Mar 10:34
Tracy C. favorited Cut Out Handle Bag
29 Mar 10:34
-
 thelittlevampirebat added Cut Out Handle Bag to bags
08 Feb 18:05
thelittlevampirebat added Cut Out Handle Bag to bags
08 Feb 18:05
-
 Jessica B. favorited Cut Out Handle Bag
22 Jan 14:54
Jessica B. favorited Cut Out Handle Bag
22 Jan 14:54
-
 aleksandra.milewska.3 favorited Cut Out Handle Bag
01 Aug 08:26
aleksandra.milewska.3 favorited Cut Out Handle Bag
01 Aug 08:26
You Will Need
-
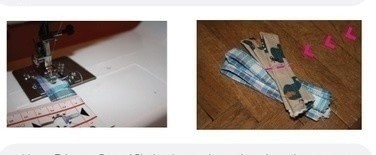
 Step 1
First of all, draw this pattern on cardboard and cut it! All measures are meant approx, so don't mind making any of them smaller or bigger! Seam allowances are minimum 1.5cm (0.95 inch). Usually I cut 5 cm (1.97 inch) to have some tolerance for tweaking!
-
 Step 2
All following instructions mean both fabrics!
After cutting, iron on some light interfacing on 2 parts of A and all of your B parts. You will need the 2 left A parts for making the cut-out handles!Now you should have this:
-
 Step 3
Take your interfaces A-parts and pin them right to right on your non-interfaced A-parts!
-
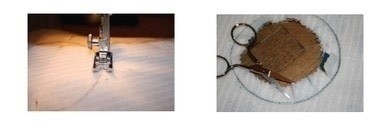
 Step 4
Stitch the hole (several times) and cut as shown in the picture! Now you can pull one side through and your cut-out is nearly finished!
-
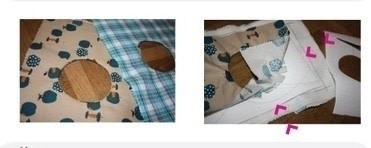
 Step 5
Iron all your cut-outs! Now take your heavy weight interfacing and cut two pieces in size of your A-pieces! Place the interfacing between your fabrics like shown! Cut your interfacing smaller than the actual markings of your A-parts! I haven't cut enough, as you can see in the picture!
-
 Step 6
Now you can stitch your cut-out seam! Add your clousureparts to the wrong side of your A-parts at this step!
-
 Step 7
Sew the side seams! Don't cut your seam allowances yet! Before, you have to check if your A-parts fit! To do so: wrong (or right) sides together, Pin your holes and your side seams, this may take ling because you will have to fiddle a lot ;)
I had to resew one of the side seams of the checkered A-parts! -
 Step 8
If the parts have the proper sizes you can cut the seam allowances! Now put right sides together so you can sew the upper seam of your bag! Maybe you should remeasure and mark where to sew firstly :)
Don't forget to pin your side seams and holes accurately, this may help! -
 Step 9
Unpin everything, cut your seam allowances, turn the whole dang thing around and IRON! The next step will make you want to throw either yourself or your sewing machine straight out of the window, I've chosen to take some deep breathes and bite my cat (nah not really). Ok... after proper ironing, pin the handleholes and sew! It may be easier to place your sewing foot like shown (through the upper hole). I'm not sure about that. Don't care too much of tracing your first stitchings, just try to sew :) I've used the handwheel to sew slowly!
-
 Step 10
Welcome to step 10 :) Now sew the lower seam, don't forget to measure and pin!
-
 Step 11
Take your C-parts! You will make now the loop for the strap! Just fold and iron them. They should be about 2.5cm (0.98 inches) in width when sewn. Then fold them in half, decide how big your loop should be and sew!
-
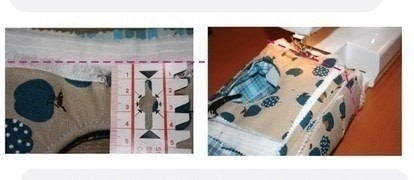
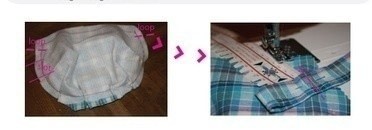
 Step 12
Take your B-parts! Pin the pleats and sewn them down, then sew your loops on, don't forget -> they should face the right side of the fabric. The ruler shows approx. 4cm (1,57 inches)! Next you can join your B-parts! Leave a small part unsewn at one of your Bs, this is where you pull your bag through at the end.
-
 Step 13
Now we have to combine our As and Bs! Take one B, turn it inside out and place your A, with the matching fabric facing, inside the B. Pin and sew! Done? Awesome! Now turn the whole thing and repeat the last step with the left over B! Remember your unsewn slot? Pull your bag through :)
-
 Step 14
Close the opening by handsewing! Just one step is missing - the straps. Sew them together in length, then fold and iron them to make a strap (width: 3cm, 1.18 in.)! Sew length and ends! I usually just zigzag the ends, not quite beautiful nor professional but easy and fast :)


very cute ^^
I already have written a tutorial for this bag some weeks ago, now i just need to find time for uploading. It's pretty imageheavy.
CO + K User