

About
It's A Goal, Crochet Net Ball Hat
My step daughter Bek asked me to make her a hat in the form of a netball. My answer was, that I would have to do some research and see what I can come up with.
I haven't touched a netball in years so I scanned the internet for netball images as part of my research.
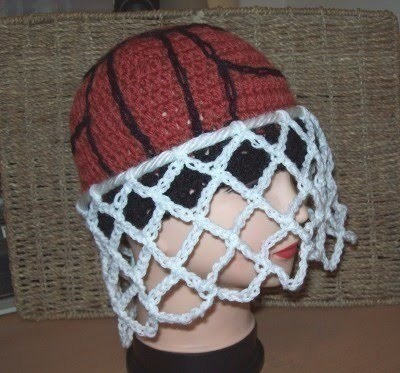
And here is the design I came up with.
A netball shot for a goal.
-
 Natasha P. favorited Crochet Net Ball Hat
09 Aug 05:13
Natasha P. favorited Crochet Net Ball Hat
09 Aug 05:13
-
 Step 1
I began with 12 dc in a ring and incresed in each round with the formula below.
12=24=36=48=60=72
I then worked 6 rows around in dc with out increasing.
I changed to black yarn for the ribbed cuff and alternated fpdc, bpdc for 3 rounds, then finished the hat.
fpdc= front post double crochet
bpdc= back post double crochet -
 Step 2
Using the picture of the netball twirling I began to sew the lines into the hat.
-
 Step 3
Not a perfect job, but close enough, my sewing skills are limited.
-
 Step 4
I had some thick white medium for the hoop of the goal.
Or you could crochet a white, single crochet foundation chain that fits around the hat. -
 Step 5
attached the white yarn to the hoop with a slip st.
Chained 8, sc around the hoop, chained 8 sc around the hoop repeated this in an even manner and joining to the beginning sl st, about 16 ch 8 loops in total.
I then sl st to the centre of the first ch 8,
ch 8, sc into the 4th chain of the next ch 8, continuing around to where I first sl st into the ch 8.
I did 2 more rows of the chain and finished off the goal netting. -
 Step 6
Wear the net on, or wear the net off, it's up to you, but I know that my step daughter will be wearing this hat whilst playing netball and the net may get into her way.
You can always sew it on if you like. -
Step 7
To make the basic hat.
US crochet terms used.
beginning ch 3 is the first dc of the round
r1. Ch 4, work 11 dc into 1st ch of ch 4, sl st to top of ch 3 to join ring (12 dc)
r2. ch 3 and work 1 dc in same place as ch 3, work 2 dc in each dc around, sl st to top of ch 3 to join,
( 24 dc)
r3. ch 3, work 2 dc in next dc, *work 1 dc in next dc, work 2 dc in next dc* repeat from *to* around sl st to join. ( 36 dc)
r4. ch 3, work 1 dc in the next dc, work 2 dc in the next dc, *work 1 dc in the next 2 dc, work 2 dc in next dc,* repeat from *to* around, sl st to join ( 48 dc)
r5. ch 3 work 1dc in the next 2 dc, work 2 dc in the next dc, *work 1 dc in next 3 dc, work 2 dc in next dc,* repeat from *to* around, sl st to join (60 dc)
r6. ch 3,work 1 dc in the next 3 dc, work 2 dc in next dc, *work 1 dc in next 4 dc, work 2 dc in next dc,* repeat from *to* around, sl st to join (72 dc)
rnd 7, to rnd 12. (6 rounds) ch 3, work 1 dc in each dc around sl st to join
Change to black yarn.
Work 3 rows as follows.
ch 2 to step up to the row you are beginning, this is not counted as a stitch.
r1. fpdc around ch 3 of row below, bpdc around the dc of the row below, *fpdc around the dc of the row below, bpdc around the dc of the row below,* repeat from *to* sl st to join into the first
fpdc
r2 and r3. (ch 2 to step up to this row) *fpdc around fpdc, bpdc around bpdc* repeat from *to* around, sl st to beginning fpdc to join.
finish off, weave in ends.
Use the above pictures and instructions to decorate your hat.
Special stitches used.
FPDCInstructions: yo, insert hook behind post of stitch (from front to back), yo, pull through, bring up even with last stitch completed, yo, pull through 2 loops, (2 loops on hook), yo, pull through rem 2 lps to complete stitch
BPDCInstructions: yo, insert hook behind post of stitch (from back to front), yo, pull through, bring up even with last stitch completed, yo, pull through 2 loops, (2 loops on hook), yo, pull through rem 2 lps to complete stitch


Comments


