

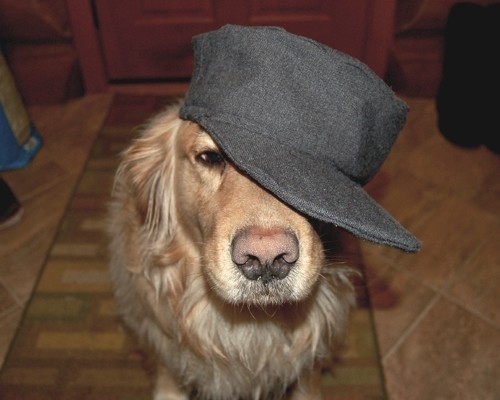

About
How to make a custom fit Combat Cap
After running around in the pouring rain last weekend without a hat, I decided to finally make one. I created this whole pattern myself, so hopefully it will work well for you. I will explain how to make your own pattern, using your own measurements, so it will fit you perfectly.
I rated this as tricky, although if you are a beginner and ready for a challenge don't be intimidated. Hopefully I explained this well; if you have problems just ask in the comments or message me.
Also I highly recommend using a pair of old trousers for fabric, because denim can be very expensive and I picked up the trousers I used for a 2 bucks at a thrift store.
Vocabulary Refresher:
Circumference-The edge of a circle
Diameter - The length of a line running through the middle of point of a circle to the edge.
-
 Kin Dragon added Combat Cap to Fabric
24 Feb 21:34
Kin Dragon added Combat Cap to Fabric
24 Feb 21:34
-
 Key West Witch favorited Combat Cap
27 Jun 00:50
Key West Witch favorited Combat Cap
27 Jun 00:50
-
 Roberta S. favorited Combat Cap
19 Oct 13:43
Roberta S. favorited Combat Cap
19 Oct 13:43
-
 Alma added Combat Cap to Hats & Headwear
14 Jun 13:50
Alma added Combat Cap to Hats & Headwear
14 Jun 13:50
-
Jen O. added Combat Cap to For fun
05 Dec 11:10
-
Hollie P. added Combat Cap to saving for later
01 Mar 10:48
-
River F. favorited Combat Cap
27 Mar 23:15
-
 TheSewingMaven favorited Combat Cap
13 Aug 01:02
TheSewingMaven favorited Combat Cap
13 Aug 01:02
-
 greenstyle added Combat Cap to Sewing
21 Jul 17:00
greenstyle added Combat Cap to Sewing
21 Jul 17:00
-
 Diane W. added Combat Cap to sewing
29 Apr 12:53
Diane W. added Combat Cap to sewing
29 Apr 12:53
-
 Step 1
Take the measurement of the circumference of your head about an inch above your eyebrow (you may want to get somebody to help you with this). Now divide that measurement in half and add one inch (this is for seam allowance).
Create a rectangle on your paper with the length of your new measurement and five inches wide. Fold your fabric in half with right sides together and cut this out through both sides so you have two pieces.
(If you are using trousers, you don't need to fold, just cut right through both sides of the leg) -
 Step 2
Now we are going to create a pattern for the top of the hat and this is going to require some math, but don't freak out it is pretty simple.
Divide the circumference of your head by Pi (3.14) to get the diameter. Now add one inch to the diameter and times that by Pi to get your new circumference. (Basically you just added your seam allowance)
Now draw a circle with that circumference using a compass or something circular from around your house (I used a bowl). Cut one circle out of your fabric. -
 Step 3
With right sides together pin and sew, with a straight stitch, the short edges of your two rectangles together to create one large circle. (This will be the side of your cap)
-
 Step 4
Press the twos seams with an iron so they lie flat and open.
-
 Step 5
Sew two straight stitches an equal distance from the middle of the seam on either side of the seem.
-
 Step 6
With right sides together, pin the top of the cap to the top edge of the side. This is a little tricky since you have to make sure you don't have any flaps or left over material. It can take a while to get it right, so just be patient.
-
 Step 7
Now sew the top to the side with a straight stitch. Check to make sure you don't have any folds, then zig zag stitch over the straight stitch.
-
 Step 8
Now turn your cap so the right side is out and press along the edge of your top to give it a sharp edge (be careful not to burn yourself since you have to hold it tight while you iron).
-
 Step 9
Cut out all the shapes again in your lining or interfacing. I used some scraps of an old stiff table cloth as a lining because my fabric needed quite a bit of support.
-
 Step 10
Sew the lining/interface together as you did with the fabric above, except do not press the seems. Once that is done put the lining in your cap (don't sew anything yet) or iron on your interfacing. Remember not to iron anything from now on if you are using a lining that has plastic or wax in it (the table cloth I used did).
-
 Step 11
Now mark 3.25 inches down from the top of the cap all the way around. Then fold the bottom edge half way to this point, and again to the point, inside the hat. The height of your hat should now be 3.25 inches.
-
 Step 12
Sew 4/8 away from the bottom edge with a straight stitch.
-
 Step 13
Now to make the bill or visor of the hat.
Take a hat that fits you well with a visor and trace the shape onto a piece of paper.
You have to push the visor flat while you trace. -
 Step 14
Then take the pattern for the top of your hat to get the appropriate sized arch. Also add a seam allowance around the edge of the overall visor pattern. I just eyed mine, but you can measure out about 1 centimeter around it if you would like.
I uploaded a scan of the visor pattern I used; it probably won't be the right size but it may help you understand. You can find it here: http://i3.photobucket.com/albums/y63/mynameisKat/IMG_0001.jpg -
Step 15
Cut the visor pattern out of your folded fabric (remember right sides together) so you have two pieces.
I forgot to take a picture of this step. -
 Step 16
Now cut off the seam allowance edge on the pattern so you have the exact size of the visor and cut this out of your plastic. Pop bottles, ice cream containers, plastic container lids, all work great for this, but if you can't find a piece of plastic then just use a thin piece of cardboard or cardpaper and coat it with duct tape to make it water proof.
Using a piece of plastic with a bend already in it, will work the best. -
 Step 17
Pin your fabric pieces right-side together, and trace the outline of your visor in chalk. Sew a straight-stitch right on the outside arch chalk line, but don't sew along the inside arch (where my thumb is pointing in the picture)
-
 Step 18
Turn the fabric right side out and place the visor inside. Now pin the visor in place, and sew it closed with a straight stitch as close to the visor as possible (even if you have to sew on the visor in spots is fine).
It is very important that there is no loose room for the visor to shift. -
 Step 19
Hold the top side of the visor against the right side of the cap and pin the visor an equal distant from the side seams along the bottom edge. Now sew it with a straight stitch.
I had to re-sew the visor on four times before I got it right, it is important that the visor isn't lopsided and the bottom seam of the cap is an equal distance from the visor top. Also make sure you sew as close as you can (if not directly on) the straight stitch you did long the inner arch of the visor, this will help it arch and keep it from flopping around. -
Step 20
Cut off loose threads, and trim it all up. Also feel free to decorate it with patches, fancy stitches, writing, chains, pins, etc... I'm going to decorate mine, but I just wanted to create a tutorial for a good base.
Hope I didn't make this too difficult, and I would love to see your versions.


INCREIBLE!!!
MIS PERROS JAMAS SE HABRIAN QUEDADO
QUIETOS CON ALGO EN LA CABEZA!!!!!!!!
Y TU LO LOGRASTE!!!
FELICIDADES!!!!