


About
Recipe for cherry blossom bites fondant fancies.
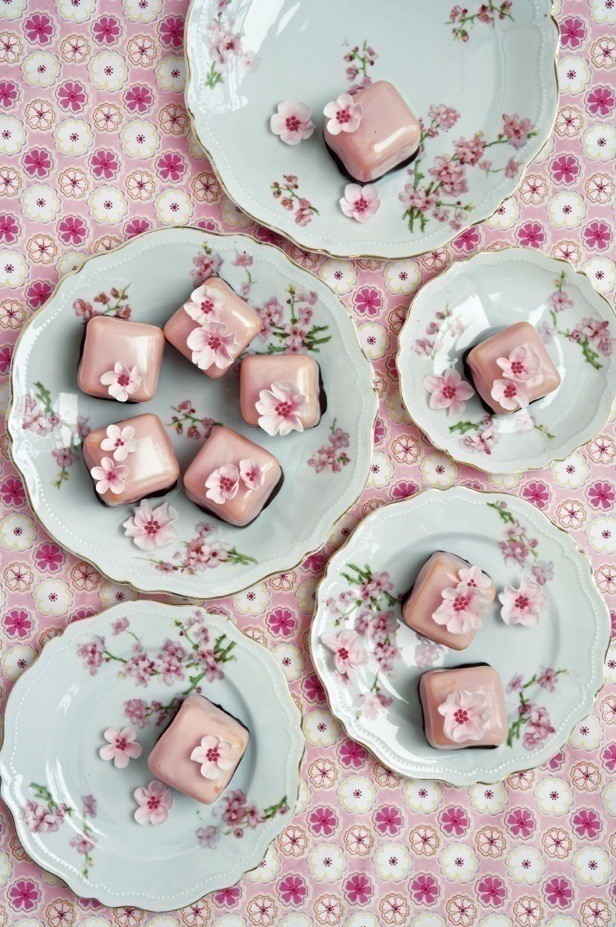
Cherry blossoms are among my favorite flowers as they are so delicate, fresh and pretty. These fondant fancies would suit a tea party marking the arrival of spring. Not only do they look divine, but they also taste heavenly - the fruity-fresh Morello cherry jam and the bittersweet chocolate perfectly complement one another and the smooth fondant icing helps create a wonderful melt-on-the-mouth texture.
Make about 30 cherry blossoms (about 10 in each size) at least one day in advance)
Cake Chic by Peggy Porschen, published by Quadrille, £20.00
-
 Luna D. favorited Cherry Blossom Bites
25 Apr 06:40
Luna D. favorited Cherry Blossom Bites
25 Apr 06:40
-
 Kaiulani W. favorited Cherry Blossom Bites
21 May 04:09
Kaiulani W. favorited Cherry Blossom Bites
21 May 04:09
-
 SassyGinger_24 added Cherry Blossom Bites to Japanese Garden Party
17 Apr 14:37
SassyGinger_24 added Cherry Blossom Bites to Japanese Garden Party
17 Apr 14:37
-
 Mythiko Ino favorited Cherry Blossom Bites
11 Jan 21:29
Mythiko Ino favorited Cherry Blossom Bites
11 Jan 21:29
-
Blondell K. favorited Cherry Blossom Bites
11 Mar 20:28
-
 CurlyMade added Cherry Blossom Bites to Easter
21 Mar 20:26
CurlyMade added Cherry Blossom Bites to Easter
21 Mar 20:26
-
 MagicalGirlMaya added Cherry Blossom Bites to Tea Party
28 Feb 23:19
MagicalGirlMaya added Cherry Blossom Bites to Tea Party
28 Feb 23:19
-
 Hgosn1 favorited Cherry Blossom Bites
30 Jun 14:50
Hgosn1 favorited Cherry Blossom Bites
30 Jun 14:50
-
 Sveta favorited Cherry Blossom Bites
19 Jan 07:23
Sveta favorited Cherry Blossom Bites
19 Jan 07:23
-
 Seren D. favorited Cherry Blossom Bites
22 Aug 21:23
Seren D. favorited Cherry Blossom Bites
22 Aug 21:23
You Will Need
-
Step 1
Mix the sugar florist paste with a tiny drop of claret food colour to a very pale pink. If the paste is very stiff and sticky, add a dab of the white vegetable fat and knead it until it is smooth and pliable.
-
Step 2
Lightly grease the non-stick plastic board with a small amount of the white vegetable fat and roll out the pink pale paste until it is about 1mm thick. Cut out the flower shapes using the five-petal flower cutters and remove the trimmings. (Keep these wrapped in cling film or in a resealable plastic bag to prevent the paste from drying out.)
-
Step 3
Place one flower shape at a time on the foam flower pad and keep the remaining flower shapes on the plastic board covered with the Stayfresh multi-mat to prevent them from drying out.
-
Step 4
To shape the petals, move the thicker end of the bone tool gently across each one until it is think and slightly frilly, being very careful not to tear it.
-
Step 5
Once all the petals have been shaped, place the flower into the well of the plastic palette that has been lightly dusted with cornflour to prevent the flower from sticking to it.
-
Step 6
Repeat steps 3-5 for all the remaining flowers and let them dry for at least 4 hours or overnight.
-
Step 7
Once dry, lightly dust the flower centres with the dark-pink dust colour using the fine artist's brush. To make the colour dust slightly paler, you can mix it with a small amount of cornflour.
-
Step 8
Mix about half the royal icing with the claret food colour and a small amount of water to a soft-peak consistency. Put it in a paper piping bag, snip a small tip off the bag to pipe small dots in the centre of each flower.
-
Step 9
<b>To temper the chocolate</b>
Place 150g of chocolate buttons in a microwaveable bowl and melt it gently on medium heat. Be careful not to overheat it, as chocolate can burn easily. Check the temperature with a thermometer; it should be melted and between 44 and 48"C. -
Step 10
Once it has reached the required temperature, stir the remaining chocolate buttons into the melted chocolate to cool it down to about 28"C while stirring.
-
Step 11
Once the chocolate has cooled down, gently warm it up again to 32-34'C and the chocolate should now be tempered. You can test it by dipping the blade of a palette knife into the chocolate - it should set within a few minutes and have a silky satiny texture.
-
Step 12
<b>To dip the fondant fancies in the chocolate</b>
Once the chocolate has been tempered, have a dampened J-cloth at hand, lightly wet your fingers with it and pick up one fondant fancy at a time (this will stop your fingers from sticking to the fondant) and dip the bottom into the chocolate until covered. -
Step 13
Place each on a wire rack for a few minutes to allow the excess chocolate to drip off and transfer it to a sheet of greaseproof paper to let it set.
-
Step 14
Repeat for all the remaining fondant fancies.
-
Step 15
<b>To finish</b>
Put the remaining white icing into a paper piping bag and use it to stick the cherry blossoms randomly on top of the fondant fancies. -
Step 16
Store at room temperature for about 3 - 5 days.

*starts drooling and mouth hangs open* o_O
<3 <3
would also be nice for high tea
need this before even attempting the cakes