


About
Butterflies and Fruit Pleated Tote
I made this tote bag during my Australia Day public holiday. I really loved the fabric but it's bright and offbeat enough that I'd be shy to wear any clothes made out of it. So I made a bag!
I made up the pattern. I just wanted something with pleats and big enough to hold A4-size notebooks for uni without being too big.
The inside's just lined with the same white fabric as on the strap. There's one large-ish pocket inside, and it closes with velcro because I was too lazy to put in a zip.
I'm going to make an effort to use it as much as possible during the single semester I've got left of uni, heh!
...And now the tutorial!
Pleated Tote Tute (aka a lesson in fudging it).
The measurements I'm giving in this tute are for a bag that holds A4 papers. My seam allowances of about 1.5cm are included. You can change this stuff as you see fit.
I should point out that I totally just fudged this the first time I made it and am not an expert at all. But onward!
-
 June S. favorited Butterflies And Fruit Pleated Tote
02 Dec 02:28
June S. favorited Butterflies And Fruit Pleated Tote
02 Dec 02:28
-
 Alma added Butterflies And Fruit Pleated Tote to Bags, Wallets...
25 Jul 08:57
Alma added Butterflies And Fruit Pleated Tote to Bags, Wallets...
25 Jul 08:57
-
 Tamara D. added Butterflies And Fruit Pleated Tote to Sewing Misc.
03 Sep 21:59
Tamara D. added Butterflies And Fruit Pleated Tote to Sewing Misc.
03 Sep 21:59
-
 Tracey G. added Butterflies And Fruit Pleated Tote to Bags, Purses & Other Accessories
31 Mar 19:53
Tracey G. added Butterflies And Fruit Pleated Tote to Bags, Purses & Other Accessories
31 Mar 19:53
-
 Kay T. favorited Butterflies And Fruit Pleated Tote
11 Nov 08:57
Kay T. favorited Butterflies And Fruit Pleated Tote
11 Nov 08:57
-
 RareJewel favorited Butterflies And Fruit Pleated Tote
20 Jul 00:40
RareJewel favorited Butterflies And Fruit Pleated Tote
20 Jul 00:40
-
 Aishwarya Purohit favorited Butterflies And Fruit Pleated Tote
22 Nov 05:20
Aishwarya Purohit favorited Butterflies And Fruit Pleated Tote
22 Nov 05:20
-
 Steph. favorited Butterflies And Fruit Pleated Tote
11 Nov 17:52
Steph. favorited Butterflies And Fruit Pleated Tote
11 Nov 17:52
-
Linda B. added Butterflies And Fruit Pleated Tote to Bags
09 May 14:09
-
 LaAlex added Butterflies And Fruit Pleated Tote to Bags
28 Feb 00:48
LaAlex added Butterflies And Fruit Pleated Tote to Bags
28 Feb 00:48
You Will Need
-
 Step 1
<b>1. Cut your fabric.</b>
a. You need two rectangles 34cm wide by 9cm high (these are yoke of the bag) and two rectangles 50cm wide by 35cm high (these are the side panels). -
 Step 2
b. Take the two larger rectangles. You need to cut a curve into each of the bottom corners. To make these symmetrical, fold each rectangle in half sideways, and then lay them exactly on top of each other. Make sure that the edges are all on the same side! Use something round to trace a nice rounded corner (I used a roll of masking tape):
-
 Step 3
If the fabric isn't too thick, you can cut through all four layers of fabric at the same time, careful not to let them shift. Otherwise, cut one layer at a time and then trace around the curve for each subsequent later. Minor differences can be hidden in the seam, however.
You end up with:
-
 Step 4
<b>2. Make your pleats.</b>
Take one large rectangle (side panel) and one small one (yoke). You need to reduce the 50cm width of the side panel to the 34cm width of the yoke.
a. Find the centre of each rectangle by folding it in half. Mark where the fold is (in pen on the wrong side of the fabric, or with a pin) for each of them, and then lay them back down the right way up like this, lining up the centre for each of them (if you're doing this on a surface where it's possible, eg. on the carpet or a padded ironing board, stick a pin the exact centre of each to hold them in place; you could also tape them down): -
 Step 5
b. I did my pleats by eye, because I'm too impatient to measure things. First I lined up the outer edge of the side panel with the outer edge of the yoke like so:
-
 Step 6
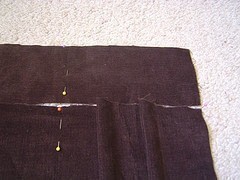
and then I just folded two pleats in so that it would lie flat. They won't need to be very deep pleats; if you put in four per panel like me, they'll end up being about 2cm (ie. using 4cm of fabric each). Pin them down where they look good to you. Make sure that they are straight; that is, that the top edge of the fabric is parallel with itself in all the folds. It will look something like this:
-
 Step 7
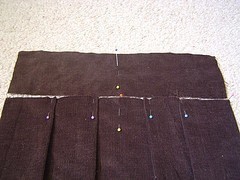
Repeat this for the other half, making it as symmetrical as you can (if you're more meticulous than I am, you might like to measure the first set of pleats so you can match the distances exactly). Note that the pleats all face in towards the centre (they are a mirror image). You will have this:
-
Step 8
c. Repeat this process so far for the other two rectangles.
-
 Step 9
d. Hold up the two pleated side panels back-to-back, and check whether your pleats match up from the top. They don't need to be perfectly aligned since you won't see them right next to each other like this again, but it's nice to have them fairly similar. If you measured them like I didn't, you shouldn't have any problems. Otherwise, un-pin and re-pin as necessary.
-
Step 10
e. Now, sew right around the top of one side panel, as close as reasonable to the edge, over the pleats, to secure them in place. If you're not using a machine (poor you!), tacking is all right at this point. (It's probably even possible to not sew and just keep it pinned for this step, but that is only for people who like to live dangerously.)
-
 Step 11
f. Do the same for the other side panel.
You'll have this:
-
 Step 12
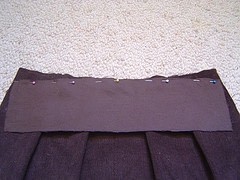
<b>3. Attach the yokes</b>
a. Get rid of one of the side panels for the time being. Pick up one yoke and put it face down on top of the pleated side panel you kept. Since the top of the panel is now curved, you need to align it with the centre (that is, the lowest part of the curve) like this. Make sure it goes straight across, rather than diagonally, by measuring the distance from the top corners of the side panel to the top of the yoke. Once everything is straight, pin it like that.Now sew it! Turn it over to do this (ie. the pleated side is visible) so that you can see what's happening, or risk a lot of unpicking.
-
 Step 13
b. Do the same for the other side panel and yoke. You will have two of these:
As you can see, the yoke might not line up perfectly with the edges of the side panel. Don't stress out too much about this.
-
 Step 14
<b>4. Finish the outside</b>
N.B. If you want to put in a zipper for closing the bag, the whole process of putting the pieces together is different. Look at lee's zip <a href="http://www.craftster.org/forum/index.php?topic=76577.0">top tote tute</a> for that. However, if you're putting in some other kind of clasp (or no clasp) read on.a. You've now got the two sides of the bag finished, and the rest of the outside is simple; you just sew them together like the side panels of any tote bag. That is, line the two panels up with the good faces of the fabric together, pin them, and then sew all the way around (except for the top, obviously):
-
 Step 15
Turn it the right side out, and tadaa! That's the outside of your pleated tote. Making the lining will be less convoluted.
-
 Step 16
<h4>SECOND, THE LINING</h4>
<b>1. Cut out your fabric</b>
There are only two panels for the lining, but they'll be a funny shape to match the outside. The easiest way to figure out that shape is to just trace around the outside of the bag, making sure to leave a seam allowance: -
 Step 17
However, make sure that the top part that will be the lining next to the yoke is 33cm by 9cm (like the yoke), or you'll have trouble assembling the bag later.
-
 Step 18
Cut this first panel out, and then trace around it to make your second panel.
-
Step 19
2. Add pockets as you like
There are a lot of great pocket tutorials on the net; sushimifune's <a href="http://www."http.com//www.craftster.org/forum/index.php?topic=10066.0%22">zippered-pocket tute</a>, angelbum's <a href="http://www."http.com//www.craftster.org/forum/index.php?topic=75595.msg729175#msg729175%22">slash pocket</a> or the pocket instructions in gloriana's <a href="http://www.cutoutandkeep.net/projects/messenger_bag">messenger bag tute</a>. -
Step 20
3. Sew the lining together
Like you did with the outside, pin the two panels together with the wrong sides facing outwards. However, this time when you sew it, you need to leave a hole in the bottom that's big enough to turn the whole bag inside-out through. -
Step 21
4. Attach the closure
Plonk a magnetic clasp into the lining, or sew in some velcro, or do whatever else takes your fancy, and we're good to go. -
Step 22
<h4>THIRD, THE STRAP</h4>
Making the strap obviously isn't hard, but it's a bit annoying. Cut two strips of fabric as long and as wide as you want the strap to be. Mine were about 125cm by 6cm. Put them together right sides in and sew all along the long sides, and then turn your tube inside out (this is the slow and annoying bit; a chopstick or something might help the job along).
-
 Step 23
<h4>FOURTH, PUT IT ALL TOGETHER</h4>
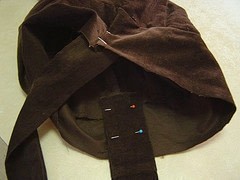
This is the part that always confuses me. But I hope it's clear!1. Put the strap in
First, the strap. I do not attach the strap the way most people seem to attach their straps; if you prefer the other method, that will work too. I sew the strap into the inside of the outside part of the bag before I put the lining in, so that I can see what's going on. Pin it in first like this; I put in about 8cm of strap: -
 Step 24
From the other side, it will look like this (whoops, ignore my shoddy workmanship):
-
 Step 25
Now, important thing is to fold the top edge under before you sew it to the strap, like this:
-
 Step 26
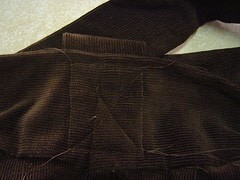
I sew the strap into the bag with a rectangle with a cross in the middle, to make it as strong as possible:
-
 Step 27
<b>2. Put the outside and the lining together</b>
Put the outside of the bag inside the lining. The good sides should be together. That is, the good side of the outside is facing outwards, and the good side of the lining is facing inwards. The strap should be in between them (don't leave it sticking out, or your bag will explode!). Line up the top edges and pin them like this: -
 Step 28
And then sew around most of that, but skip the area around the straps. That is, you'll leave a hole in each corner.
Turn the whole thing inside out through the hole you left in the bottom of the lining. You can sew up that hole now. Then push the lining into the bag. You're almost finished! It should look like this:
-
 Step 29
Fold the lining down against the straps like this and pin it:
-
 Step 30
Then sew all the way around the top edge of the bag like this (hopefully you will be better at sewing in a straight line than I am):
-
 Step 31
Sew in all 4 million lose threads... and it's done! Just remember to pin on all your emo badges or you won't be scene :)
I hope these instructions are easy to understand; feel free to ask for clarification or make suggestions if you like!


and divinely precious bag. i think i will use steps 1-13 to make a pleated skirt!! nowhere could i find better, clearer instructions on how to make pleats with the yoke which will be my waistband! i will def put up my "version" when i´m done!! thanks so much for your work. karise.