


About
Nice coasters made out of old tiles, which will bring lots of colour into your home.
I love reusing things around my home and creating simple projects, which fill my spare time with some creative thinking and productivity. My home is practically filled with things I created with my own hands from various other items. These patterned tile coaster are just one of those things. I really enjoyed this project, because it's incredibly simple and yet you create something you will use every single day. The idea came to me after our bathroom renovation was finished and there was a box of tiles left unused. The rest of the things I needed I found in my local craft store. Here's how I did it.
-
 Angela W. favorited Diy Patterned Tile Coasters
09 Aug 07:23
Angela W. favorited Diy Patterned Tile Coasters
09 Aug 07:23

-
 Step 1
First you should start by cutting the patterned paper into squares, which are slightly smaller than the tiles. So, measure the side of the tile, remove a little less than 1 centimetre from each side, draw the shape you want to cut out on the back side of the paper, get the scissors and cut out the pieces you want to glue to the tiles.
-
 Step 2
Clean the tiles and make sure they are completely dry and dust-free. Then get the PVA glue you bought, and apply a small layer of it on the top side of the tile. After that gently position the patterned paper on top of the tile and fixate it. Then, if you want for your new coasters to survive for longer, you can apply a coat of glue on the top, which will help secure the paper. Then leave it to dry for as long as needed.
-
 Step 3
Once the layers of glue are completely dry, you should spray the entire tile with the acrylic sealer, which will make the surface waterproof and expand the life span of your new patterned tile coaster. It will make the tile look nice and glossy, and you won't have to worry about spilling things on it. I would also advise you to use at least two layers of sealant, to make sure that it will hold and everything is covered.
-
 Step 4
The last thing you need to do before your DIY patterned tile coasters are ready for use, is to cut out a small pieces of felt fabric with the same dimensions, and glue them to the corners of back side of the coaster. This is done in order to prevent scratches and other damage, which could be caused to your tables or desks by the harsh surface of the tile. Once you do that, your beautiful and brand new tile coasters are ready for use!


 1
Snacks & Sides »
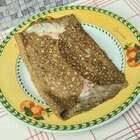
Breton Pancake With Buckwheat Flour
1
Snacks & Sides »
Breton Pancake With Buckwheat Flour
 2
Folders & Binders »
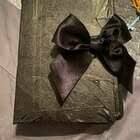
Diy Folder Organizer
2
Folders & Binders »
Diy Folder Organizer
 3
Moussaka »
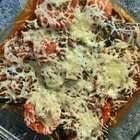
Moussaka
3
Moussaka »
Moussaka
 4
Home Accessories »
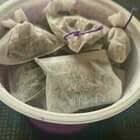
Moth Proof Sachets For Your Wardrobes
4
Home Accessories »
Moth Proof Sachets For Your Wardrobes


