


About
you just need nail polish, a dish of water, and a toothpick!
A spiderweb-inspired nail design perfect for Halloween.
Tags
-
 michaela.vincent2 favorited Spooky Spider Nails; A Halloween Diy
06 Dec 08:34
michaela.vincent2 favorited Spooky Spider Nails; A Halloween Diy
06 Dec 08:34
-
 Sara Y. favorited Spooky Spider Nails; A Halloween Diy
05 Aug 00:59
Sara Y. favorited Spooky Spider Nails; A Halloween Diy
05 Aug 00:59
-
 Jessica A. favorited Spooky Spider Nails; A Halloween Diy
20 Feb 22:38
Jessica A. favorited Spooky Spider Nails; A Halloween Diy
20 Feb 22:38
-
 beautifully_morbid favorited Spooky Spider Nails; A Halloween Diy
16 Jan 06:37
beautifully_morbid favorited Spooky Spider Nails; A Halloween Diy
16 Jan 06:37
-
 AbsintheFairy favorited Spooky Spider Nails; A Halloween Diy
09 Nov 21:03
AbsintheFairy favorited Spooky Spider Nails; A Halloween Diy
09 Nov 21:03
-
 Kymberleigh favorited Spooky Spider Nails; A Halloween Diy
15 Oct 17:40
Kymberleigh favorited Spooky Spider Nails; A Halloween Diy
15 Oct 17:40
-
Jessica D. added Spooky Spider Nails; A Halloween Diy to To-make list
01 Oct 02:23
-
 Amanda Wicked favorited Spooky Spider Nails; A Halloween Diy
06 Jul 08:18
Amanda Wicked favorited Spooky Spider Nails; A Halloween Diy
06 Jul 08:18
You Will Need
-
 Step 1
Step 1: Gather materials. You need a small dish filled with water (this is my paint mixing dish, so that's why it's so dirty! :) ). Get some toothpicks, black and white nail polish (I used Ulta white and Wet and Wild black). You will also need some nail polish remover for cleanup.
-
 Step 2
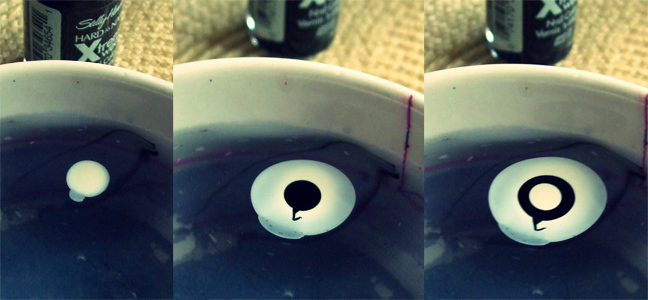
Step 2: Make you spiderweb pattern. Drip a drip of the black polish into the water. You will see it "disappear" into the water. It's really weird! Now, add a drip of white. This paint should fizzle out a little bit but still hold it's shape. Layer/drip another black and another white on top.
-
 Step 3
Step 3: To make the spiderweb look, Take your toothpick and drag gently from the center dot outward, to look like a start of a web. You don't want to break the film formed by the polish on top of the water.
-
 Step 4
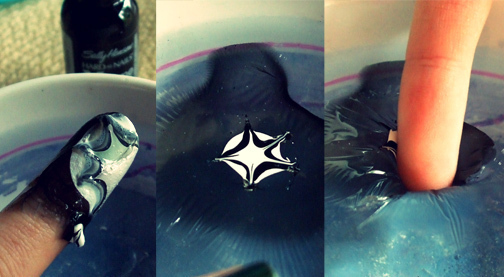
Continue to pull outward at the same spots to create your spikes. Now, take your nail of choice and gently press down on the part of the pattern you want on your nail. As you can see in the last picture, the film of polish will buckle a little bit. Press down all the way into the water, then take a toothpick and roll the excess film around your finger onto the pick to make sure it doesn't ruin your pattern. Lift out of the water.
-
 Step 5
This is what your nail will look like! Continue for each nail (layering your polish, dipping, and rolling up the excess with your pick. This pattern was used for my pinky, so I made it a little smaller to not waste the polish.
-
 Step 6
Here is a close-up of the pinky. Step 5: Clean up. This is how messy it can get (if you use the toothpick to roll-up the excess as explained above, you will be slightly less messy. I didn't obviously and this is how it turned out. So make sure you do it!)
Use your polish remover to remove all excess polish (I used Q-tips. Make sure your nails are all dry before doing this, or they can smear real bad).


Comments

 1
Books & Journals »
Stolas's Grimoire
1
Books & Journals »
Stolas's Grimoire
 2
Charms »
Custom Tamagotchi Charms
2
Charms »
Custom Tamagotchi Charms
