


About
A how-to for the perfect watermarble every time!
As fun and beautiful as watermarbled nails seem, this look can be kind of tricky to achieve. This tutorial is aimed at helping you get the right look, every single time!
-
 autumnrose.lee favorited Diy Watermarble Nail Art
11 Mar 11:35
autumnrose.lee favorited Diy Watermarble Nail Art
11 Mar 11:35
-
 Rhonda G. favorited Diy Watermarble Nail Art
21 Feb 08:37
Rhonda G. favorited Diy Watermarble Nail Art
21 Feb 08:37
-
kiki w. added Diy Watermarble Nail Art to Makeup
29 Jan 17:47
-
 asia.pearce added Diy Watermarble Nail Art to Makeup
27 Jul 00:23
asia.pearce added Diy Watermarble Nail Art to Makeup
27 Jul 00:23
-
 mmotse03 favorited Diy Watermarble Nail Art
18 Aug 20:24
mmotse03 favorited Diy Watermarble Nail Art
18 Aug 20:24
-
 autumn rose l. favorited Diy Watermarble Nail Art
13 Aug 21:49
autumn rose l. favorited Diy Watermarble Nail Art
13 Aug 21:49
-
Dee D. added Diy Watermarble Nail Art to beauty
03 Feb 19:42
-
Calah L. added Diy Watermarble Nail Art to NAILS
09 Jan 16:03
-
 Meredith T. favorited Diy Watermarble Nail Art
03 Dec 14:14
Meredith T. favorited Diy Watermarble Nail Art
03 Dec 14:14
-
jesta b. favorited Diy Watermarble Nail Art
25 Nov 06:08
-
 Step 1
Paint a white base color. I can't say for sure, but I think a white base should be put under all watermarbles! It helps in bringing out the color of the polishes you use.
-
 Step 2
Tape around your fingers. This is very important. I wouldn't recommend using any other tricks to prevent polish from getting on your fingers because tape is really the only way to go. I usually do one piece of tape to go around my nail and one more to go under my nail and around my finger.
-
 Step 3
This is where we start using our polishes. I use just regular sink water but I've head bottled water works too if you're having issues with it. Room temperature too!
I would recommend trying each polish you use before starting just to make sure they spread properly. I used all Wet N Wild polishes for this design because they are honestly the best I've found for water marbling. They spread really well! I know the Sally Hansen Xtreme Wear polishes work really well too though. -
 Step 4
Start dragging your polishes in using your toothpick! VERY IMPORTANT: Do not go from the very outside ring. Start from a few rings in because it's very likely that the outside most will have dried by then and will drag your whole design and ruin it.
-
 Step 5
Basically same thing as last step but drag in more polish. You want to make it look nice when it goes on your nails. Make sure to work quickly in this process though. Don't lollygag and let your polish dry.
-
 Step 6
After doing all of your nails, you'll end up with something similar to this. See where the tape comes in handy?
Remove the tape (carefully!) and you're left with just a fraction of the mess. -
 Step 7
Remove the tape (carefully!) and you're left with just a fraction of the mess.
-
 Step 8
Use your acetone to clean around your cuticles. There are many short tutorials on Youtube showing how to properly do this.
Alright so we aren't done yet. The trick to the perfect watermarble is tricking your audience into thinking you can watermarble perfectly! See how my pinky looks pretty weird and my middle finger has a huge knick in it? Well all you need to fix this is a thin paintbrush and the polishes you used in the watermarble.
Basically what I do is go over the messed parts and make them look how they "should." I fake it! If some of your lines are too thin/thick, fix them! Maybe even if your colors aren't quite as opaque as you'd like them to be (like I did with my middle finger)
-
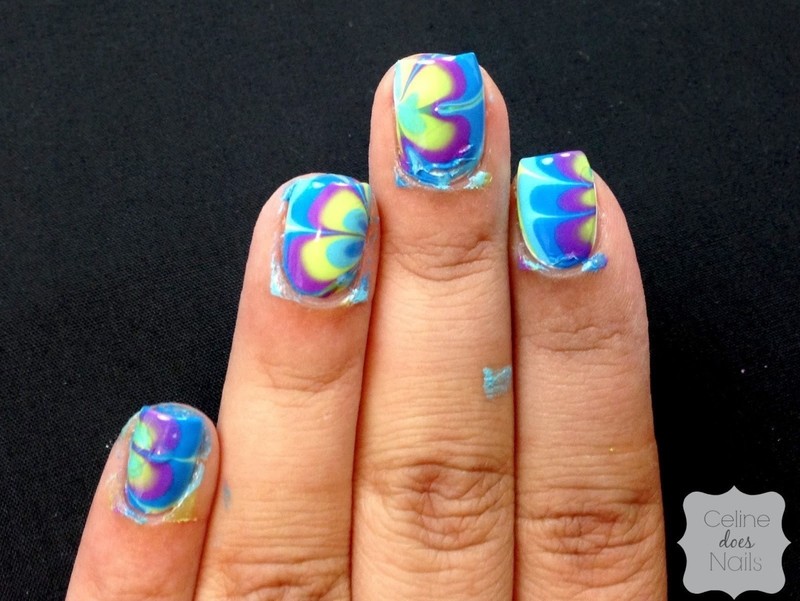
 Step 9
Once you're happy with how your nails look, add top coat and you've done it! You've successfully watermarbled your nails!


 1
Books & Journals »
Stolas's Grimoire
1
Books & Journals »
Stolas's Grimoire
 2
Charms »
Custom Tamagotchi Charms
2
Charms »
Custom Tamagotchi Charms


