


About
Tutorial: Making a Yo-Yo Necklace
Let's get started!
*You may print out my circle templates here: I recommend printing onto cardstock to make tracing easier
Downloads
- yoyo.pdf 3.53 MB [ Download ]
-
 Kyara S. favorited Yo Yo Necklace
04 Oct 19:42
Kyara S. favorited Yo Yo Necklace
04 Oct 19:42
-
 Cricket V. favorited Yo Yo Necklace
10 Jan 10:33
Cricket V. favorited Yo Yo Necklace
10 Jan 10:33
-
 jen s. favorited Yo Yo Necklace
06 Oct 15:06
jen s. favorited Yo Yo Necklace
06 Oct 15:06
-
 joathina favorited Yo Yo Necklace
11 Aug 11:59
joathina favorited Yo Yo Necklace
11 Aug 11:59
-
Shari B. favorited Yo Yo Necklace
30 Jul 10:43
-
 silentband favorited Yo Yo Necklace
26 May 17:30
silentband favorited Yo Yo Necklace
26 May 17:30
-
 Fuzzy buddy commented on Yo Yo Necklace
14 Apr 18:49
Fuzzy buddy commented on Yo Yo Necklace
14 Apr 18:49
-
 mandiCHU favorited Yo Yo Necklace
07 Aug 07:25
mandiCHU favorited Yo Yo Necklace
07 Aug 07:25
-
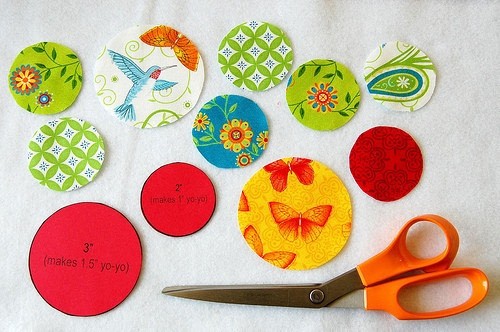
 Step 1
Use your fabric marker (or pencil or chalk) to trace a circle onto the wrong side of your fabric. The diameter of your finished yo-yo will be slightly less than half of size of this circle.
-
 Step 2
Cut out your circle. For this necklace you will need to trace and cut out seven 2" circles and two 3" circles (which will result in seven 1" yo-yos and two 1.5" yo-yos).
-
 Step 3
Thread your needle and tie a knot in the end. With the wrong side of your circle facing you, fold down the edge of the fabric about 1/8" and push the needle through from wrong side to right side. Straight stitch all the way around your circle, folding a bit and adding a stitch all the way around the edge until you have stitched all the way around the circle and created a small hem. Do not backstitch or do anything fancy. You need a simple straight stitch because you will be ruffling your fabric.
-
 Step 4
It should look something like this, with your final stitch coming up from the right side to the wrong side, and ending up next to your first stitch. Don't worry about it being perfect--imperfections will be lost in the ruffles and will actually create a more interesting final yo-yo.
-
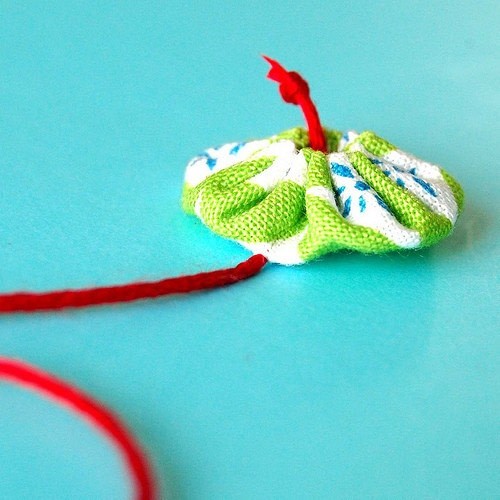
 Step 5
Carefully and gently ruffle the edge by pulling on the thread ends.
-
 Step 6
It should look like a pouch, with the right side visble and the wrong side inside the pouch. Tie a knot firmly, but gently enough so as not to break the thread. Tie several knots (three or four) and snip off the extra thread.
-
 Step 7
Flatten the pouch into a circle and Viola! you've made your first yo-yo!
-
 Step 8
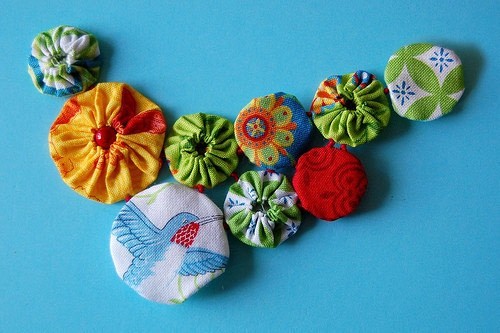
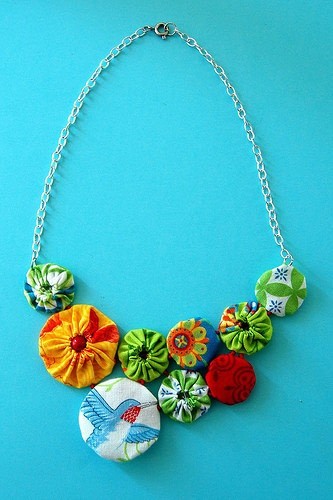
Make enough yo-yos for your necklace and lay them out in your design. I liked the back of some of my yo-yos and thought it was nice to have a difference of texture in my design, so I flipped over a few of my yo-yos. I also wanted an asymmetrical design so I placed my two larger yo-yos to the left of the center. Play with it until it looks just the way you like, and add more or take away some yo-yos if you need to in order to make a design that works for you.
There are several ways that you can join your yo-yos together. You could place the right sides of two yo-yos together and do a simple whip stitch to join them, or you could push a metal jump ring through two yo-yos to join them. For this necklace I used embroidery thread and knotted the yo-yos. To do that:
-
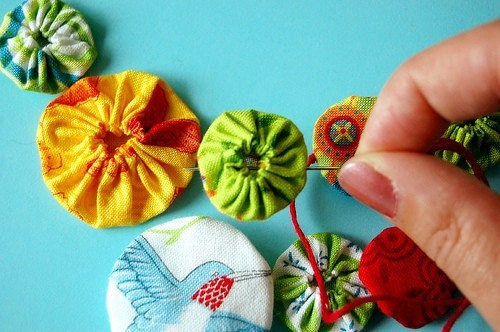
 Step 9
Cut a length of embroidery thread long enough to weave through your entire design. Thread your needle and tie a knot in the end. Going through the center of your first yo-yo (in this case I started with my top left yo-yo) sew through from the inside to the outside and pull until the thread stops and the knot is flush against the inside of the fabric.
-
 Step 10
Tie a knot in your thread and before it is completely tightened, use the tip of your needle to move the knot as close to the fabric as you can.
-
 Step 11
Tighten and slide the knot up until it is flush against your yo-yo.
-
 Step 12
Remove the needle and finish tightening the knot.
-
 Step 13
Sew through your next yo-yo as though it was a bead, going in one end and coming out the other. You will not necessarily go straight in one side and out the other! Look at your design--you want to poke holes at the points where the yo-yos touch. If it makes it easier, use your fabric marker to make a tiny mark where you should sew the thread through.
Take care not to poke through your fabric somewhere in the middle. If you "puff" up your yo-yo a bit to make threading it easier, make sure that you flatten the yo-yo as much as you can before tying your next knot. You want the knots flush up against each side of a yo-yo without bunching the fabric or leaving any gaps. -
 Step 14
You can also add beads to the center of some of your yo-yos. Simply go in one end with your needle, then thread through your bead and then out the other side. Settle the bead neatly in the center of the yo-yo, tighten your thread, and make a knot.
-
 Step 15
When you have placed all of your knots and stitched together all of your yo-yos, finish off by going in through your last yo-yo and instead of going all the way through to the other side, make a tiny stitch just inside one of the center ruffles. Tie a knot and tuck it into the yo-yo. Depending on your design, you may have to tie off the thread at several points and then start again with a new thread. For this piece, I first threaded together all of the top row of yo-yos (the top six yo-os), then I threaded together the bottom three yo-yos and attached them to the top row.
-
 Step 16
It is important that your yo-yos are anchored together at at least two points. Yo-yos that only have one piece of thread running through them will flip around. You can either add more knots, or you can whip stitch a second anchor point on the yo-yos that only have one knot attaching them to another yo-yo. To do this, fold your yo-yos with the right sides facing each other and make a small stitch very close to the top and next to the existing knot. Tie a double knot and snip off the excess thread.
-
 Step 17
Your finished piece is ready to be attached to a chain!
-
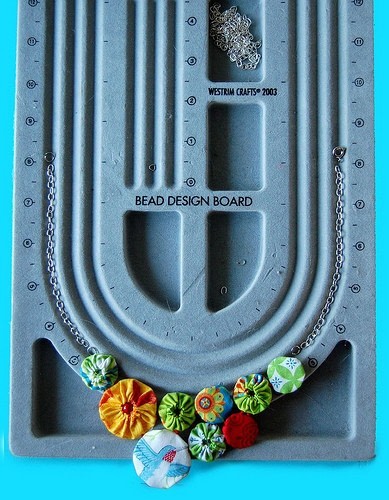
 Step 18
Center your piece on a bead design board. For a 16" necklace, lay out your chain from the edge of your piece to the 8" mark and cut with wire cutters. Remember to always turn your head away and shut your eyes when you cut chain because little sharp metal bits will go flying! Cut a second piece of chain for th opposite side.
-
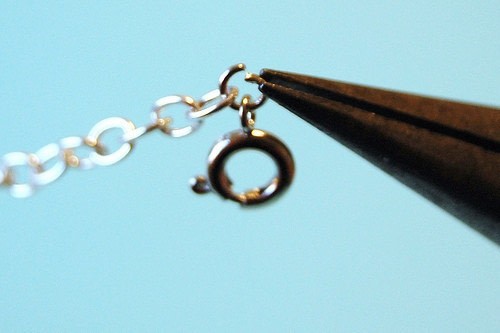
 Step 19
Attach your chain to your yo-yo piece using an open metal jump ring. Please review instruction on how to properly open a jump ring here: click!
Push your jump ring through the yo-yo, then attach your chain and close the jump ring. Do the same on the other side of your yo-yo p -
 Step 20
Attach a lobster claw to the other end of one chain and a large jump ring to the other chain.
-
 Step 21
You're all done! Put the necklace on and be admired by friends and strangers who will gasp when you say, "Oh, I made it myself! It was nothing, really!"


Comments


