About
How to create a floral wreath using the Procreate app
Procreate is a low-cost drawing app with tonnes of useful features, including a great symmetry tool. Follow this simple tutorial for creating a floral wreath on the iPad with Procreate. You can use the steps to create all sorts of radial art and wreaths, perfect as a border for lettering projects, illustrations, and greeting cards!
Tags
-
 Nothing favorited Wreath In Procreate
27 Apr 19:04
Nothing favorited Wreath In Procreate
27 Apr 19:04
-
 mmotse03 favorited Wreath In Procreate
18 Jun 22:05
mmotse03 favorited Wreath In Procreate
18 Jun 22:05
-
 Abbi Laura published her project Wreath In Procreate
11 Jun 09:00
Abbi Laura published her project Wreath In Procreate
11 Jun 09:00
You Will Need
-
 Step 1
First of all, you'll need to set up the symmetry guides.
Go to Canvas > Edit Drawing Guide > Symmetry and select Radial Symmetry. Make sure you tick Rotational Symmetry and Drawing Assist.
These options will give you a centre point which you can move around and place anywhere on your canvas, and guidelines running through it. The Drawing Assist means you can draw everything on just one section and it will automatically repeat all the way around!
-
 Step 2
Sketch in some simple flower shapes. Start directly on top one of the guidelines, and you will see your sketch repeat itself on all of the others. Neat, huh?
I like to draw a line between corresponding points on two of the guidelines - this will give you an octagonal shape which is useful for knowing where to sketch in your flowers.
-
 Step 3
Start filling in gaps with more flowers and a few leaves. Try to keep things varied - you don't want visible sections of one type of flower or one leaf shape, and you want your gaps to look fairly natural. Think about the overall flow of the wreath as a whole.
-
 Step 4
Once you've sketched out your wreath (in amazing record time, because you only have to sketch one section!), hide the guides and make sure you're happy with your sketch. Hiding the drawing guides will get rid of the lines, but Drawing Assist will still work, meaning you can sketch in extra details and it will still repeat around the wreath!
-
 Step 5
For the next step, choose a background colour and fill this underneath your sketch layer. I went for a dark background to make my flowers pop. Set your sketch layer to Multiply, and you may want to reduce the opacity.
Create a layer in between the background fill and the sketch layer. This is where you'll start colouring in flowers! Take the brush* of your choice and start painting in the petals, in any style you're comfortable with.
*BRUSH TIP: Here I wanted a watercolour effect, so the brush I'm using is actually a version of the "Blotchy" brush (in the Calligraphy section) which I adapted for painting. I prefer it over the actual Watercolour brushes that come with Procreate!
-
 Step 6
On a new layer under the flower layer, start painting in the leaves. You can use as many or as few layers as you like for this, but I find it easier to keep my colours separated in case I want to edit them later on.
-
 Step 7
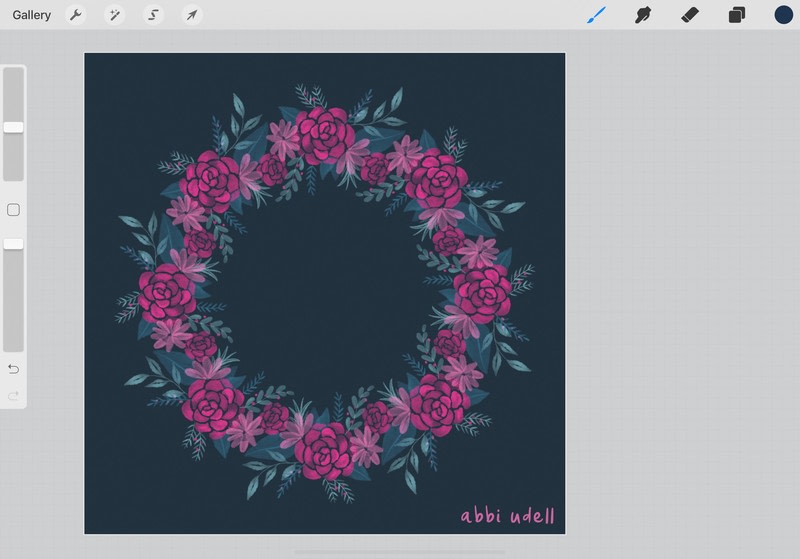
Hide your sketch layer, add in any extra details (like here I added a few little berries to carry that lovely pink colour through the wreath) and there you have it! A beautiful floral wreath.
I used this wreath for a Mother's Day card with lettering in the centre, but there are all sorts of things you can do with a wreath like this. Experiment with settings, brushes, and elements to create all sorts of beautiful wreaths!