https://www.cutoutandkeep.net/projects/wire-tree-of-life • Posted by
This is a photo holder made out of wire. I call it a tree of life because you hang ornaments off the branches that represent aspects of life. I made this as a gift for a friends 21st birthday, which is why the ornaments I chose were keys, a symbolic 21st birthday gift, and I also hung little silver photo frames off the branches with photos of family in them. This is relatively simple you just need to be patient working with the twisted wire. If you need an explanation of any of my steps send me a message!


This is a photo holder made out of wire. I call it a tree of life because you hang ornaments off the branches that represent aspects of life. I made this as a gift for a friends 21st birthday, which is why the ornaments I chose were keys, a symbolic 21st birthday gift, and I also hung little silver photo frames off the branches with photos of family in them. This is relatively simple you just need to be patient working with the twisted wire. If you need an explanation of any of my steps send me a message!

Cut a length of the thicker wire about 90cm and make in to a loose coat hanger shape, twisting the ends together, making a stalk about 10cm long. Using two round objects with about 2.5cm diameter, such as a glue stick or large marker pen, put in side the 'coat hanger' as shown and twist them until the wire is tightly wound. Remove the 'twisters'.

This is what the wire should look like when it is twisted enough. Repeat to make another 'leg'.

Cross the two 'legs' over each other to make a cross shaped base. Twist the two bases 'stalks' together a little or use a bit of thin wire to wire them together. The neater you manage to tightly secure the two legs together, the better the rest of the project will work. A slightly trickier way of doing this step is to cut the wire long enough so that the stalks of the two legs are about 60cm long, and then the two legs will make up 4 of the branches of the tree later. I would cut two lengths of wire, both 310cm to make the two legs, making sure that the stalks are about 60cm on each end.

For each branch that you want your tree to have, you need 60cm of thick wire. I made my tree with 8 branches. So because I made my 'stalks' on my base extra long, I only needed 4 extra branches to make 8 branches all together. So once you have all of your branches, twist them together a bit, like shown, to secure them.

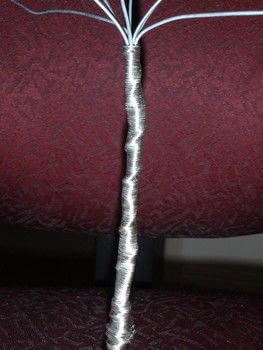
Next get the thin wire, and without cutting it at all, becuase you will need one continuous 10m length (best to leave it on the roll), wind it all around the 'trunk' of the tree from about 40% along the length of the trunk from the bottom. Start at the highest part and lay the beginning of the wire along side the trunk and fold back on it self and begin winding over to conceal it. The tighter and neater you wind the wire around the trunk the cooler it will look, especially with shiny silver wire. You can experiment with the way you wind the trunk up, becuase cool effect can be achieved by weaving, etc.

Wind the wire all the way along the 'trunk' till you get to the base. At the base, you can just tie the wire off here if you like, or you can do what I did, and just keep weaving until the wire runs out and tie it off then. I wove the base of the tree on the 4 legs using a 'God's eye' weaving style, as can be seen here.

To finish the tree, simply wind the ends of the branches around your 'twister' that you used earlier to make circular shaped paper clips to hold photos. I found three circles around the 'twister' best to make usable paper clips so make sure the lengths of the branches are long enough to accommodate this. Then you can slip charms or trinkets on to the branches on the paper clips as shown. If you wanted another variation, you could try threading beads on to the wire at various steps, such as on to the original coat hanger or on to the thin wire as you wind it around the trunk. I tried to make the whole tree out of 20 guage wire but found it didn't work as well with thicker wire that I got from a hard ware store. The thin 'jewelery shop' wire is great for weaving though!