About
Draft your own Western style yoke for an existing shirt pattern
This is a tutorial for adding Western style yokes to a traditional menswear inspired button-up shirt pattern. I'm using the Archer shirt pattern by Grainline Studio.
-
 C T. added Western Style Yoke Modification to Clothes! x
05 Apr 00:38
C T. added Western Style Yoke Modification to Clothes! x
05 Apr 00:38
-
Suzi T. favorited Western Style Yoke Modification
07 Nov 22:30
-
 Lucky Lucille published her project Western Style Yoke Modification
21 Sep 01:05
Lucky Lucille published her project Western Style Yoke Modification
21 Sep 01:05
You Will Need
-
 Step 1
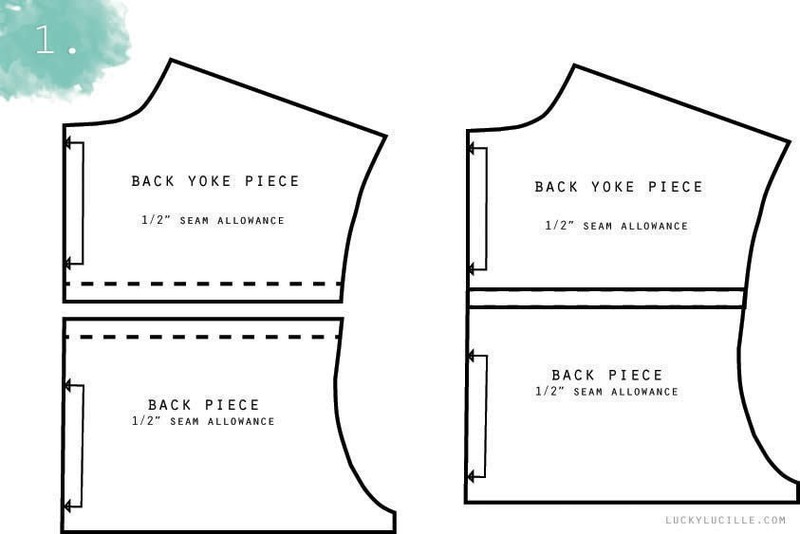
NOTE: I'm using the Archer shirt pattern by Grainline Studio as my base pattern. Seam allowances for this particular pattern are 1/2".
Step One: Since we’re adding our own extended yoke to the back, we want to retrace the back pattern piece and the original yoke piece as one continuous piece. To do this, mark the 1/2″ seam allowance at the top of the back piece and the bottom of the yoke piece, then overlap them. This will negate the seam allowance and make sure you’re not adding any extra length to your new back pattern piece.
-
 Step 2
Step Two: Now that you have your new back pattern piece traced we can start altering the yoke. I start by tracing the entire original yoke piece except for the bottom edge. To make the western style point, I extended the fold line by 1 and 5/8ths inches (this measurement can be altered to suit personal preference, but will include your 1/2″ seam allowance). Next, find the shoulder notch closest to the neckline and draw a line parallel to the fold until you intersect the original bottom edge of the yoke piece. Now we’re going to start shaping the curve to connect those two points. Using the curved edge of a styling design ruler (a round dinner plate works great too!) draw a short, smooth line from that established point on the right (illustrated above with the teal dotted line) down towards our new point on the left at the fold. Now, draw another short smooth line from the extended point on the left, up towards the curve you just made on the right. There will be a chunk in the middle that’s still open and unconnected at this point. You can sketch in the rest of this curve free-hand, or keep using your curved ruler with short smooth strokes until you have a nice smooth slope. There should be no obvious seam between the original yoke and your new yoke tracing. No need to re-add the seam allowance, it’s already there.
-
 Step 3
Step Three: If your first attempt was a little messy, re-trace your new yoke piece with the smoothest curve and without the original yoke lines, as shown above. Make sure you’re transferring all the original pattern markings and notches to your new western yoke piece. Yay! Your new back yoke piece is done! If you’re not interested in the front yoke pieces, you can skip to step six.
-
 Step 4
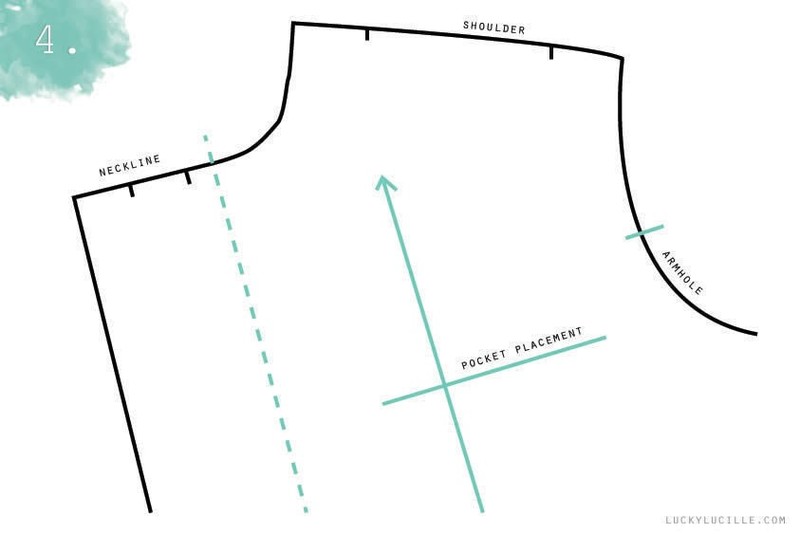
Step Four: To draft the front yoke pieces there are a few pattern markings on the front pattern piece that will help you. Lay a piece of tracing paper on top of the front pattern piece and start tracing the outside edge around the shoulder, neckline, and armhole. Also identify the grainline, the pocket placement line, the armhole notch, and the line where the button band folds over (all illustrated in teal above).
-
 Step 5
Step Five: The sizing/shape of these front yoke pieces can be varied to personal preference, but if you like the size of mine (shown in a recent post), this is what I did – Find the notch at the armhole and draw a small line 1/4th of an inch above it. Then draw a line (parallel to the pocket placement line) from this line you just marked, over to the grainline. Next, find the line that marks the fold of the button band and make a new mark 5/8ths of an inch to the right of it. Connect this point with the grainline at the line you just drew (shown above with the solid lines). Now that the general shape of your front yoke is established, you can add your 1/2″ seam allowance to your pattern piece (shown with the dotted line above). When you cut out this new piece, leave a bit of over hang at the seam allowance on the bottom, then fold that seam allowance up and cut off the excess so it’s even with the neckline and armhole. If you don’t do this, your seam allowance wont end flush with your pattern piece when you fold the allowance under to topstitch (think about what happens when you try to press a dart the wrong way. You need a little sticky-outty bit to keep things squared up along the neckline and armhole).
NOTE: I forgot this in the illustration, but your new grainline is parallel to the line that angles up toward the neck.
-
 Step 6
Step Six: Now for the sewing part! Using a long basting stitch, sew 1/2″ from the edge of your yoke piece to mark your seam allowance (I have the yoke shown over top of my back piece in the photo but they are not connected at this point).
-
 Step 7
Step Seven: Using that line of basting stitches as a guide, press your seam allowance towards the wrong side of the yoke piece.
-
 Step 8
Step Eight: Snip a few notches into the seam allowance (not all the way to the fold!) to help the fabric press flat along that curved edge.
-
 Step 9
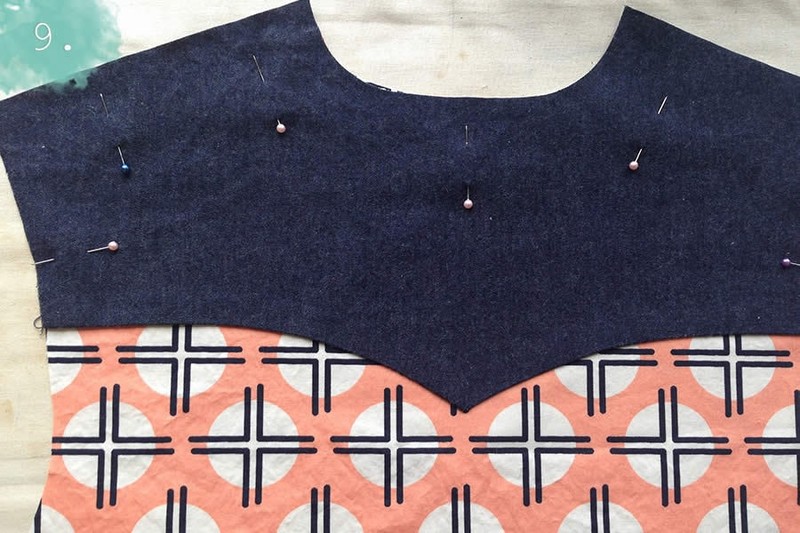
Step Nine: Press your yoke piece again on the right side to ensure everything is nice and flat, and your curves look smooth and even. Then line up the yoke along the shoulders, neckline, and armholes matching notches and other markings. Pin the yoke down on the back piece (Generally I prefer to use as few pins as possible, but use as many as you feel you need).
-
 Step 10
Step Ten: Using a regular stitch length, topstitch very close to the edge of your yoke to conceal your seam allowances and secure your new western style yoke piece to the back pattern piece. Follow the rest of the instructions to sew the shoulder seams (Use this same sewing method for your front yoke pieces).