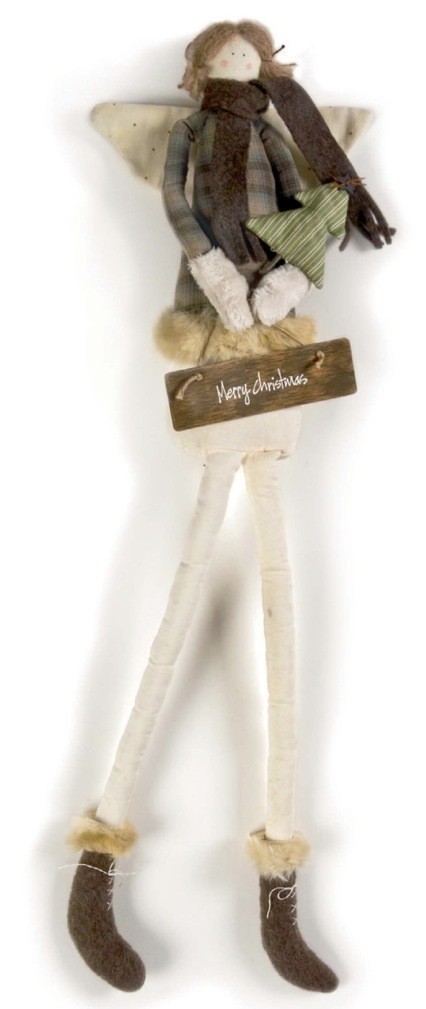
Welcome Angel
Extract from Christmas Crafts Scandinavian Style • By Tone Merete Stenkløv and Miriam Nilsen Morken • Published by Stackpole Books


About
Christmas Crafts Scandinavian Style
Tags
© 2024 Tone Merete Stenkløv & Miriam Nilsen Morken / Stackpole Books · Reproduced with permission. · Christmas Crafts Scandinavian Style by Tone Merete Stenkløv & Miriam Nilsen Morken, published by Stackpole Books (www.stackpolebooks.com).
-
 signe P. added Welcome Angel to dekoration
27 Dec 19:21
signe P. added Welcome Angel to dekoration
27 Dec 19:21
-
 Birgit favorited Welcome Angel
23 Dec 18:57
Birgit favorited Welcome Angel
23 Dec 18:57
-
 Twisted Fibers favorited Welcome Angel
22 Dec 06:26
Twisted Fibers favorited Welcome Angel
22 Dec 06:26
-
 Step 1
BODY
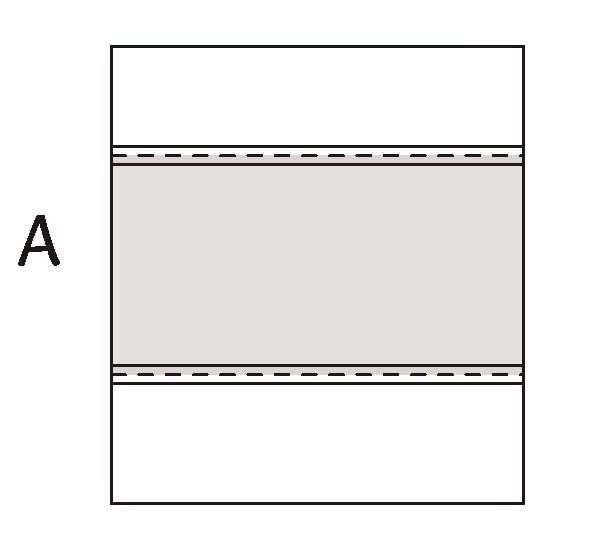
Cut the bottom from a light-colored fabric. Cut a piece of fabric 6 1/2 by 12 1/2 inches for the body, a piece of light-colored fabric 3 1/4 by 12 1/2 inches for the head, and a piece of light- colored fabric 4 by 12 1/2 inches for the bottom part of the body. Sew the pieces together as shown in figure A. -
 Step 2
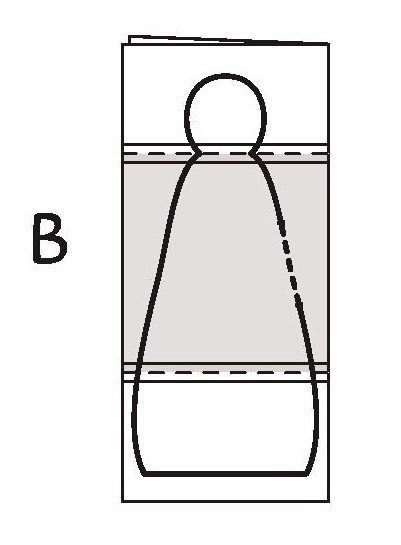
Iron the seams. Fold the piece in half, right side to right side. Trace the pattern for the body onto the cloth so the borders between the fabrics are near the markings on the pattern; see figure B. Mark the opening. Sew around the body except the bottom. Cut out and cut notches in the seam allowance.
-
 Step 3
FEET
Fold the felt in half and cut parts for two shoes. Cut two pieces 31/4 by 113/4 inches from the same light-colored fabric you used for the body. Place the two parts of the shoe together and sew a seam on 5 cm of the edge; see figure C. -
 Step 4
Do the same with the other shoe. Unfold the shoe piece and sew it to the light leg fabric; see figure D. Fold the piece together and continue the seam around the shoe and up along the leg. Reverse, iron, and stuff the feet.
-
 Step 5
Place the feet inside the body where marked; see figure E. Attach them with basting stitches so the feet are placed correctly when you sew on the bottom. Put the legs through the opening while you sew on the bottom. Sew on the bottom, reverse the figure, and iron the body. Fill the bottom with plastic pellets or rice and the rest of the body with fiberfil. Close the opening.
-
 Step 6
ARMS
Cut a piece of fabric for the mittens 3 by 93/4 inches and
a piece of the body fabric 7 by 93/4 inches and sew them together. Lay them flat and iron the seam allowance. Fold the combined piece in half, right side to right side. Trace the pat- tern for the hands so the border between the fabrics is at the markings on the pattern; see figure F. Sew around the hands and arms and cut them out. Reverse, iron, and stuff the arms. Fold the seam allowance on top of the arm inwards and sew the arms onto the body by hand. -
Step 7
FACE/HAIR
Cut pieces of yarn 5 1/2 inches long. Place the yarn on the head and baste from the forehead and backwards. Make the yarn into pigtails. Use a black waterproof ink pen to make the eyes (make sure it’s not too thick). Use a brush and a pink stamp pad to make the rosy cheeks. -
Step 8
WINGS
Place the fabric, folded in half with the right side inwards, on a layer of batting. Trace the pattern, mark the opening, and sew around the edge. Cut out the wings, and cut notches in the seam allowance. Reverse and iron the wings. Close the opening and sew the wings to the figure. -
 Step 9
SIGN
Sand, stain, and drill holes in a piece of plywood measuring 1 1/2 by 5 inches. Stamp on the desired text. Thread a small
rope through the holes and make knots on the front side of the sign. (You can also buy a ready-made sign if you wish.)
Sew the tree as described on page 63. Make the scarf from felt: cut a piece of felt 1 by 20 inches and cut fringes at the ends. Felt does not fray, so you don’t need to hem it. Cut
a strip of imitation fur 1 inch wide to go around the body and two strips 3/4 inch wide to go around the legs. Glue or baste the widest strip over the seam between fabrics on the body. The other strips should be placed over the seam between the fabrics on the leg. Sew a few crosses on the shoes for laces and make a bow; see figure G. Glue the hands, the sign’s rope, and the tree to the stomach.