


About
It'll never leave you for another!
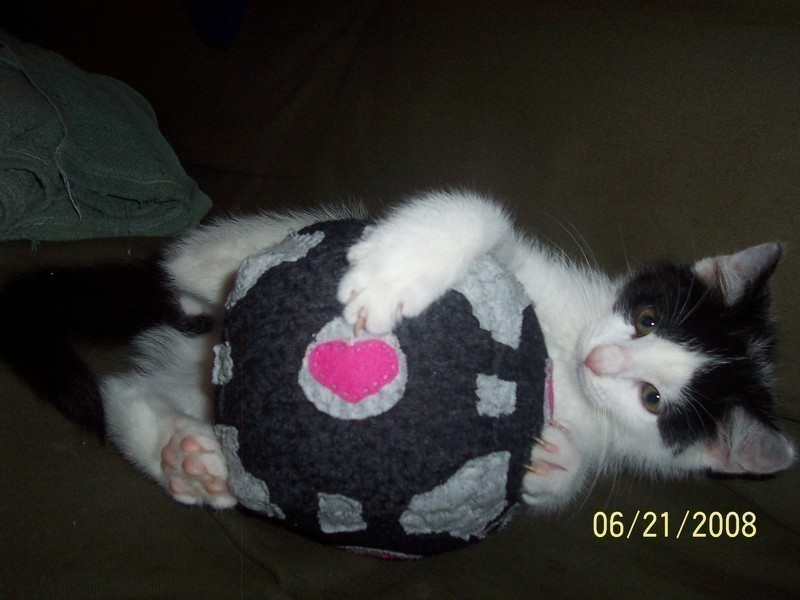
So this is the Companion Cube from the game Portal. If you've ever played the game, I'm sure that this cube would give you great amusement. I know it does for me. Sadly the cube pictured, I didn't make it for myself. It is a present for my older brother, whose now 20.
I think it makes a wonderful gift, even if the gift is to yourself. It's really not hard, just VERY time consuming.
Hope you enjoy it!
Oh yeah. And...as you can see, it makes a good kitten toy. =P
UPDATE: My Brother absolutely adored this. He said it was the greatest gift he'd gotten this year. I believe he's taking it with him when he moves out for college. He's going across the state...I'll miss him...
Tags
-
 Bonnie P. favorited Weighted Companion Cube
09 Mar 04:51
Bonnie P. favorited Weighted Companion Cube
09 Mar 04:51
-
 Tierra T. favorited Weighted Companion Cube
16 Nov 22:08
Tierra T. favorited Weighted Companion Cube
16 Nov 22:08
-
 emmabota73 favorited Weighted Companion Cube
01 Jan 09:19
emmabota73 favorited Weighted Companion Cube
01 Jan 09:19
- kkit12 favorited Weighted Companion Cube 25 Jun 19:01
-
 colourChemist added Weighted Companion Cube to Pillows
09 Jun 01:59
colourChemist added Weighted Companion Cube to Pillows
09 Jun 01:59
-
AnnaMong favorited Weighted Companion Cube
07 Apr 15:58
-
Reagan W. favorited Weighted Companion Cube
03 Apr 02:39
-
 Ana.Loli favorited Weighted Companion Cube
30 Mar 07:40
Ana.Loli favorited Weighted Companion Cube
30 Mar 07:40
-
 Quiana added Weighted Companion Cube to project
21 Jan 04:34
Quiana added Weighted Companion Cube to project
21 Jan 04:34
-
 Naomi D. favorited Weighted Companion Cube
22 Oct 13:47
Naomi D. favorited Weighted Companion Cube
22 Oct 13:47
-
 Step 1
First, cut out six dark gray squares of fabric.
Oh, and by the way. If you don't want to spend your money on fabric, use old t-shirts. I used an old t-shirt for the light gray and an old skirt for the dark gray. It cuts the cost to nothing. But if you want fabric, be my guest. =P
-
 Step 2
Using your trusty needle and thread, sew all the squares together like this.
<---- -
 Step 3
Sorry I don't have pictures or cut outs or whatever of the individual pieces, but I did make a diagram =/
You'll need to cut out:A - 24 light gray color
B - 24 light gray color
C - 6 light gray color
D - 6 pink colorIf you think you'll lose some, go ahead and make extra. I know I lost at least 3 along the way, then mutilated a few others.
To go from there, sew each heart, which are piece D to a circle, piece C.
-
 Step 4
This is how each face of the cube should be set up. I do NOT recommend just sewing each piece on right away, but to go at them as you sow the cube together. But I'll get on that in later steps.
Start by sewing your cube to look like the picture.
<-----
Start on the middle square, or the one in the center, whatever you would call it. -
 Step 5
Once you've got the middle/center square taken care of, spread out into the sides connected to it.
I'm not quite sure how to better explain it...so I really hope the picture tells you all you need to know.
-
 Step 6
Here's a fairly important step. If you want your Companion Cube to look right, you're going to have to sew the pieces on each square together...if that makes sense.
The pieces of each square will be close when you sew them on, but not necessarily touching.
What you have to do is sew them together, but don't pull hard or they'll wrinkle.
-
 Step 7
Keep spreading the pieces over the cube. Wait to sew the heart/circle pieces on until you've got the corner pieces in place. If you don't it might end up in the wrong place.
Remember to leave room to sew the squares together later on. No need to make extra work for yourself.
Go on sewing until your squares look exactly like this.
<----Take note that some pieces are still missing. Piece B. I left this off because not all of my part A pieces are the same size, therefore when I go to center the part B pieces, they might not match up when I sow the rest of the cube together.
Okay, sorry if that sounds a little confusing. Just leave those pieces off until you're sewing the squares together. Trust me...it WILL be easier.
-
 Step 8
So once your cube looks like the one in the above picture, you can start sewing the squares together.
Remember as you go along to sew the light gray pieces together.
-
 Step 9
It will get progressively harder to work with the cube as you stitch it up, but just bare with it. I promise it's worth it.
Once you're on your last side, sewing it up that is, leave a hole to stuff it right where the gray squares come together. If you leave the hole right there, it will be significantly easier to hide the seam. I know my seams are always messy when made from the outside.
-
 Step 10
Well, now it's time to stuff your cube. What I did was use the rest of the light gray shirt that I got my pieces from. I snipped it into strips and stuffed them right in. I also saved my little scraps all throughout the project to put in as stuffing.
I recommend using an old shirt to stuff your Companion Cube. It gives it more weight and fills it better.
Once I had it stuffed pretty full with shirt, I used REAL stuffing, like the store bought stuff and padded the inside. I just put a tiny little bit all around the cube...to make it cushy. It really had a good effect. The cube is soft and pliant, like it would be if you just used stuffing, but it's much heavier. The key to it being heavier is that it's a WEIGHTED Companion Cube. Anywho...the stuffing really isn't essential. Use whatever your heart desires.
-
 Step 11
Now it's time to finish up the cube! Once it's stuffed up, you just have to sew the hole shut. First, sow the actual hole shut, not sewing through the light gray pieces on the square. Then, once the hole's gone, sew the light gray pieces together, just like all the others. If you're not good at hiding your closing seam, this completely covers it up. and that's all! Yeah...I know it takes awhile, but it's pretty darn cool...


MY CATS ARE CUTER