
About
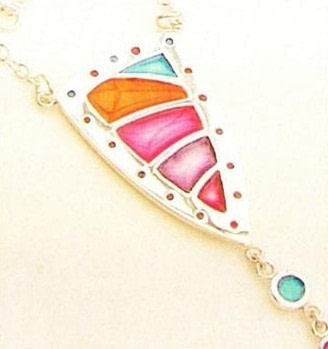
Classic simple lines and clean colours make this summer sunset pendant a must for any occasion
Years ago whilst at Art College a tutor said that he collected ideas in his sketch books, he kept those books through the years and referred to them often. It is a great way to collect ideas and to go back even years later and find designs that you haven’t used yet.
I am using a ‘champleve’ technique to put cold enamel in this pendant. ‘Champleve’ is when ‘roughs are carved out of metal and filled with vitreous enamel. I have cut out areas in silver sheet and soldered it onto a backing of silver to create the troughs. By doing this the resin colours do not mix with each other and will stay vivid and bright.
The pendant should be completely finished and polished before the resin is added as the last stage is unlike traditional enamel resin and can’t withstand heat.
Designer Tips
Solder the piece on a soldering wig so that the heat can circulate and is not soaked away into the soldering block
Thread small items onto a wire before putting into the barrel polisher so they are easy to find
Use Hyfin Stainless Steel Polishing Compound instead of Tripoli Polish as it is less greasy
-
 Alex Z. added Vibrant Sunset Pendant to Интересное
12 May 17:40
Alex Z. added Vibrant Sunset Pendant to Интересное
12 May 17:40
-
 mmotse03 favorited Vibrant Sunset Pendant
23 Jun 09:12
mmotse03 favorited Vibrant Sunset Pendant
23 Jun 09:12
-
rene c. favorited Vibrant Sunset Pendant
31 May 10:59
-
 Pam favorited Vibrant Sunset Pendant
24 May 17:02
Pam favorited Vibrant Sunset Pendant
24 May 17:02
-
 Kate B. published her project Vibrant Sunset Pendant
23 May 09:00
Kate B. published her project Vibrant Sunset Pendant
23 May 09:00
You Will Need
-
 Step 1
Draw up a triangle 24mm wide and 36mm long with curved sides for your pendant and put a border round the edges with a line design in the middle. Then play with different coloured pencils to decide on your palette. Make a tracing of the outside of the design and fold it in half to make sure each half is the same - adjust it if it is not.
-
 Step 2
Anneal a piece of silver sheet which is 28mm x 40mm and 1mm thick. Glue the tracing onto the sheet with glue such as Bostick or Pritt stick. When the glue is dry, cut round the edge with a piercing saw. File and emery paper the edges so that they are smooth.
-
 Step 3
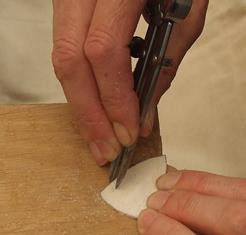
Set a pair of dividers to 4mm wide and then gently score an even border round the silver being careful not to mark too deep. Pencil in the design in the middle and mark where the decorative holes in the border will be. Then decide where to drill holes to cut out the middle design and mark them.
-
 Step 4
Use a centre punch to make guiding holes for drilling so the drill bit will not slip and mark the silver. With a 0.8mm bit drill all the holes in the border and centre design. These holes will be where the saw-blade will go in to pierce out the design. lf the border holes are uneven open them up with the saw blade or a round needle file.
-
 Step 5
Pierce out the centre design. When you come to a corner and cannot turn the saw blade pull it back and work a bigger hole using the blade like a file then it will be easy to turn the corner. Neaten the lines with needle files. Clean the back of the pendant with emery paper to make a good clean surface for soldering.
-
 Step 6
Clean the surface of the second silver sheet. Put it on a soldering wig and coat it in flux. Then melt several pieces of hard silver solder onto the surface. Put the pendant, also coated in flux, onto the sheet. Heat it well and the solder should flow and join the two pieces. Add more solder from the outside edge to make sure there is a really good join.
-
 Step 7
When the pendant has been pickled and washed cut the excess silver sheet away. File and clean the edges of the pendant. Solder two different sized jump rings onto the waste sheet, pickle and wash them. Cut round the jump rings and file the edges. Hammer the jump rings slightly so they are flattened.
-
 Step 8
Solder three small jump rings onto the corners of the pendant. Solder three jump rings of the same size as the others onto the little circles. Pickle, wash, then clean up with files and emery paper. Then put all three pieces in a barrel polisher for an hour or so.
-
 Step 9
Polish the pendant and circles on a polishing motor. The back can be left matt or textured which can be done with emery paper or a tool on a Dremel. Make sure the pendant is completely grease- free. Alternatively the pendant could also be finished with a matt surface which would contrast nicely with the shiny resin. Fix the pendant and the circles to an acrylic block with Blu-Tack.
-
 Step 10
Mix up five different resin colours using transparent orange, blue, pink, violet and red with a touch of white pearl in each to give an opalescent look. The resin must be mixed by weight - 2 parts resin to 1 part hardener. Observe safety rules by wearing barrier cream and do not eat or drink while using resin.
-
 Step 11
Put the resin into the pendant adding drops with a cocktail stick or a pin for the little holes. lf you do spill resin on the silver wipe it away with a piece of kitchen roll immediately. Do not fill up to the top because that is not the effect wanted in this piece. Leave the resin to cure in a warm dust free place preferably overnight.
-
 Step 12
Attach the drops to the pendant with jump rings and decide on the length of chain. Attach the chain with jump rings. The jump rings will not be soldered on. (lf you want them soldered it will have to be done before Step 10 and you would have to be careful balancing the pendant flat to put the resin in). The pendant is now ready to wear.