


About
Moomoo to cute skirt- marvlooooous!
I found this moomoo on one of my thift shop hunts, I loved the stripes sooooo much I had to have it! (Not as a moomoo of course!) I thought I could turn it into a skirt and now- Oh the cuteness!!I am not a seamstress, and am pretty terrible at sewing, but I pulled this off, so I think anyone can!
Tags
-
 MissCindy added Upcycled Moo Moo. to Skirts and Dresses
31 Jan 13:32
MissCindy added Upcycled Moo Moo. to Skirts and Dresses
31 Jan 13:32
-
MissCindy favorited Upcycled Moo Moo.
23 Dec 21:46
-
 Shantelle t. added Upcycled Moo Moo. to how to clothing
23 Oct 17:58
Shantelle t. added Upcycled Moo Moo. to how to clothing
23 Oct 17:58
-
Gena S. favorited Upcycled Moo Moo.
16 Sep 05:19
-
 bemeself favorited Upcycled Moo Moo.
24 Aug 22:59
bemeself favorited Upcycled Moo Moo.
24 Aug 22:59
-
cara b. favorited Upcycled Moo Moo.
01 Aug 21:11
-
 Rosie R. favorited Upcycled Moo Moo.
28 Jun 15:31
Rosie R. favorited Upcycled Moo Moo.
28 Jun 15:31
-
 Afilover47 favorited Upcycled Moo Moo.
15 May 17:04
Afilover47 favorited Upcycled Moo Moo.
15 May 17:04
-
Tessa S. favorited Upcycled Moo Moo.
10 Feb 02:47
-
Kathleen R. added Upcycled Moo Moo. to To-make list
31 Jan 06:36
-
Step 1
Once you have your dress or skirt (Be it a moomoo, vintage maternity, or maybe one that is just too big for you.) you'll need to decided its new length. The length of my green skirt was easy to decide, the moo moo had pockets which I wanted to keep, so I had to work around those. (My waistband ended up about 2 inches above the pockets.) We’re not going to take in any of the waist, we’re instead going to fold in a strip of elastic, letting it gather and do all the work for us. Be sure you leave yourself enough fabric above your desired waistband to do so, before you cut! (How much you leave is going to depend on the width of elastic you use- I decided on 2.5 inches by adding the width of my elastic, plus one inch extra. If you’re using thicker or thinner elastic, you’ll need to adjust.) I used pinking shears to cut along the line I marked with a washable marker. Cutting the top will ensure you will not have to hem the bottom.
(You might notice in my photos my skirt is two different lengths, this is because later I decided I wanted it shorter, and then had to hem anyway!) -
Step 2
Next you'll need to sort out your elastic waistband. Use some measuring tape to measure around where you'll wear your skirt. Cut yourself a length of elastic half an inch longer then this length. You're going to need this extra length to sew your elastic into a circle. Now, there are lots of correct methods you can use to sew in a waistband, but I am going to tell you the one I used. –Quick! Sew your elastic into a circle!
-
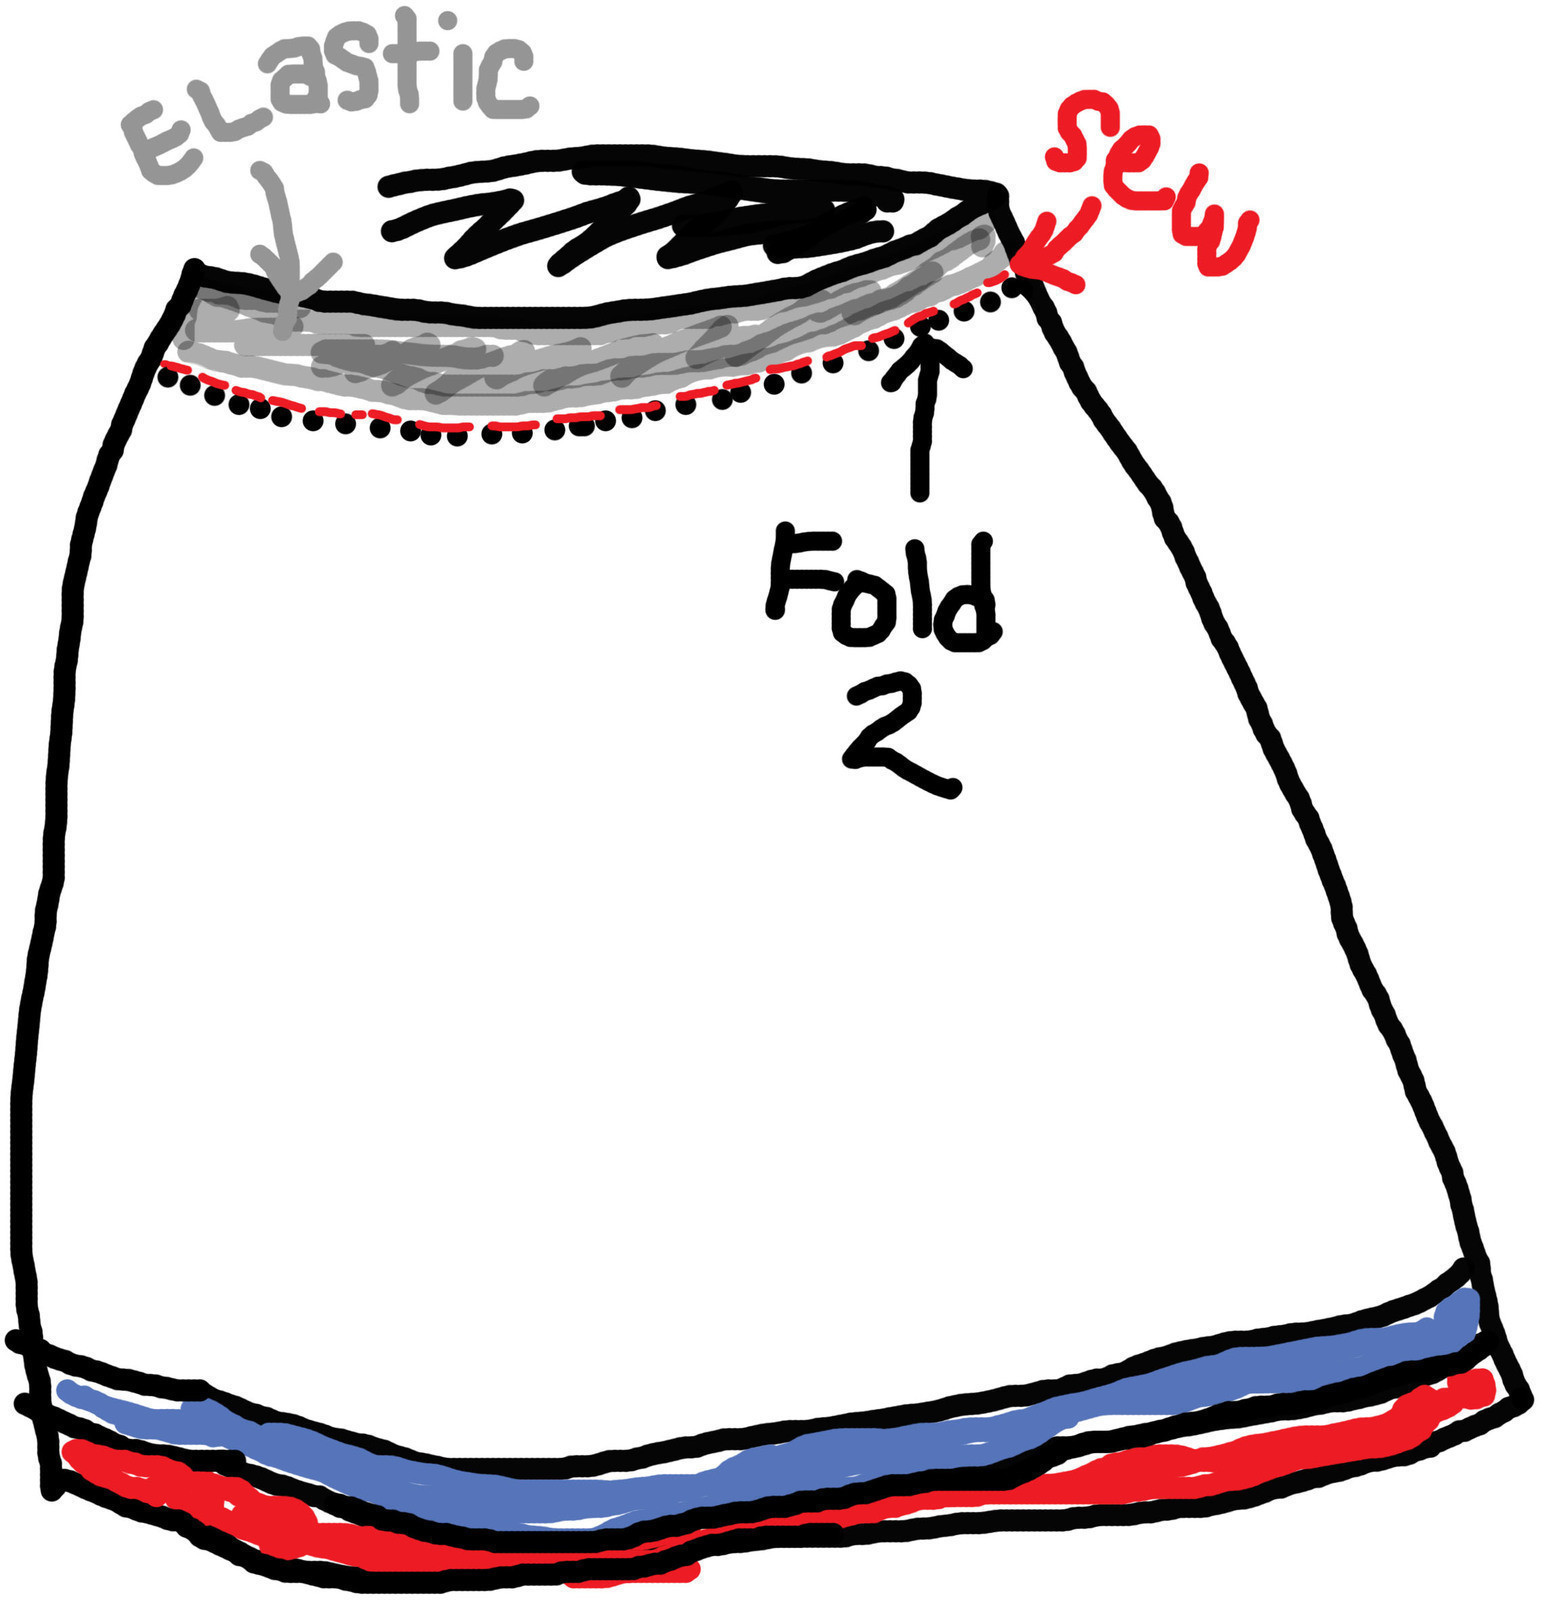
Step 3
Get your iron ready… fold the skirt over, toward the inside, at the top of its future waistband and iron in a crease. (In the picture this is fold 1.) You’ll need this crease to guide the elastic circle. Once you’ve created this crease all the way around, unfold it, and fold over crease 2. (Fold 2 in the pictures.) Fold two is going to ensure there is no raw fabric on the inside of your skirt, if you don’t care about this, you don’t need it. I cared, so I folded it, and made sure that my elastic would just have the tiniest of extra room in its new pocket home. (I guess you could describe it as a tube? We’re gona seal up this elastic in a tube to make the waistband.) *Note-If the fabric is too tight around the width of the elastic it will roll, and you don’t want that. This tiny extra room will make sure it doesn’t.
-
Step 4
Now you should have, a skirt with two creases, which you have folded in, and in again. An elastic circle, and a ton of pins. Push the elastic all the way up into the top crease and pin along the bottom of fold 2. As you’re pinning along fold 2 you’re going to be gathering the fabric a lot, bunching it up, try to do so evenly but don’t worry if it doesn’t look great… as long as you do not sew the elastic to the fabric yet, you’re going to be able to adjust those gathers later. Once you’re pinned, sew along fold 2 with thread that matches your skirt. Sew along fold 2 only, and try not to sew the elastic to the fabric. Use a sewing machine or do it by hand… no matter.
-
Step 5
Once you have sewn all around the skirt and the elastic is in place, you’ll need to smoosh your skirt around it until you’re happy with the distribution of the gathers, and see that any pockets or seams are in the proper place. Then simply add a few small stiches into the elastic and skirt at the cardinal directions to ensure things stay sorted and BOOM! Skirt perfection.
-
Step 6
Enjoy your swirly new skirt!


