


About
Cutie gloves recon'd from an old sweater!
I'm styling some sweet, new, upcycled fingerless gloves this season. I started with a wool blend sweater that was getting a bit drab and destined for the Goodwill bin and went a bit color crazy on it. Whatcha think? Want to know how I did it? Well, get ready cause this tutorial is a whopper!
Tags
-
 mary.stuerke.7 added Upcycled Fingerless Gloves, Valentine Style to Accessories
24 Jan 19:46
mary.stuerke.7 added Upcycled Fingerless Gloves, Valentine Style to Accessories
24 Jan 19:46
-
mary.stuerke.7 favorited Upcycled Fingerless Gloves, Valentine Style
24 Jan 19:46
-
 Kelly K. favorited Upcycled Fingerless Gloves, Valentine Style
26 Sep 09:34
Kelly K. favorited Upcycled Fingerless Gloves, Valentine Style
26 Sep 09:34
-
 Pulchra Luna favorited Upcycled Fingerless Gloves, Valentine Style
04 Jan 05:08
Pulchra Luna favorited Upcycled Fingerless Gloves, Valentine Style
04 Jan 05:08
-
 Step 1
1--Before dyeing the sweater, soak it in warm water for a few minutes. This helps the fibers to absorb the dye easily and evenly.
2--Next up, cover the work surface, grab some rubber gloves and shake up the dye. I mixed ½ cup of Rit Tangerine dye with 2 gallons of very hot 140˚ water in a big plastic container. Make sure to mix well. If you tap water is not quite hot enough, just heat some in a tea kettle or microwave.
3--Gently squeeze out the excess water from your sweater and immerse in the hot dye bath. The sweater should be fully submersed in the dye and with enough room for the fabric to flow freely as you gently stir. We're going for some nice even color here. After 5 minutes in the dye bath, add ½ cup of white vinegar. This helps to achieve a darker color for wool fiber. The length of time in the dye depends on how deep a color is desired. This sweater took a total of 15 minutes in the dye bath. Remember that it will look darker when wet so keep that in mind when determining your color.
4--When you like the color tone, remove the sweater from the dye and rinse in cool water until the water runs clear. Then wash in mild detergent with warm water and lie flat to dry to keep the shape.
-
 Step 2
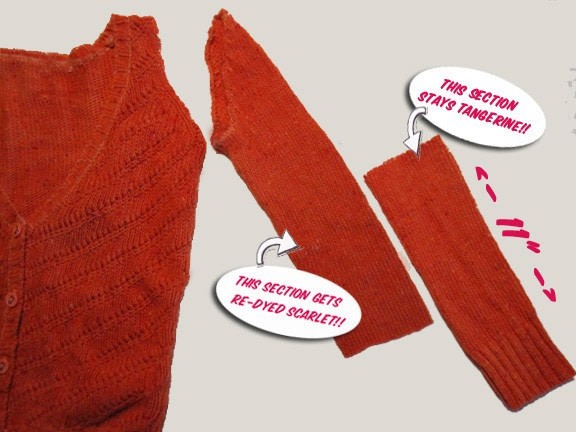
5--OK, time to start the deconstruction! Carefully snip out the shoulder seam stitches to release the sleeves from the rest of the sweater.
(Stay tuned for a fun vest project I have in mind for the body of the sweater but for now, it's all about the sleeves.)6--Now basically, the sleeves become the gloves and you can make it any way you wish but here's how I made mine.
7--I cut a tube section 11" long from the cuff. This makes the "finger end" of the gloves.
-
 Step 3
8--The remaining, cut-off, shoulder end of the sleeve now gets re-dyed a lovely shade of Scarlet. Here's the recipe:
Mix 1/4 cup of Rit Scarlet dye with 1 gallon of that very hot water in your plastic container. Again, mix well. Immerse these two shoulder-end sleeve portions in the dye bath. After 5 minutes, add ¼ cup of white vinegar and continue to gently stir for an additional 5 minutes or until your desired color is achieved. Repeat the rinse and wash instructions like above.9--When dry, I cut two 6" tubes from these red sections.
-
Step 4
10--Slide the red tube over the orange tube, purl sides together, line up the raw edges and pin. I used a zigzag stitch on my machine to sew this seam. I then turned it out to the right side. I decided to use the purl side for the outside but you can decide that for yourself.
11--The top end of the red section was still unfinished so I gave it a quick once around the edge with a zigzag stitch to keep it from unraveling. Then I crochet'd two rows around with a smoky, light blue crewel yarn to create a slightly lettucey edge.
-
 Step 5
12--For the thumb hole, I carefully opened a 1½" hole in the side seam starting 1" from the cuff end of the tangerine portion. To make sure this opening didn't continue to open, I did an easy blanket stitch that went around the thumb hole. It was such a nice accent that I continued the blanket stitch the full length of the side seam as well.
-
 Step 6
Now basically, the gloves are done structurally but the fun part is adding all the extras that make it really unique.
13--Since it was V-day coming up, I was into hearts galore! From the scrap of scarlet wool, I cut out 2" heart appliques. I stitched them on with the blanket stitch again cause it cleans up the edges. Using the same blue crewel yarn, I added a few simple stitches and french knots just for fun.
-
 Step 7
☜ Cute detail, huh?
14--And if you're up for a real nifty trick, check out those shimmery, baby-orange, pearl beads I sewed around the heart. Wanna know where I got perfectly matched beads for my new gloves?
-
 Step 8
15--Well, I scooped a wee bit of the hot Tangerine dye from the original bath and just dropped a few white pearl beads in for a minute or two. Rinse them off in a little strainer and Voila... it's an insta-accent!
Whew, that is one massively wordy tutorial! Hope you could follow it. Give a shout if you have any questions.


Versions

Comments


