

About
Time to organize
Recently I've had a great kid's party at home. It was lots of fun and lot's of toys were left on floor after the party..... I do have some bins to organize the toys but sometimes the needed toy (usually the smallest) is on a very bottom, well you've got the rest of the picture......:)
Well, today I found an old container for dog food. It is in a good shape - why not to use it?!
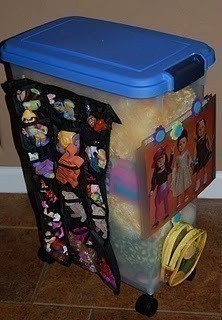
OK Here we go. The total length of the project is 5 minutes (assuming you have everything you need). You'll need any container on wheels. Some old jewelry organizers, any plastic packaging form bed sheets or toys will work just fine. Velcro strips. Cute picture to decorate, plastic sleeve to keep the picture in (that's optional). Any decor elements of your choice and that's it!
Tags
-
 laurie b. favorited Toy Organizer
01 Oct 18:03
laurie b. favorited Toy Organizer
01 Oct 18:03
-
 Rainbow Wyvern favorited Toy Organizer
03 Feb 18:56
Rainbow Wyvern favorited Toy Organizer
03 Feb 18:56
-
 Step 1
Wash your container and air dry - make sure it's clean and doesn't have any smells
-
 Step 2
Get your jewelry organizers ready.
-
 Step 3
In my case, I've folded the tops and glue them down using hot glue gun.
-
 Step 4
Attach self adhesive Velcro Strips: soft part to the hanging portion and stiff part to the container. Your child can remove each side according to what she wants to play with:)
-
 Step 5
Attach your decorative picture in a plastic sleeve (to cover the original Pet food Container Picture, that I couldn't remove) to decorate. Embellish it as you like. I also added small pocket bellow the picture - there is never enough storage with kids:)
-
 Step 6
You are done!
My daughter had so much fun sorting her favorite little toys in little pockets and now they are at her finger tips. She is so proud of herself:)
I hope this tutorial was helpful!
Talk to you soon.


