


About
Cute little tote bags you'll Love to make!
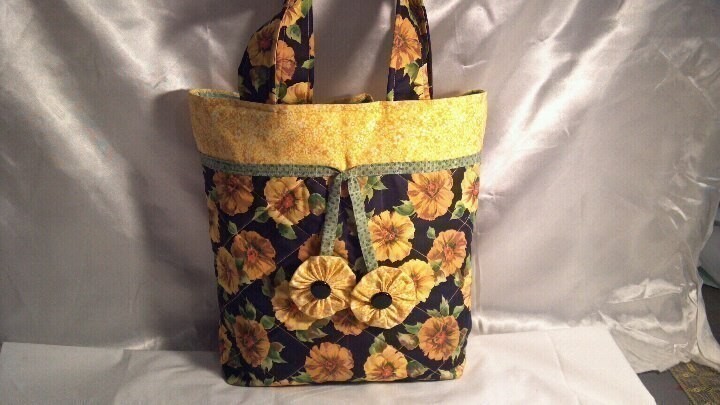
This is a tote bag I found free on Pinterest from Joannes fabrics called "Zest tote bag"... I have made them and sold them, and people love them! It's not a hard bag to make, and its actually very fun to make! Enjoy!
Tags
-
 Joanne B. favorited Tote Bags
29 May 18:57
Joanne B. favorited Tote Bags
29 May 18:57
-
 Key West Witch favorited Tote Bags
12 Sep 08:21
Key West Witch favorited Tote Bags
12 Sep 08:21
-
Rebecca M. favorited Tote Bags
20 Jun 02:34
-
 forbunnie favorited Tote Bags
10 Mar 14:13
forbunnie favorited Tote Bags
10 Mar 14:13
-
Caron K. added Tote Bags to Bags & Purses
23 Dec 08:28
-
 Pimke added Tote Bags to Nähmuster
02 Feb 13:28
Pimke added Tote Bags to Nähmuster
02 Feb 13:28
-
 Lee S. favorited Tote Bags
01 Aug 00:12
Lee S. favorited Tote Bags
01 Aug 00:12
-
 jennifer favorited Tote Bags
12 Aug 19:42
jennifer favorited Tote Bags
12 Aug 19:42
-
Joy C. favorited Tote Bags
01 Aug 03:34
You Will Need
-
Step 1
Supplies and Tools
1/2 yd Fabric A (for handles & tote)
1/4 yd Fabric B (for bands and flowers)
1/2 yd Fabric C (for lining and tie)
Thread
30x20 lightweight quilt batting
sewing machine
Iron
Pinking shears
Ruler
Water-soluble pen
Optional: Rotary cutter, ruler and mat -
Step 2
Cutting Directions:
1. From fabric A cut two 15x12 3/4" = front and back, two 18x4" = handles
2. From fabric B cut two 15x5 3/4" = front and back band.
3. From fabric B (I made two Yo-Yo's) and attached a button in the center.
4. From fabric C cut two 15x15" = lining, one 40x1 1/2" = tie
5. From quilt batting cut two 15x15" = front and back, 18x2" = handles -
Step 3
ASSEMBLY:
Note: Stitch all seams with right sides together.
1. Stich a front and back band to the top edge of the front and back using 1/4" seam allowance. Press seam open.
2. Beginning 1 3/8" from the center of seam, draw diagonal quilting lines 2" apart on front and back with a water-soluble pen.
3. Place batting between these joined pieces and the lining pieces with the sides and lower edges even. The top band will extend 3" above batting and lining. Pin along the outer edges and along the seam line and quilting lines.
4. Stitch in the ditch along the seam line. Quilt along the drawn lines. Baste 3/8" from sides and lower edges.
5. Pin front and back with right side together. Stitch 1/2" from sides and lower edge. Zigzag finish seam allowance below band.
6. Fold band to the inside over top edge of quilt batting and lining. Turn under 1/2" along stitching line and stitch.
7. Fold corners diagonally matching side seam to bottom seam. Draw line 1 3/4" up from corner. Line should measure 3 1/2" across. Stitch along line to miter corner.
8. Fold tie in half lengthwise. Stitch 1/4" from long edges. Trim seam allowance and turn right side out. Press tie flat with seamline along 1 long edge.
9. Match center of tie to center of lower edge of the band. Pin tie in place along the lower edge of the band. Make knot in center of other side. Stitch the tie along the edges.
10. Place quilt batting on 1/2 of the wrong side of the handle pieces. Baste along inner edge of batting and 3/8" from outer edge. Trim stitching along side edge.
11. Fold the handle in half right sides together and stitch 1/2" from raw edges. Turn right side out and press lightly so seam is along one side edge. Topstitch 1/8" from long edges.
12. Place the ends of the handles just below the lower edge of the band so that they are each about 2 1/4" from the center. Pin in place from outside of the bag. From the outside stitch the handle in place along the lower edge of the tie. Topstitch 1/8" from the fold at the top of the band stitching throught the handles.
13. Sew the two Yo-Yo's to each tie end.
