


About
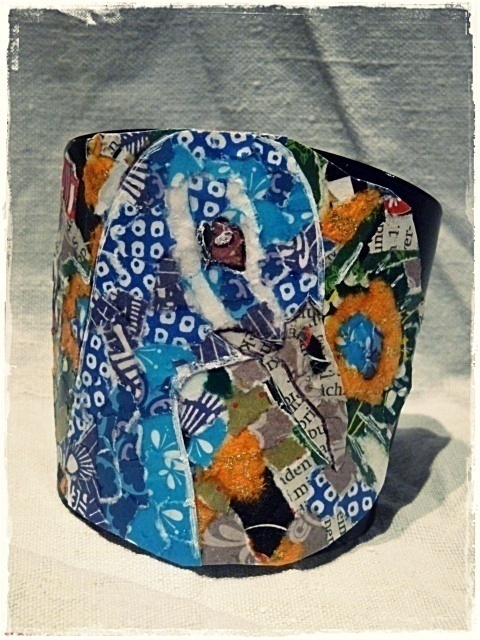
This is the 2nd part of the tutorial and mainly about how I have put the peacock on the cuff, the first part is about how I made the cuffs.
At the moment Recycling Craft is a perfect way for myself to try other techniques. Here I combined a Vinyl Record Cuff together with my favourite Torn Paper Technique.
And yes ... again a cute Peacock ... cause I totally love peacocks.
Tags
-
 ladonnagaga favorited Torn Paper Vinyl Record Cuff Part 2
21 Mar 16:34
ladonnagaga favorited Torn Paper Vinyl Record Cuff Part 2
21 Mar 16:34
-
 Susi S. added Torn Paper Vinyl Record Cuff Part 2 to VHS
01 Oct 17:16
Susi S. added Torn Paper Vinyl Record Cuff Part 2 to VHS
01 Oct 17:16
-
 Whimsical Peacock added Torn Paper Vinyl Record Cuff Part 2 to fun iDEas
29 Jun 03:46
Whimsical Peacock added Torn Paper Vinyl Record Cuff Part 2 to fun iDEas
29 Jun 03:46
-
 Nikki G. favorited Torn Paper Vinyl Record Cuff Part 2
27 Dec 19:28
Nikki G. favorited Torn Paper Vinyl Record Cuff Part 2
27 Dec 19:28
-
 elahluna favorited Torn Paper Vinyl Record Cuff Part 2
14 Dec 12:11
elahluna favorited Torn Paper Vinyl Record Cuff Part 2
14 Dec 12:11
-
 Syeyon K. commented on Torn Paper Vinyl Record Cuff Part 2
19 Nov 05:04
Syeyon K. commented on Torn Paper Vinyl Record Cuff Part 2
19 Nov 05:04
You Will Need
-
 Step 1
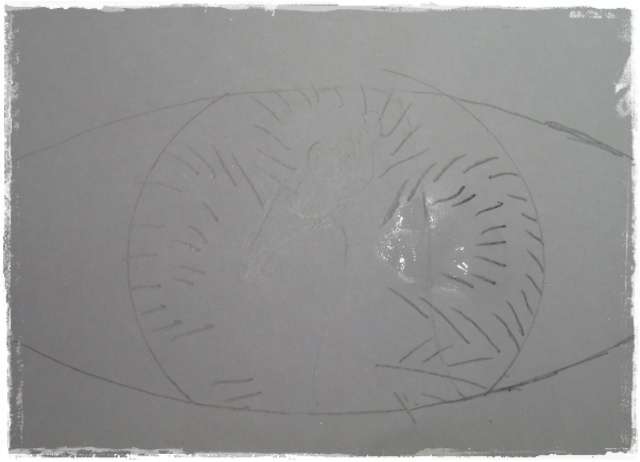
Also on this part you start first with the template you used for the cuff and just draw a sketch of what you want to have on the cuff at the end.
-
 Step 2
Now you start with your tons of torned papers.
I normally use this box to collect the different pieces and here you also can see the glue I normally use.
I use a huge "Flinke Flasche" cause I always need so many glue that small bottles aren't that useful.
-
 Step 3
Now you put some glue on the part you want to start with. I prefer starting with the beak and then move backwards.
-
 Step 4
I think you can see that I really love to combine colors.
Also I don't use any reference pictures ... I just set the colors where I want to set them.
-
 Step 5
When you are done it looks like this and now you need to wait until the glue is try.
-
 Step 6
While I am waiting I have sketched the backpart I am gonna glue the peacock at the end.
-
 Step 7
And yes there are more colors than before, but I think the combination of these colors fit at the end.
-
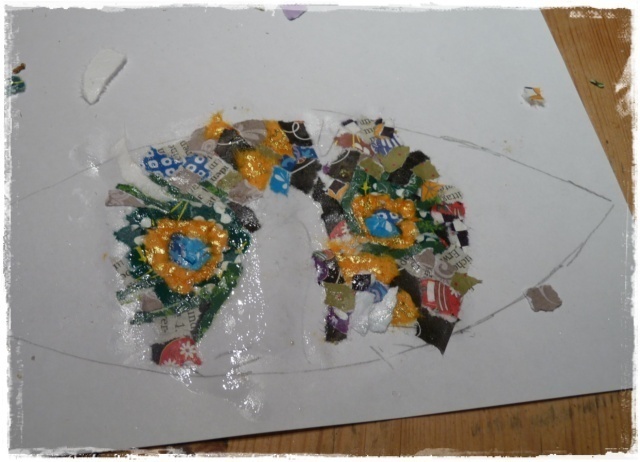
 Step 8
When the first part dried a bit you are able to cut the peacock out of the piece.
-
 Step 9
Here you can see the back of the peacock and the finished back part.
-
 Step 10
Now you press the peacock on the back part and than cut the back part and ... wait.
-
 Step 11
This step is optional, cause there is no need to do it, but I always prefer to set some highlights on the piece using some markers.
-
 Step 12
Here you can see the cuff and the peacock piece.
-
 Step 13
Now you put the peacock piece on the table and put lots of glue on the back part
Now you press the cuff on it and just press the parts to the cuff.
If you want you can put at the end also some varnish on the cuff ...


Comments


