


About
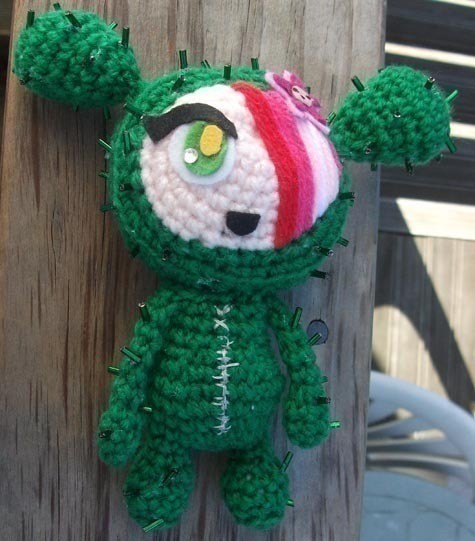
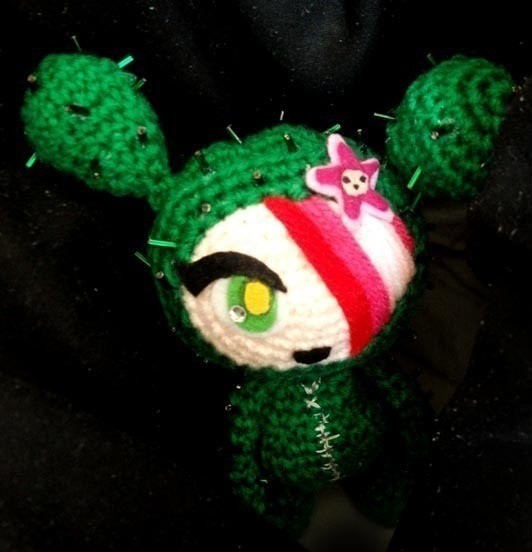
A cute little amigurumi of a cute little Cactus Girl
This is my first pattern on CO&K, and my first amigurumi pattern so I hope I do this right!
I have no idea how long it took me to make or cost-wise as I had all the bits needed already except the bugle beads, and it took ages to make up the pattern. 3 hours is a guess :D
SANDy and the Cactus friends are copyright of tokidoki and Simone Legno.
Pattern is currently untested, feel free to contact if there are any problems.
Tags
-
 Galaxie A. favorited Tokidoki Sandy Amigurumi
29 Dec 02:54
Galaxie A. favorited Tokidoki Sandy Amigurumi
29 Dec 02:54
-
 ZombieUnicorn favorited Tokidoki Sandy Amigurumi
14 Jan 22:51
ZombieUnicorn favorited Tokidoki Sandy Amigurumi
14 Jan 22:51
-
 TwinkleTime favorited Tokidoki Sandy Amigurumi
22 Oct 15:25
TwinkleTime favorited Tokidoki Sandy Amigurumi
22 Oct 15:25
-
 Lydia H. favorited Tokidoki Sandy Amigurumi
29 Aug 07:17
Lydia H. favorited Tokidoki Sandy Amigurumi
29 Aug 07:17
-
 bethany.tsubaki favorited Tokidoki Sandy Amigurumi
17 Jun 20:04
bethany.tsubaki favorited Tokidoki Sandy Amigurumi
17 Jun 20:04
-
 Chudames added Tokidoki Sandy Amigurumi to Crochet
05 Feb 19:58
Chudames added Tokidoki Sandy Amigurumi to Crochet
05 Feb 19:58
-
Chudames favorited Tokidoki Sandy Amigurumi
05 Feb 19:57
-
 Marakyo added Tokidoki Sandy Amigurumi to To Do
02 Feb 13:57
Marakyo added Tokidoki Sandy Amigurumi to To Do
02 Feb 13:57
-
Marakyo favorited Tokidoki Sandy Amigurumi
02 Feb 13:57
-
 Gabrielle H. favorited Tokidoki Sandy Amigurumi
27 Oct 10:47
Gabrielle H. favorited Tokidoki Sandy Amigurumi
27 Oct 10:47
You Will Need
-
 Step 1
Cheat Sheet
Ch – Chain
Sc – single crochet
St – stitch
SlSt – Slip stitch
FO – Finish off
YO – Yarn Over
BLO – Back Loops Only – crochet into the back loops of stitch
2sc in 1 – increase by putting 2 single crochet (or whatever number is written) in one stitch
Dec – decrease by putting hook into front loop of two stitches to be brought together, yarn over and bring through all 3 loops on hook. Also known as an “invisible decrease.”
ML3 - Magic Loop plus starting number of stitches. If you don’t know how to do a Magic Loop, I suggest you Google/ YouTube it. -
Step 2
Ears (Make 2)
In Green
ML5 (5)
R1: *2sc in1* repeat around (10)
R2: *2sc in1* repeat around (20)
R3-4: sc around (20)
R5: *sc2, dec* repeat around (15)
R6: *sc3, dec* repeat around (12)
R7: sc around (12) Stuff.
R8: *sc2, dec* repeat around (9)
R9: *sc, dec* repeat around (6)FO, leave long tail for sewing.
-
Step 3
Face (Make 1)
Before you begin, take green yarn and cut off a generous length for sewing with later. (I used 60cm, and had plenty left over. You could probably get away with 30cm.) Put aside.
Flesh: Ch4 (4)
R1: Sc into the 2nd ch from the hook, and into next st across. When you reach the end of the ch, make 3 sc into the last st. Turn your work 180 degrees and sc into the other side of the foundation chain. Sc 2, 3sc in1 (10)
R2: sc 3, 3sc in1, sc4, 3sc in1, sc (15)
R3: sc3, 3sc in1, sc2, 3sc in1, sc3, 3sc in1, sc2, 3sc in1 (22)
R4: sc4, 2sc in1, sc4, 2sc in1, sc5, 2sc in1, sc4, 2sc in1, sc (26)
R5: sc6, 2sc in1 twice, sc11, 2sc in1 twice, sc5 (30)
R6: sc around. Slst to first st of R5 round to create smooth oval. Switch to green.
R7: Start in next stitch (not one you slst into), sc4, 3sc in1, sc4, 3sc in1, sc9, 3sc in1, sc4, 3sc in1, sc5 (38)
R8: *2sc in1, sc3* repeat around (for final repeat, you'll only be able to fit the increase and 1 sc instead of the full 3sc) (48)
R9: BLO sc around. (48)
R10: sc round (48)
R11: *sc4, dec* repeat around. (40) -
 Step 4
This next step is easier to do now before you stuff, as you can access the back of the face very easily. Either pull hook with loop on it upwards to make large loop (this will prevent it slipping) or put a safety pin through it.
Grab you pieces of red yarn, and tie a big knot at end. Thread onto wool needle, and insert into edge of face, from back to front, 3/4 of way along top edge near left corner. Put needle down through bottom edge of face near bottom right corner. Look at a reference picture to see exactly where. Bring needle back up, and do second strand of red hair (you may need to knot yarn at back of first stand to stop it coming back up with needle) Repeat for third strand. Tie off and cut excess.
Using same method, repeat in dark pink, light pink, white, light pink again and finally dark pink. Try to fill in the space as evenly as possible, but if needed, put more strands in to fill up space and not show skin underneath.
Taking green yarn you put aside earlier, back stitch around face (where green meets flesh) to define the difference a bit better. Once all yarns are tied off, pick up crocheting again.
R12: *sc8, dec* repeat around (36)
R13: *sc4, dec* repeat around (30)
R14: *sc3, dec* repeat around (24)
R15: *sc4, dec* repeat around (20) Stuff head, but not tightly. Keep the front flattish, while rounding out the back.
R16: *sc1, dec * repeat around (14)
R17: dec around (7)FO, leave long tail for sewing. Stuff head more if required, sew opening closed, with tail. Sew in loose end.
-
Step 5
Arms (Make two)
In Green
ML4 (4)
R1: 2sc in1, sc3 (5)
R2: 2sc in1, sc4 (6)
R3: sc around (6) Place tiny amount of stuffing in arm end if desired.
R4: sc2, dec, sc2 (5)
R5 – 6: sc around (5)
R7: sc3, dec (4)
R8-9: sc around (4)FO, leave long tail for sewing.
-
Step 6
Legs (Make two)
In Green
ML4 (4)
R1: *2sc in1* repeat around (8)
R2: BLO sc around (8)
R3 - 5: sc around (8)
R6: *sc2, dec* repeat around (6)
R7: sc around (6)FO, don’t leave tail. Stuff lightly.
-
Step 7
Body (Make one)
In Green
Ch3
R1: Sc into the 2nd ch from the hook, 3sc into last st. Turn your work 180 degrees and sc into the other side of the foundation chain, 2sc in1 next st, sc in last st. (8)R2: 2sc in1 twice, *insert hook in next st of body, insert hook into next st of leg, yo, draw through leg st and body st, yo and draw through both loops. 1sc has been made.* Continue on st of leg, sc4, repeat ** on final leg st. 2sc in1 twice, repeat ** attaching second leg this time, sc4, repeat **. (20)
R3: sc around (20)
R4: *2sc in1, sc*twice, 6sc, repeat ** twice, 6sc (24)
R5: *2sc in1, sc* three times, 6sc, repeat ** three times, 6sc (30)
R6: sc around (30)
R7: *sc3, dec* repeat around (24)
R8: *sc2, dec* repeat around (18)
R9: *sc4, dec* repeat around (15)
R10-11: sc around (15)FO, leave long tail for sewing. Stuff.
-
 Step 8
Putting SANDy together
Sew arms to top of body. Sew ears to head. Sew head to body.
Looking at reference pictures helps now with the next steps. I sort of just winged it a bit.
For eye, cut circle out of white felt, an oval of green felt and a smaller oval out of yellow. Glue one of top of other, keeping them aligned more towards the right (you can also sew them if desired, but I chose to glue.) If so desired, add a small crystal to left inner of green part of eye for ‘sparkle’ effect.
Using black felt, cut out her mouth (a small half circle) and her eyelash (basically a curved line with a small triangle at end.) Glue along top of eye, then glue whole eye to face, taking note of placement on references. Glue on mouth. If desired, add small amount of blush to cheek.
Using dark pink felt, cut out a small star. Trace onto light pink felt, and cut out about 2mm away from line. Glue together. Cut out a small circle in flesh, and using fine tip marker, draw two dots for eyes, and a small triangle for a mouth. Stick on top of star. Glue to head.
-
 Step 9
For the zip, take light grey embroidery thread, backstitch along middle of body; start at the bottom and stop around ¾ way up. To make the teeth of the zip, stitch small lines along one side of line, turn and stitch up other side (I highly recommend drawing out the zip with chalk first. I didn’t and it shows very clearly on mine.) At top, stitch a small x (for crossbones) and a small v (for the heart.)
-
 Step 10
Now for the spikes. Empty your bugle beads into a small dish. On some scrap card, squeeze out a small blob of craft glue. Take one bead, dip the end slightly into the glue, and glue the bead (standing upright) onto leg of doll (it helps if the beads are placed into the ‘hole’ created by stitches; it gives more yarn for the bead and glue to grab onto.) Continue putting beads onto legs (about 2-3 on each,) arms (about 5 on each) and up around front of front and ears. Just work on the front side for now. Once completed, leave to dry, then turn upside down and use remaining beads on back of ears and head.
Admire your creation!!!!
-
Step 11
SANDy and the Cactus friends are copyright of tokidoki and Simone Legno.
This pattern is an original pattern by Amie (April 2012). Please do not claim this pattern as your own. If you wish to share this pattern, you may link to this pattern but please do not reprint it on your site. You may print and keep a copy for your own personal use but you may not reprint, sell or distribute the pattern; or sell items made from this pattern.


Comments


