


About
For a more sedate and colour-coordinated look.
I love tie dyed fabrics, but when it comes to choosing colours for curtains or decorative pillows I'm sadly conservative. I tend to go with two or three colours, fairly different from the riot usually seen in classic tie dye. What's a girl to do when she wants the patterns but not the colour scheme? Well; tie and dye, of course!
This is a test I did, just to try it out. The fabric is pieces left over from knight costumes for the kids, the dye is a green shade I'd bought on clearance months before.
Tags
-
 Sarah Sylvia S. favorited Tie Dye In The Washing Machine
20 Jul 17:51
Sarah Sylvia S. favorited Tie Dye In The Washing Machine
20 Jul 17:51
-
 Pimke added Tie Dye In The Washing Machine to Upcycling
03 Mar 12:20
Pimke added Tie Dye In The Washing Machine to Upcycling
03 Mar 12:20
-
 amanda.bailey25 added Tie Dye In The Washing Machine to Fabrics/Re vamp
18 Jun 23:47
amanda.bailey25 added Tie Dye In The Washing Machine to Fabrics/Re vamp
18 Jun 23:47
-
amanda.bailey25 commented on Tie Dye In The Washing Machine
18 Jun 23:46
-
 Maemi.Gojo added Tie Dye In The Washing Machine to Clothing
03 Jun 17:06
Maemi.Gojo added Tie Dye In The Washing Machine to Clothing
03 Jun 17:06
-
 Stitches favorited Tie Dye In The Washing Machine
30 Apr 01:13
Stitches favorited Tie Dye In The Washing Machine
30 Apr 01:13
-
 Hester A. favorited Tie Dye In The Washing Machine
28 Apr 23:16
Hester A. favorited Tie Dye In The Washing Machine
28 Apr 23:16
-
 piefacetoldmeso favorited Tie Dye In The Washing Machine
28 Apr 18:18
piefacetoldmeso favorited Tie Dye In The Washing Machine
28 Apr 18:18
-
piefacetoldmeso commented on Tie Dye In The Washing Machine
28 Apr 18:18
-
 Ravens Trove added Tie Dye In The Washing Machine to Clothes
28 Apr 14:28
Ravens Trove added Tie Dye In The Washing Machine to Clothes
28 Apr 14:28
-
Step 1
Buy fabric and dye. What to choose depends entirely on the result you want; do you want matching pillows for your sofa or are you dyeing fabric for a skirt?
Fabrics made of synthetic fibre are difficult (or even impossible) to dye at home. Linen or cotton are easiest, they can withstand high temperatures and absorb the dye well.
Buy more fabric than you need, some areas of the fabric will look better than others when dyed and it's difficult to keep a consistent pattern all the way to the edges.
Almost all new fabrics are treated to protect them from becoming dirty from handling and shipping. This protective coat needs to come off, otherwise you're likely to get a bad and spotty result from dyeing. Wash the fabric as hot as possible before dyeing it. Instructions for washing and caring for the fabric should be provided by the store.
In Sweden, fabric dye is available at most supermarkets, if you don't know where to find it locally, ask in the fabric store. The dye and the fabric need to match - that is, if you have a dye that needs a hot wash to work properly the fabric can't be the kind to only withstand a cool wash.
-
 Step 2
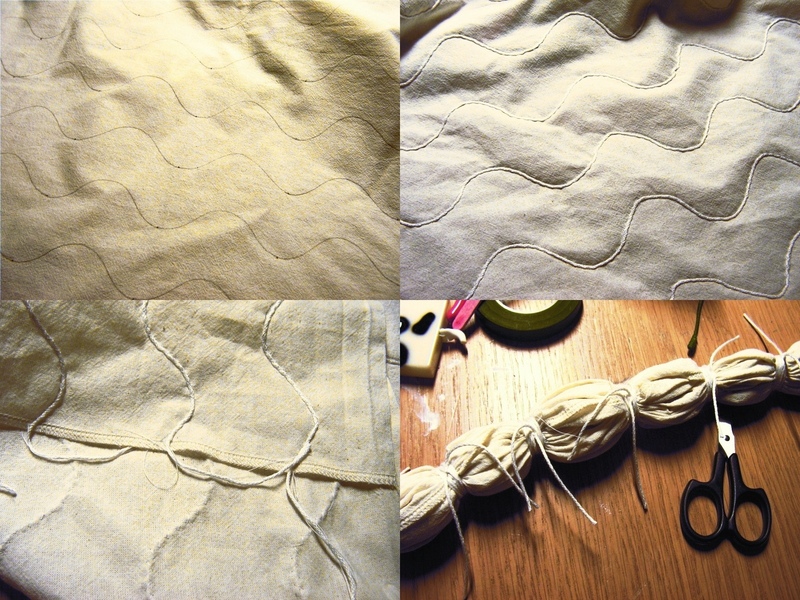
You need to pick a pattern. Since I had no idea what the finished result would be (or indeed what result I wanted) I cut my fabric in six pieces and designed six very simple pattens.
Basically, you need to cover the areas you want to remain undyed by gathering the fabric and wrapping it tightly with string or strong thread. This is where you can be as wild or as structured as you want. I measured and drew curves, lines and dots with a pencil, then sewed a zigzag seam over a strong thread. This helped me get a consistent pattern. If you want, simply gather your fabric and tie the string in random places, I wanted some order :)
-
 Step 3
This is basically what I did, step by step. I measured and drew lines, sewed along those lines with a zigzag stitch over a heavy thread (easier if you have a presser foot with a 'tunnel' on the bottom, sometimes they come with the machine), gathered the fabric by pulling on the thread then tied the ends of the thread together. The thread needs to be strong, otherwise it'll break when you pull it.
To make the undyed line wider, wrap a string tightly around it when all the threads are gathered. -
 Step 4
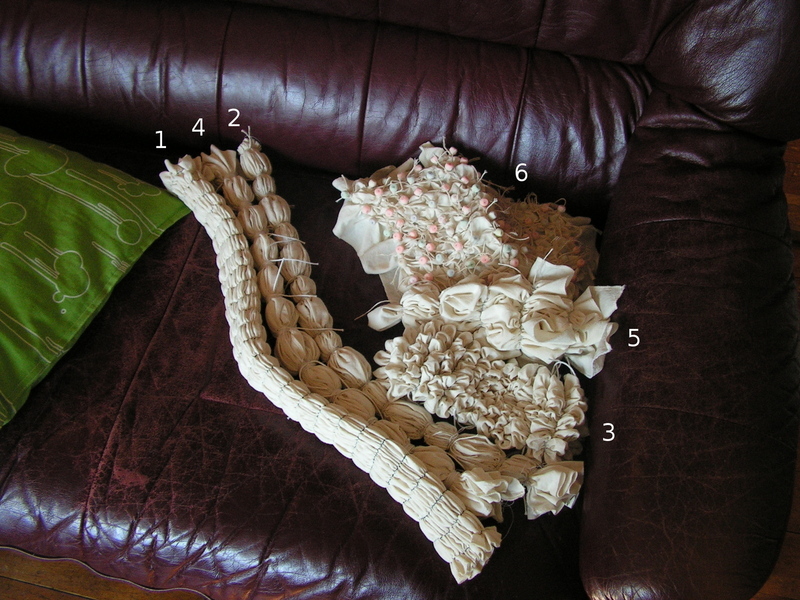
Beads are great for tie dye. A larger bead for a larger circle. If you cover the fabric-covered bead in plastic before dyeing, the circle will remain undyed.
Check that the bead itself won't dye your fabric. Natural wooden beads are safe. -
 Step 5
All my tie dye experiments, before dyeing :) Some I've wrapped with string, some I've simply gathered and then tied off the thread.
Now, to the washing machine. The instructions on the package will tell you how to do it; should the fabric be wet before you put it in the machine? How heavy is your fabric - will one pack be enough to give you the desired shade?
When the washing cycle is finished I always run a second program, just to be sure all the exess dye is gone.
After removing the finished product from the machine I also clean my machine out thoroughly. Using a dish brush and plenty of hot water, I go over every area I can reach. I also clean the filter. Not doing this means you risk dyeing something by accident in the future.
-
 Step 6
Now to the reveal. Untie the string, untack the seams, remove the beads, then hang the fabric to dry.
I realized when I was removing the seams from the fabric that polyester thread is a must for the zigzag seams. Cotton thread would have been to weak to pull out without breaking when wet.
I quite like the result. I'll probably try beads of different sizes next and cover some with plastic. I also want to cover more of the fabric, dye, remove the string and add more in other places then dye again, in a different colour.


Comments


