


About
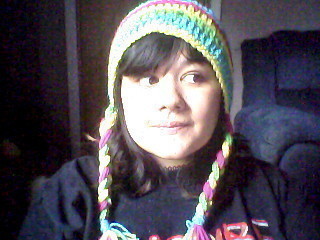
A warm, cute hat with braids.
This pattern is written, assuming you know how to do basic croceht stitches, such as chain (ch), double crochet (dc), double crochet back loop only (dc BLO).
The ch doesn't count as first stitch.
Tags
-
 Galaxie A. favorited The Twiggy Hat
29 Dec 01:52
Galaxie A. favorited The Twiggy Hat
29 Dec 01:52
-
 srslyjc favorited The Twiggy Hat
26 Mar 17:15
srslyjc favorited The Twiggy Hat
26 Mar 17:15
-
 Maemi.Gojo added The Twiggy Hat to Grandma Sports
02 Jun 08:41
Maemi.Gojo added The Twiggy Hat to Grandma Sports
02 Jun 08:41
-
 joanne.mccreath favorited The Twiggy Hat
18 Dec 20:21
joanne.mccreath favorited The Twiggy Hat
18 Dec 20:21
You Will Need
-
 Step 1
With Color A (I used yellow), ch 3 or magic circle.
Rnd 1: 10 dc in the first ch, join with sl st to first dc. (10dc) ch 2,
-
Step 2
Round 2: 2 dc in each dc around, join with sl st to first dc. (20dc) ch 2
Round 3: (1 dc in next st, 2 dc in next st) around, join with sl st to first dc. (30dc) ch 2
Round 4: (1 dc in next 2 st, 2 dc in next st) around, join with sl st to first dc. (40dc) ch 2
Round 5: (1 dc in next 3 st, 2 dc in next st) around, join with sl st to first dc. (50dc) ch 2
Round 6: (1 dc in next 4 st, 2 dc in next st) around, join with sl st to first dc. (60dc) ch 2
Round 7: 1 dc in each st around, sl st to first dc. Color change to color B (60dc)
-
 Step 3
Round 8-11: 1 dc (BLO) in each st around, sl st to first dc, changing color for each row.
-
 Step 4
Round 12: sc in 27 st, ch 3, sk 2 st, sc in 3rd st, and for 26 st, ch 3, sk 2 st, sc in 3rd st, and for any remaining st you might have (if you added more st to make hat larger.) FO.
-
Step 5
Measure out and cut 8 strands of color B, C, and D that are twice the size that you want your braids to be. (4 for each side of each color.)
Total strands you should have: 24
Make sure they are all the same size, or very close.
-
 Step 6
Attach the strands 2 at a time, keep the colors close to each other.
You should have 4 strands of color b next to each other, 4 strands of color c together, and 4 of D together, on each side in the ch 3 space.
Then braid them together, and when done, wrap a piece of yarn around the bottoms to tie it off and secure it. Then trim the ends to even off.
-
Step 7
Done! :) You've just completed the Twiggy Hat! This fits most teens and adults. For small children sizes, keep an eye out for my WIP, the "Salem Hat" Salem is my 3 year old, and I plan to make a similar hat to the Twiggy hat for him.


