The Pleated Skirt
Extract from Skirts & Dresses for First Time Sewers • By Christine Haynes • Published by Search Press


About
Skirts & Dresses for First Time Sewers
Personally, I love a good pleat. It is a much more formal and polished way to create fullness in a garment, and when not in motion, the fabric hangs flat, unlike the pouf of a gather, making a smooth and flattering line.
Pleats are great because they look impressive, but they are incredibly easy to create by simply folding fabric. They offer a nice alternative to gathers and, for the most part, any spot that has gathers can usually become pleats and vice versa. I have made this version of a pleated skirt easier for the beginner sewer by including a simple elastic waistband.
Key characteristics
The main element of this skirt are the folds of fabric that create the pleats. The waistband has elastic and from there the fullness of the folds fall down from the waist to the hem. This short version lands mid-thigh.
Who does it suit?
The pleats of the skirt will create volume for a larger hip, and the elastic waist will stretch to fit to either your natural waist or your hip, depending on where you would like to wear it. Keep in mind that this skirt is rather short, so be ready to bare some leg!
Suitable fabrics
Because the pleats will be pressed, it’s easiest for a beginner to stick to natural fibres that will take to an iron easily, like cotton and linen. Also, due to the elastic waist, bulk is not a good idea, so I recommend looking for a quilt-weight cotton or similar fabric.
Styling tips
To downplay the sweetness of this skirt, try wearing it with a concert T-shirt, tights and boots to give it a bit of a rocker edge. Alternatively, if you want to work the youthful angle, a cardigan and flats will look fresh and timeless.
Opposite: Floral skirt by La Redoute. Above: Vintage sheer black mini skirt, styled by Kelly Stiles (t); Pleated vintage skirt, styled by Jean Dotts (b).
-
 Luna D. favorited The Pleated Skirt
24 Apr 16:43
Luna D. favorited The Pleated Skirt
24 Apr 16:43
-
Daina S. favorited The Pleated Skirt
26 Oct 20:14
-
Sidney S. favorited The Pleated Skirt
03 Sep 22:31
-
 RareJewel favorited The Pleated Skirt
05 Feb 09:40
RareJewel favorited The Pleated Skirt
05 Feb 09:40
-
 Melissa Beth added The Pleated Skirt to Zooey Deschanel DIY
19 Jan 10:28
Melissa Beth added The Pleated Skirt to Zooey Deschanel DIY
19 Jan 10:28
-
Melissa Beth favorited The Pleated Skirt
19 Jan 10:27
-
 Miss Captain Cosplay added The Pleated Skirt to Hedy Lamarr (In Progress)
20 Sep 05:10
Miss Captain Cosplay added The Pleated Skirt to Hedy Lamarr (In Progress)
20 Sep 05:10
-
Jasmin F. favorited The Pleated Skirt
08 Aug 12:52
-
Alecia B. favorited The Pleated Skirt
01 Jul 01:54
-
Rebecca M. favorited The Pleated Skirt
13 Jun 19:45
-
Step 1
Getting started
Having a good iron is essential for all sewing, but especially for pressing pleats, so make sure yours is in working order before starting this project. Take your time with folding and pressing, being sure to press by lowering and lifting your iron, instead of moving the iron back and forth over the fabric. Simply press, lift, move and press again.Pattern pieces
1101 = skirt centre front (cut 1 on fold)
1102 = skirt side front (cut 2)
1103 = skirt centre back (cut 1 on fold)
1104 = skirt side back (cut 2)
1105 = waistband (cut 2 on fold)TIP
You will be pinning and pressing your pleats, so only use glass head pins or pins made entirely of metal so you do not accidently melt any plastic-headed pins to your iron and new skirt! -
 Step 2
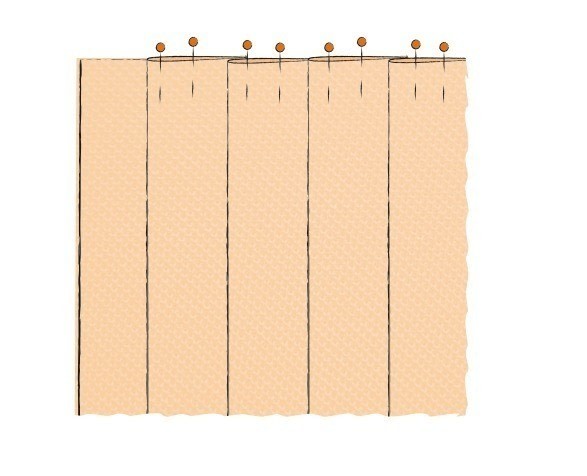
Sew the skirt side front pieces to the skirt centre front. Then sew the skirt side back pieces to the skirt centre back. Finish the seams at 1 cm (3⁄8 in) and trim excess seam allowance. Following the marks on the pattern, fold and pin the pleats in place around the entire skirt.
-
 Step 3
Tack the pleats in place at the 1-cm (3⁄8-in) seam allowance.
-
 Step 4
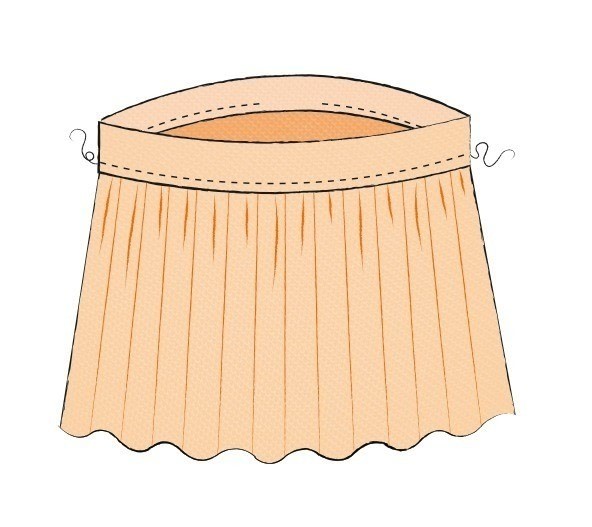
Place one waistband on top of one of the skirt pieces, right sides together. Stitch across the top, keeping the pleats in place. Repeat with the other waistband and skirt piece. Press the seam allowances up towards the waistband.
-
 Step 5
Fold and press the waistband towards the wrong side of the skirt so that there are 4 cm (11⁄2 in) of waistband on the wrong side. This should cover the seam you have just sewn. Repeat on the other skirt and waistband piece.
-
 Step 6
Unfold the waistband so it is open and place the two skirt pieces right sides together. Sew along the side seams. Finish the seams with a zigzag stitch at 1 cm (3⁄8 in) and trim off the excess seam allowance. Press the seams flat.
-
 Step 7
Zigzag around the raw top edge of the waistband to finish it.
-
 Step 8
Fold the waistband along the fold made in Step 4 and pin in place. Make sure the bottom of the waistband covers the seam with the skirt on the inside. Stitch on the waistband just above this seam, leaving a 5-cm (2-in) opening for inserting elastic into the waistband.
-
 Step 9
Cut a length of elastic to fit comfortably around your waist, plus 2.5 cm (1 in) for overlapping in the next step. Attach one end to a bodkin. Feed the bodkin and elastic into the opening left in the waistband. Feed around until the other end comes out of the opening.
-
 Step 10
Overlap the ends by 2.5 cm (1 in) and stitch them together with a zigzag stitch. Go back and forth a few times with the stitch to secure the join before closing up the hole in the waistband with a straight stitch.
-
 Step 11
Press the hem of the skirt up by 1.25 cm (1⁄2 in), with wrong sides together. Press up another 1.25 cm (1⁄2 in) and pin in place. Topstitch the hem as close to the inside fold as possible.
-
 Step 12
Sewn-down pleats
It is common practice to sew along the folds of pleats from the waist down to the point where you would like the fullness to begin. After Step 1, align your sewing machine needle just inside a pleat fold and topstitch it from the top of the skirt down about 7.5 cm (3 in) and backstitch. Repeat on all the pleats, then continue with the rest of the steps to finish the skirt.