


About
Make your dinner parties sparkle…
Crystals hanging from an aluminium pole are all you need to create a glamorous, and sexy feel to your kitchen or dining table. LEDs powered by four AA batteries will cause this light to last for a long time without the need to change a thing and all the time you and your guests will be bathed in glittering, twinkling crystal light. Take your Dremel 8200 and your Dremel Versatip and simply follow our step-by-step guide below!
You can check out more fantastic projects on the Dremel website.
-
 Key West Witch added The Crystal Light Rail to Crafts General
21 Mar 00:16
Key West Witch added The Crystal Light Rail to Crafts General
21 Mar 00:16
-
 Vikki Y. added The Crystal Light Rail to Decor
12 Jan 05:09
Vikki Y. added The Crystal Light Rail to Decor
12 Jan 05:09
-
Jennifer S. favorited The Crystal Light Rail
24 Nov 09:30
-
Joanne C. favorited The Crystal Light Rail
01 Jun 17:53
-
 dippydiscoball added The Crystal Light Rail to Wishlist
10 May 17:38
dippydiscoball added The Crystal Light Rail to Wishlist
10 May 17:38
-
Aurelie L. added The Crystal Light Rail to Miniatures
17 Mar 17:13
-
 Impervious2 favorited The Crystal Light Rail
31 Jan 03:14
Impervious2 favorited The Crystal Light Rail
31 Jan 03:14
-
 zoegirl221 added The Crystal Light Rail to Christmas
16 Sep 00:09
zoegirl221 added The Crystal Light Rail to Christmas
16 Sep 00:09
-
 WaterAngel added The Crystal Light Rail to Misc.
23 Apr 18:24
WaterAngel added The Crystal Light Rail to Misc.
23 Apr 18:24
-
 laura.williamsburrows favorited The Crystal Light Rail
29 Aug 17:35
laura.williamsburrows favorited The Crystal Light Rail
29 Aug 17:35
-
 Step 1
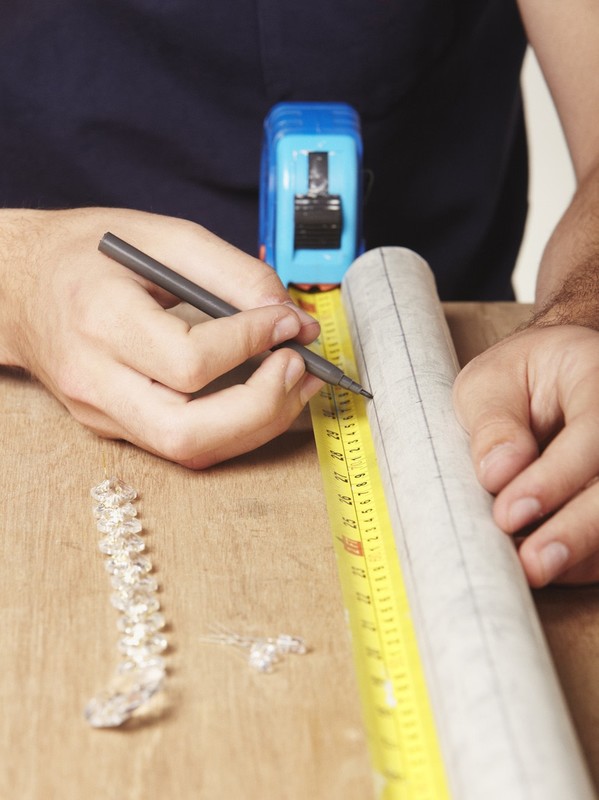
Marking up
Buy a length of chrome handrail 900 mm in length from a DIY outlet. And mask up with masking tape to protect the surface of the chrome and to allow yourself to be able to mark up. Draw a line along the entire length of the handrail. On the opposite side, mark another line in the same way. Then, mark up the length of chrome handrail into five equal segments on one of the lines you have drawn. These are the points where your LEDs will be placed. Now, go to the other line you have drawn along the length of the chrome tube and draw two more lines 20 mm either side of this. These are the lines from which your crystals will hang. -
 Step 2
Drilling your light rail
Now, use a centre punch to avoid your drill skating across the surface of the handrail, then drill a pilot hole through the handrail for the LEDs on the line described above using your Dremel 8200 with the Dremel drill bit 1.6mm from the Precision Drill Bit Set 628. Then, using a drill with a 8 mm drill bit, enlarge the hole. Now go to the two lines you have drawn from which to hang the crystals. Divide each of these lines into four equal segments and drill the middle three intersections with 1,6mm holes spaced equally apart. This is so that you can hang three sets of crystals on each side.On the top line, mark up a spot 20 mm from each end. This will be the position for the wire rope to go through the handrail to hang your crystal light rail to the ceiling. Drill the size of holes suitable for the wire rope you intend to use.
TIP : It is advisable to use a cutting fluid when drilling into metal.
-
 Step 3
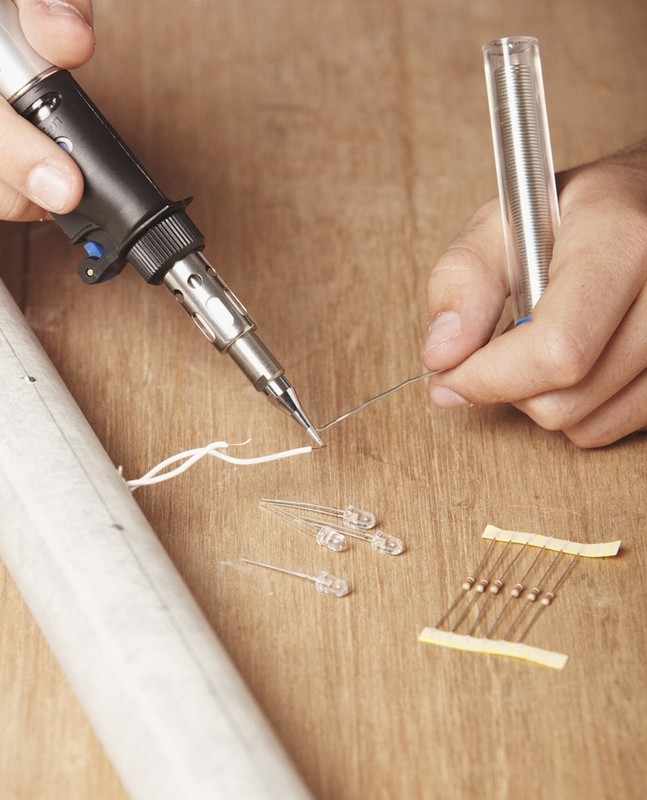
Wiring Up
You should find a wiring diagram packed with your LED pack of lights. Follow this and feed all the wiring in the correct formula in through the ends of the tube and out through the holes for the LEDs. Leave enough slack on the wires so that they can be easily soldered outside of the tube. The slack that allows you to make the soldered connections outside of the tube can be pushed back inside the tube once the wiring loom has been soldered up and insulated. Wire up and then take your Dremel Versatip with soldering tip 201 and solder your connections to the battery pack, switch and the resistors on the feeds to the LEDs.We fed two separate feeds from the battery positive through three R2 resistors on each, in parallel to the two separate LED pairs which are in series : A, K, A, K. Then we ran on from each LED pair to the battery negative via the switch.
When you’ve done all this, insulate all the parts of the wiring loom and the exposed tails of the LEDs. Once the wiring loom is complete, test it to see it that everything works as it should before you assemble the lamp. Then, insert the LEDs into their holders and push all the wiring back into the tube taking care not damage any of the insulation on the loom. Now, push the LED holders into the holes.
SAFETY TIP : If you are not confident of making this step safely, ask a local electrician to check your wiring for you or ask him to wire up the light for you.
-
 Step 4
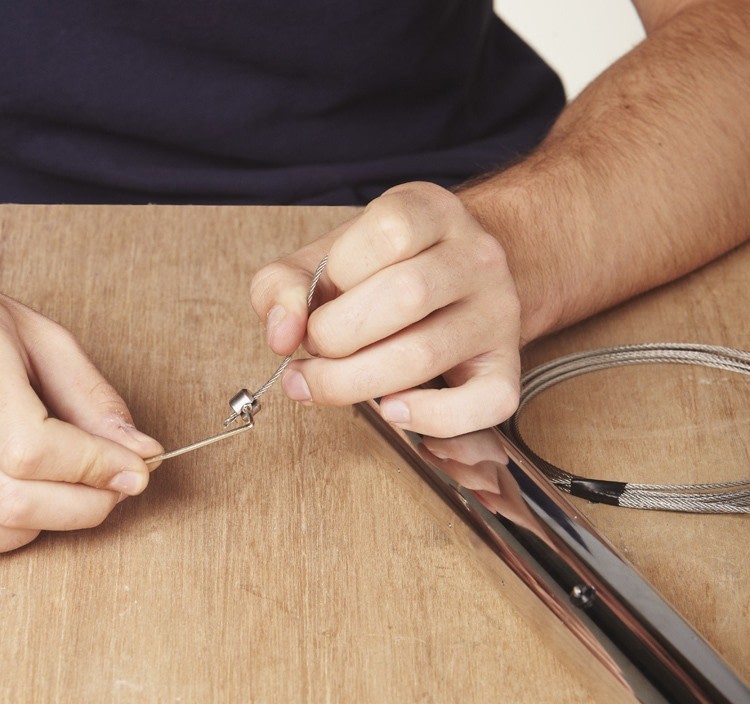
Hanging the light rail
Drill an appropriate sized hole for the micro switch into the end cap using your Dremel 8200 and drill bit from the Dremel Precision Drill Bit Set 628 up to a size of 3,2mm. If your switch needs a larger hole than this, you will have to use another drill and drill bit. Fit switch. Then, fit hanging wire ropes through the holes you’ve previously drilled at each end of the handrail and cut to the required length, depending on the height of your ceiling and how low you want the light rail to hang over your table. Secure with rope locks. Insert the other end of the wire rope into the ceiling fixing. Secure with another rope lock. Position ceiling fixing top halves with a spacing of 860mm and fix to the ceiling. Screw the bottom half of the ceiling fixing to the top part. -
 Step 5
Hanging the crystals
Once the light rail is hanging in place securely, hang all your crystals into the holes you have drilled previously. And switch on your light rail.


Comments

