About
Oils
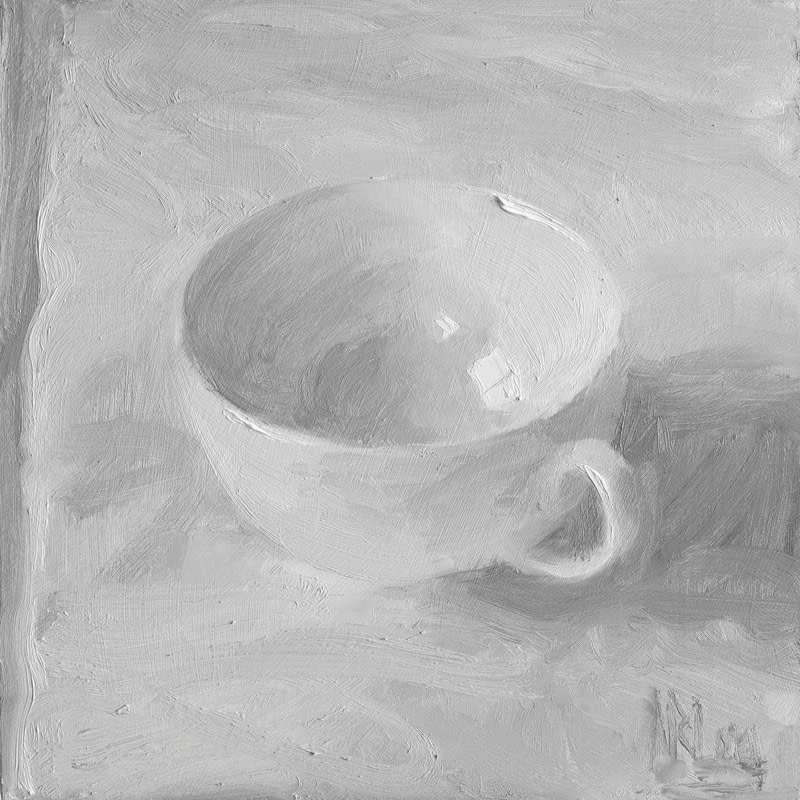
In this project you will learn to mix a range of tonal values and use them to convey light and shade on a white object. Working in black and white helps you to master tone without being distracted by colour.
Colours needed
Ivory Black
Titanium White
Tags
© 2024 Norman Long / GMC Publications · Reproduced with permission.
-
 Crafterella featured Teacup Painting
16 Aug 23:00
Crafterella featured Teacup Painting
16 Aug 23:00
-
 RareJewel favorited Teacup Painting
07 Aug 15:10
RareJewel favorited Teacup Painting
07 Aug 15:10
-
 GMC Group published her project Teacup Painting
02 Aug 09:00
GMC Group published her project Teacup Painting
02 Aug 09:00
You Will Need
-
 Step 1
When you love colour as much as I do, it’s tempting to skip over tonal value and head for the exciting stuff. Only when you buckle down and start to look carefully at a white object do you see the true beauty and subtlety that is there. If you can nail the ability to see lights and darks, you can use the craziest colour in the world and get away with it.
You can copy my painting of a teacup or do your own painting of any simple white object. Place your object on a white surface and make sure it is lit by one main light source from the side, such as window or a lamp. Position your canvas level with the subject so that you can compare them at a glance.
The setup for your work. If you are right-handed, it’s preferable to have the easel to your right (so that you are not reaching across yourself) and your subject on the left.
-
 Step 2
Pre-mixing colours
To give yourself a head start, it’s a good idea to mix a few tonal values ready to drop into the painting. To paint a white object, we will only need five values (white to middle grey) and we already have white, so it won’t take long.
For pre-mixing colours, I encourage you to use a palette knife to gain some practice in handling this tool. The knife is very easy to clean off between mixes, meaning that you don’t get bits of one colour mixed into another by mistake.Start by squeezing out white paint for tonal value 1 in the lower left of your palette, followed by black and at least three blobs of white for mixing the rest of the greys. Mix middle grey (tonal value 5) first, comparing your mixture with black and white until it sits equally between them (you will use more white paint than black). Next mix tonal value 3, to sit equally between values 1 and 5, and finally values 2 and 4.
Mix tonal values 1–5. Check that you have fairly even steps between them and adjust if need be.
-
 Step 3
Stage 1
There are two good reasons for using a light colour for the initial drawing. Firstly, it gives us chance to get it wrong. We can easily mix up a darker colour and redraw on top. Secondly, let’s imagine we did our drawing in black. Every light colour we put on top will mix with the black and get muddy.
Dilute tonal value 2 to make the paint flow easily and use a No. 2 round brush to draw the shapes on your canvas. Make the shape of the object fill the square as much as possible. Outline the shape of the shadows too – they connect the object to the edges of the picture.
To make the inevitable corrections your drawing will need, use kitchen towel dipped in solvent as an eraser. If you feel like checking proportions, try to find something vertical which matches something horizontal in the picture. Here the height of the cup is equal to the distance from the left side of the cup to the middle of the handle. It’s not critical at this stage, but if you want to check if your ellipse is symmetrical, look at it in the mirror.
Tip
Before you start, swing the brush around just above the surface of the canvas. Feel your confidence – you are in control of the whole painting. If you feel like it, splodge some paint anywhere on the canvas just to show who is in charge! -
 Step 4
Stage 2
The next step is to identify the very lightest thing in your subject. When looking for tonal values, try squinting. Almost close your eyes and notice how all the complexity of the subject is reduced to simple areas of light and dark. Here the lightest things are the highlights in the cup, reflecting the window. Blob in some thick white paint, just as a marker and reminder that everything in the whole canvas must be made darker than these notes in order for them to sing (1).Now look for the very darkest parts of the subject, areas which are around value 5. Think only in terms of shapes, not objects. Note how I have painted across the edge of the cup, grouping the cast shadow and the dark side of the cup together into one shape.
Now that you have marked the lightest and darkest areas, you can work in any order, blocking in big shapes with one of your five tonal values. Many beginners ask what to do first. Is it darks before lights, or background before subject? The real answer is that you can do it in any order you please. In practice, I look at the painting, then at the subject and ask myself, what’s one big thing I can do to make the painting more like the subject? That’s what I do next.
-
 Step 5
Stage 3
To keep the viewer interested in a painting, aim for variety in many aspects of the painting. This includes the thickness of the paint. As a general rule, aim for thin darks and thick lights. This is because thick paint sticks out and catches the light, an advantage with light colours because it makes them appear lighter. In darker passages, we generally don’t want too many ridges of paint because the light will catch on them and disrupt the effect of darkness. At this stage the thick paint in the shadowy interior of the cup was distracting, so I used the palette knife to scrape it off.We noted earlier that every colour is affected by surrounding colours. While there is still some white unpainted board peeping through, we cannot truly judge all the tonal values. Now that the white is covered, we can see where we stand and make finer adjustments in tonal value. One such area is the shadow inside the cup, where one block of tone has been made into two.
Tip
Use your finger to soften the hard edges of the block-in stage. I like to use the side of my little finger because it is smaller than my forefinger. It also seems appropriate to use your extended pinky for the delicate job of painting a teacup! -
 Step 6
Stage 4
You could stop at the previous stage but for me, the cup just didn’t feel very special, so I took a piece of torn kitchen towel and dragged it through the thick areas of paint, breaking the hard edges. I also used the palette knife, scraping paint off and moving it around to create more texture. If you are brave enough to soften all the edges in this way, each new brushmark will appear crisp and sharp.I introduced the table edge because of the big empty space on the left and the sense that the cup was floating in mid-air. Swirly marks with the No. 4 bristle brush give a sense of cloth over the table. If you want your brushmarks in the final painting to have texture and swing, keep using large bristle brushes until the end. My smallest brush was reserved for the signature and the delicate cross in the highlight that indicates the window frame.
-
 Step 7
Break up hard edges by dragging torn kitchen towel through the paint.
-
 Step 8
The lighter parts of the cup were painted with softer synthetic brushes and the highlights laid on gently after using the lift-off technique to get a nice glob of paint.