


About
Super simple & super cute!
With this tutorial I'll show you how to make a wrap skirt in a snap.
-
 Atomiller favorited Easy Breezy Wrap Skirt
05 Mar 23:33
Atomiller favorited Easy Breezy Wrap Skirt
05 Mar 23:33
-
 stephanie.wissel.3 favorited Easy Breezy Wrap Skirt
20 Jul 11:06
stephanie.wissel.3 favorited Easy Breezy Wrap Skirt
20 Jul 11:06
-
 nickyreneespace favorited Easy Breezy Wrap Skirt
12 Dec 00:00
nickyreneespace favorited Easy Breezy Wrap Skirt
12 Dec 00:00
-
 GabriELLE favorited Easy Breezy Wrap Skirt
05 May 04:41
GabriELLE favorited Easy Breezy Wrap Skirt
05 May 04:41
-
 Kellyton K. favorited Easy Breezy Wrap Skirt
18 Mar 16:42
Kellyton K. favorited Easy Breezy Wrap Skirt
18 Mar 16:42
-
 Key West Witch favorited Easy Breezy Wrap Skirt
12 Sep 12:42
Key West Witch favorited Easy Breezy Wrap Skirt
12 Sep 12:42
-
Rebecca C. commented on Easy Breezy Wrap Skirt
02 Sep 21:58
-
Rebecca C. favorited Easy Breezy Wrap Skirt
17 Jul 03:27
-
 caybilge favorited Easy Breezy Wrap Skirt
12 Jun 14:20
caybilge favorited Easy Breezy Wrap Skirt
12 Jun 14:20
-
Jenn B. favorited Easy Breezy Wrap Skirt
05 May 01:02
-
 Step 1
We're going to start by making a pattern for the skirt, using a skirt you already own as a template.
Fold two sheets of paper (I used old wrapping paper) in half. Fold your skirt in half, too, and line up the fold of the skirt with the folded edge of the paper. Use straight pins to pin the skirt to the paper, or weigh it down with something heavy, then trace all the way around the skirt.
-
 Step 2
Once you have the pattern’s basic outline, you’ll need to make a seam allowance around it. Use a ruler to measure and mark dashes a half-inch away from the original skirt outline.
-
 Step 3
Draw a line connecting the dashes you just made to create a half-inch seam allowance all the way around the pattern’s original outline.
-
 Step 4
Cut your pattern out along the seam allowances.
-
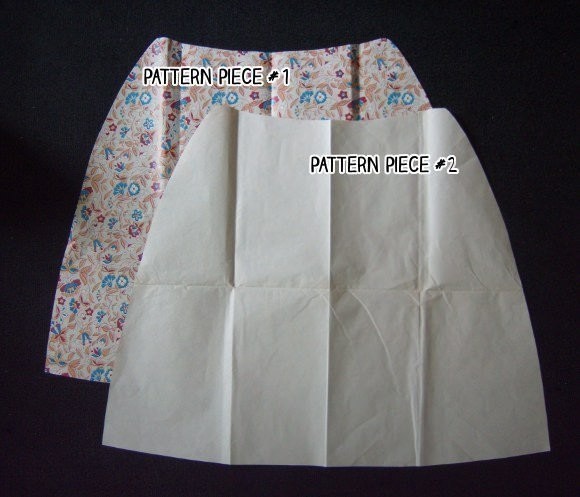
 Step 5
After cutting the pattern and unfolding the paper, you should have two identical skirt-shaped pieces of paper. We’ll refer to these as pattern pieces #1 and #2.
-
 Step 6
Take pattern piece #1 and cut it exactly in half. Keep one half and get rid of the other.
-
 Step 7
On pattern piece #2, measure about three inches in from the right-hand side of the pattern. Make a mark there, and cut straight down from that point. Discard the right-hand side (the smaller side).
-
 Step 8
All right! Your finished pattern pieces should look something like this.
-
 Step 9
Fold your fabric in half and lay the pattern pieces out as you normally would. Place pattern piece #1 on the fold of the fabric and place pattern piece #2 on the selvage. Pin the pattern pieces into place; cut out the fabric accordingly.
Also remember to cut out two long skinny rectangles and a small 3 x 3 inch square of fabric - these pieces will act as our skirt ties + side loop (for weaving the ties through later on).
-
 Step 10
Now all these random bits of fabric are going to start looking like an actual garment!
First, you’re going to sew the skirt’s straps. Start by folding each strap piece lengthwise (with the patterned/printed sides facing each other on the inside of the fold). Pin the straps like I did in the photo above.
For each strap, sew a straight line a half-inch away from the raw edges of one short side and two long sides. Then, using the opening at each strap’s un-sewn short side, turn the strap right-side out, so the fabric’s pattern/print faces out.
-
 Step 11
Heat your iron, and press the straps flat. Do the same with the little rectangular belt-loop piece, too. Your finished straps and belt loop should look something like the pic above. Set them all aside for later.
-
 Step 12
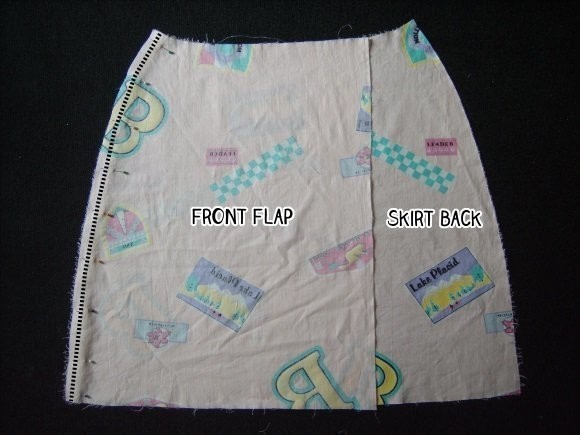
Next up: stitching the skirt panels together!
Start by placing the front flap piece so that its printed side touches the printed side of the skirt’s back piece. Pin the pieces together at the curved side (where your hips would go). Sew a straight line a half-inch away from the raw edge (where the pieces are pinned together).
-
 Step 13
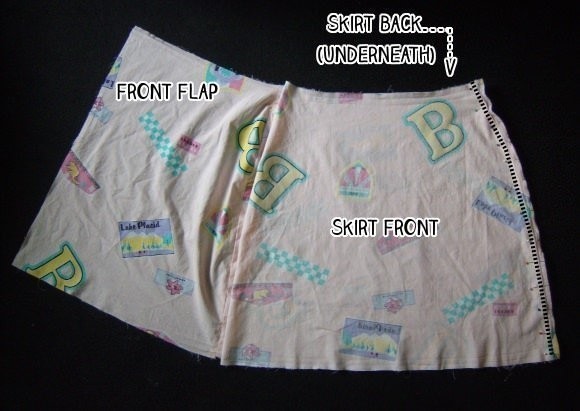
Next, place the right (patterned/printed) sides of the skirt front and skirt back together. Pin them along the curved side, and sew a straight line a half-inch away from the raw edge.
After stitching both sides, the whole thing should look something like this (see next step).
-
 Step 14
When you lay the fabric flat, the skirt front will be on the left, the skirt back will be in the middle, and the front flap will be on the right.
-
 Step 15
Use your iron to press the seams you stitched open, so they lay flat like so.
-
 Step 16
Now it’s time to prep the skirt’s straps/ties! In order for the skirt to close/tie properly, you’ll need to add a belt loop to one side of the skirt and a button hole to the other. These features will act as channels for the ties to go through, and help keep the skirt in place while you’re wearing it. First, the buttonhole:
1. On the inside of the skirt (the where the raw edges of the seams show), find side seam that connects the back part of the skirt and the front flap. Measure one inch away from the waistline and mark this point on that side seam with a pin.
2. From that pin, measure one inch down the seam and mark that spot with a second pin.
3. Between those two pins, sketch out a skinny rectangular shape directly over the side seam.
4. Sew all the way around this marking with a straight stitch. Pretty soon, this is going to be a buttonhole!.
-
 Step 17
Use a seam ripper (or pointy scissors) to snip open the part of the side seam that’s inside the ring of stitching you just did. Be careful not to snip through the stitching itself! This is what the buttonhole will look like from the outside of the skirt when you’re done.
-
 Step 18
To make the belt loop, you’ll essentially be repeating the exact same process that you did with the buttonhole, only this time you’ll be working on the outside of the skirt:
1.. Along the side seam that connects the skirt back to the skirt front, measure one inch down from the waistline and mark that spot with a pin.
2. From the first pin, measure another inch further down the seam and mark that place with another pin.
3. Place the small belt-loop rectangle of fabric between these two pins and stitch into place by sewing the top and bottom edges of the loop to the skirt, just like you would with a belt loop on a pair of jeans.
-
 Step 19
One last thing! To finish the skirt, pin a double-fold hem along the outer perimeter of the skirt and sew with a straight stitch.
-
 Step 20
On the skirt’s waistline, pin the un-sewn end of a strap/tie to the outer corner, and stitch into place.
-
 Step 21
How to wear it:
Weave the tie from the right-hand side of the skirt through the buttonhole you made on the left-hand side. Pull the tie from the left-hand side through the belt loop to the right-hand side. Bring both ties around to your back and make a bow to close.


Comments

