https://www.cutoutandkeep.net/projects/string-hexnut-bracelet • Posted by Kate L.
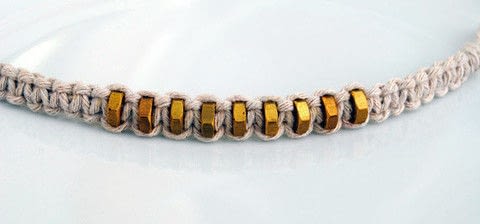
This bracelet has been inspired by this really wonderful “Braided Hex-nut Bracelet” tutorial which I pinned on Pinterest a while back. Two things I absolutely love about this project are: 1) It’s cheap as chips: I already had string in the cupboard and the brass hexnuts were 3p each from the hardware shop. 2) It’s my kind of jewellery: I’m not really a girly girl IYKWIM! The bracelet I made is a bit different to the ‘braided hex-nut bracelet’ and uses macrame instead, which is great, because I promised some tutorials a while back and felt a bit bad that I hadn’t written any yet! Happy knotting!


This bracelet has been inspired by this really wonderful “Braided Hex-nut Bracelet” tutorial which I pinned on Pinterest a while back. Two things I absolutely love about this project are: 1) It’s cheap as chips: I already had string in the cupboard and the brass hexnuts were 3p each from the hardware shop. 2) It’s my kind of jewellery: I’m not really a girly girl IYKWIM! The bracelet I made is a bit different to the ‘braided hex-nut bracelet’ and uses macrame instead, which is great, because I promised some tutorials a while back and felt a bit bad that I hadn’t written any yet! Happy knotting!

Square Knot Please note: I have used different colored cord in the tutorial so that it’s easier for you to figure out whats going on! Knot four cords together.

Bring the left cord over the two middle cords. Then bring the right cord over the left cord, under the two middle cords and through the loop formed by the left cord. Pull the right and left cord until the knot tightens.
Bring the right cord over the two middle cords. Then bring the left cord over the right cord, under the two middle cords and through the loop formed by the right cord. Pull the right and left cord until the knot tightens. Yippee…you have tied a square knot.

If you want to introduce a bead (or hexnut) then simply thread it through onto the two middle cords then carry on tying square knots. This might seem a little tricky a first but I promise once you have done it a dozen times you’ll be sorted….! For the hex-nut bracelet I used four lengths of string, measuring about 60cm each in length and tied the following knots: 8 Square knots 1 hex-nut 1 square knot 1 hex-nut 1 square knot 1 hex-nut 1 square knot 1 hex-nut 1 square knot 1 hex-nut 1 square knot 1 hex-nut 1 square knot 1 hex-nut 1 square knot 1 hex-nut 1 square knot 1 hex-nut 8 square knots (There’s probably a short-hand way of writing this but shorthand instructions always scare me so I generally give them a wide berth!)