


About
String Craft
Twit twoo! Make this funky owl picture by wrapping thread between nails. Let your imagination and creativity go wild by layering threads, and combining freeform wrapping with neater, more precise sections.
Tags
Downloads
- 114869_2F2016-08-24-115225-Owl+template.pdf 1.64 MB [ Download ]
-
 Rae G. favorited String Art Owl
04 Sep 20:58
Rae G. favorited String Art Owl
04 Sep 20:58
-
Sarah w. favorited String Art Owl
05 Jan 18:17
-
Crash Blackburn favorited String Art Owl
12 Aug 04:09
-
maribeth d. favorited String Art Owl
17 Mar 21:52
-
 Moi T. favorited String Art Owl
20 Jul 09:00
Moi T. favorited String Art Owl
20 Jul 09:00
-
Helen D. commented on String Art Owl
20 Jul 00:14
-
Rae G. added String Art Owl to I wanna make!!
21 Sep 00:32
-
 Aurora T. added String Art Owl to String art
19 Aug 02:50
Aurora T. added String Art Owl to String art
19 Aug 02:50
-
Janina R. added String Art Owl to Owl
26 Apr 17:47
-
Rena G. favorited String Art Owl
29 Mar 01:43
-
Step 1
Spray the piece of wood black and allow to dry.
-
 Step 2
Tape the template on onto the wood using the masking tape, then hammer a panel pin into each dot.
-
 Step 3
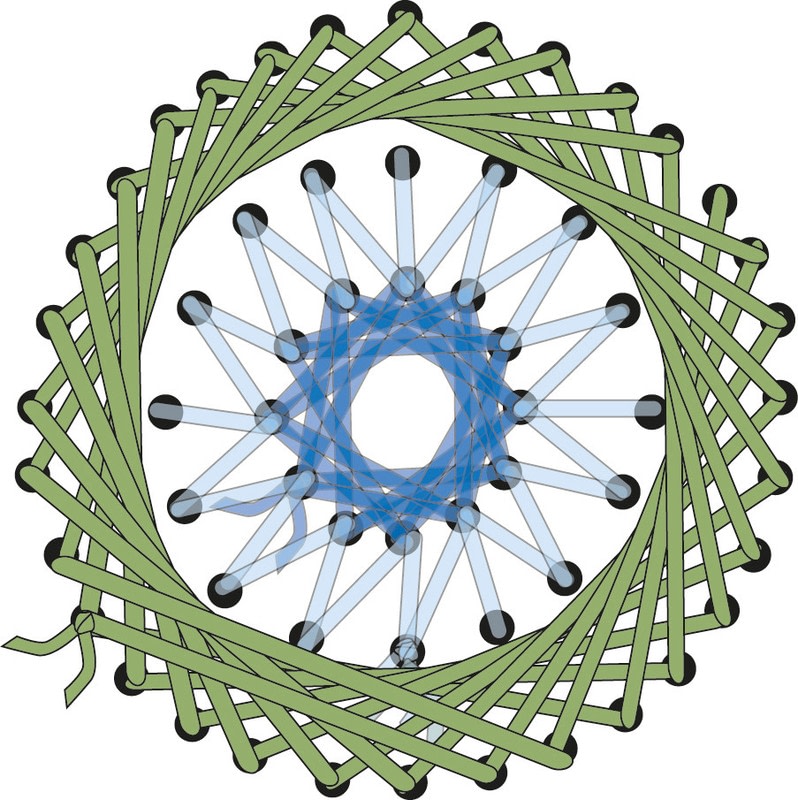
Gently remove the paper template. Start with the eyes: tie the blue thread to one of the inner circle nails and wrap around the nails in the order shown.
-
 Step 4
Then take the light blue and wrap around the nails in the order shown.
-
 Step 5
To complete the eyes, take the light green thread and wrap around the nails in the order shown.
-
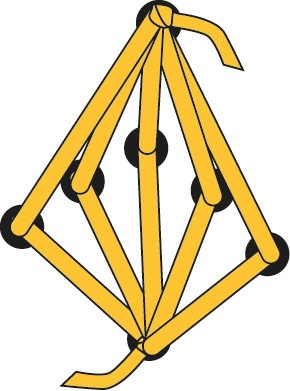
 Step 6
For the beak, attach the yellow thread to a beak nail and wrap as shown.
-
 Step 7
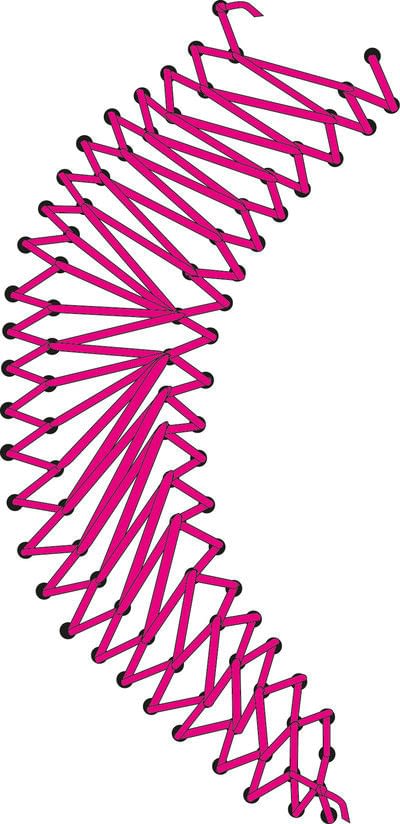
Now move onto the wings. Using the magenta thread, zigzag around the edges in the order shown, then fill in the center section with larger zigzags. Repeat on the other wing.
-
 Step 8
Wrap threads as shown vertically to create the chest and tail, using the magenta, pale pink, orange, pale orange, and peach threads in order, from the outside inward, to create the shaded effect.
-
 Step 9
Then add a layer of horizontal teal threads over the top of the chest section.
-
 Step 10
Finally, add a second layer of vertical peach, pale orange, and orange threads across the center of the chest and tail as in step 8.
-
 Step 11
Now complete the face. Add layers of pink and pale pink thread in a random order—I added pale orange on the forehead and ears, and zigzags of orange and pale pink around the face.


Comments

