

Strapless Dress
Extract from Pattern Making Templates for Skirts & Dresses • By Prier & Tisdall • Published by Search Press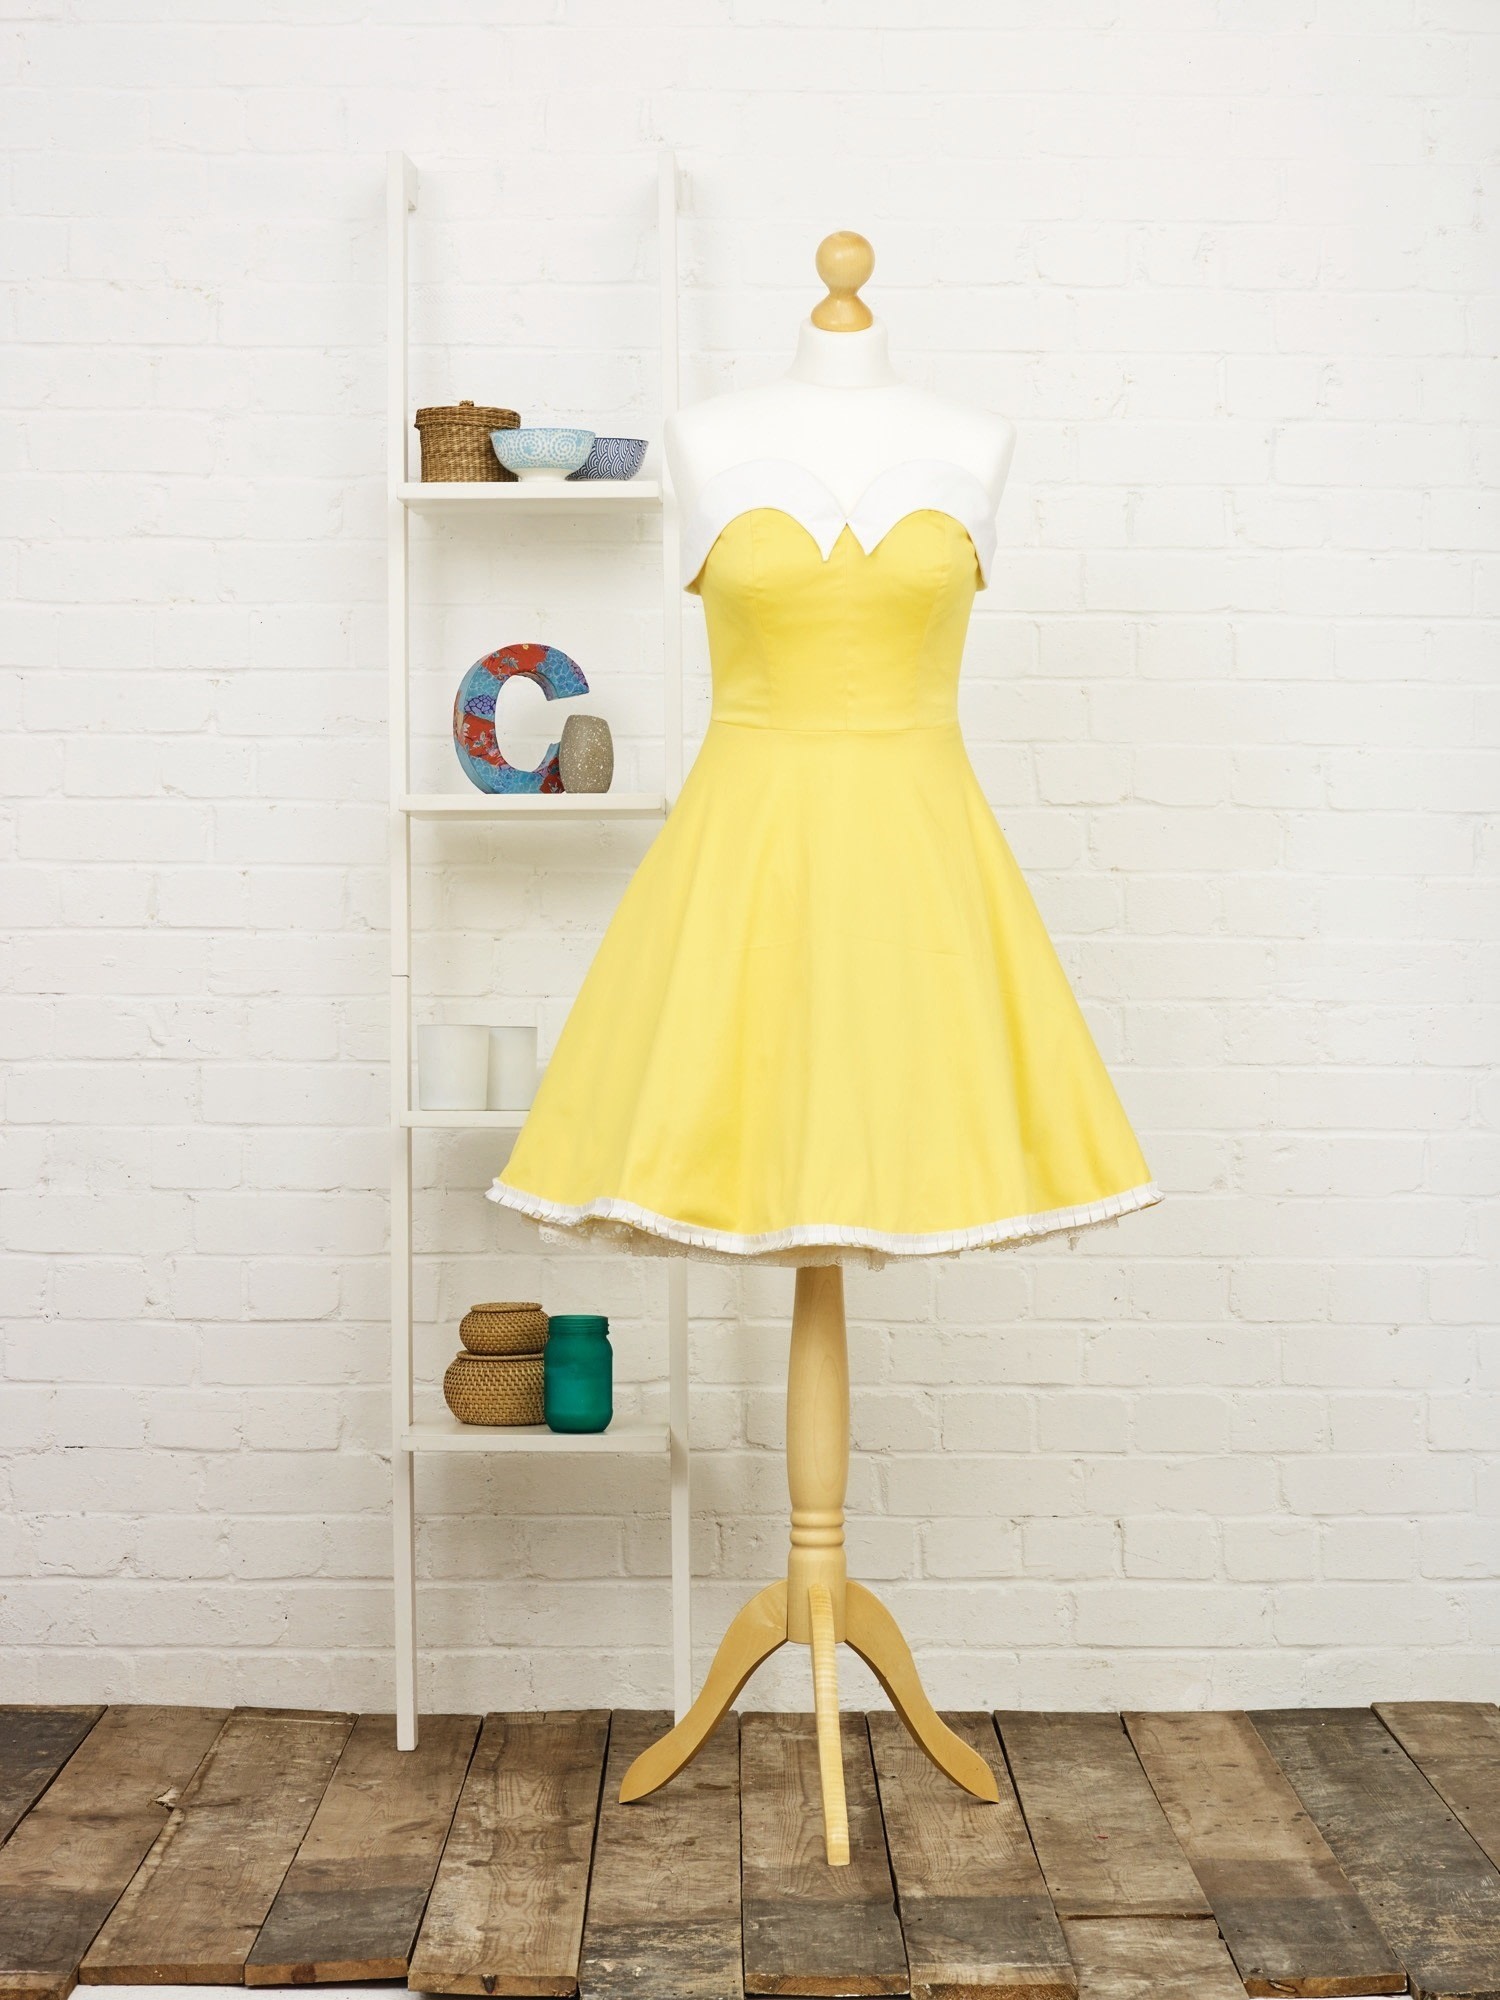

About
Pattern Making Templates for Skirts and Dresses
This vintage silhouette makes a beautiful summer dress in a bright cotton or shirting with a contrasting bodice trim. Wear it with a petticoat for full fifties flare. In a luxury fabric, this also makes a great prom dress. The versatile shape works in a number of lengths, and you could mix and match with one of the other
skirt designs—the Pencil or Godet styles would look really elegant.
KEEPING IT UP
>>Strapless dresses need boning to stay up. Cut the lining the same as the bodice and sew polyester boning down all the seams except the CB, where the zipper will have a similar effect. Remember to add plastic caps to each end of the bones so they don’t dig into you!
>>For a couture touch, your dress will stay up much better with an internal belt made from a 1in. (2.5cm) grosgrain ribbon sewn in at the waist (like a waist strap on a backpack). Catch the ribbon by hand at each of the seams and fasten separately at the back with a hook, making it a little tighter than the zipper.
Downloads
- 116078_2F2017-03-15-092024-Dress+STRAPLESS_TS.jpg 168 KB [ Download ]
-
 Mikeria W. favorited Strapless Dress
25 Jun 07:25
Mikeria W. favorited Strapless Dress
25 Jun 07:25
-
 Luna D. favorited Strapless Dress
24 Apr 15:32
Luna D. favorited Strapless Dress
24 Apr 15:32
-
Victoria L. favorited Strapless Dress
01 Jan 14:39
-
 Key West Witch favorited Strapless Dress
12 Sep 09:34
Key West Witch favorited Strapless Dress
12 Sep 09:34
-
 Kaitlynn L. favorited Strapless Dress
07 Aug 22:41
Kaitlynn L. favorited Strapless Dress
07 Aug 22:41
-
 Mimi C. favorited Strapless Dress
13 Jun 08:43
Mimi C. favorited Strapless Dress
13 Jun 08:43
-
 Lucy C. added Strapless Dress to Project 1
02 Apr 15:45
Lucy C. added Strapless Dress to Project 1
02 Apr 15:45
-
Key West Witch added Strapless Dress to Sewing
20 Mar 16:04
-
Melissa S. favorited Strapless Dress
19 Jan 17:35
-
Melissa S. added Strapless Dress to Dress
19 Jan 16:48
You Will Need
-
Step 1
Creating the pattern
Starting with Darted Dress sloper, bodice only:Bodice
Working on the front and back at the same time:
1. On the front bodice, close and overlap the shoulder dart by .in. (2cm), and open the waist dart. This will keep the dress closefitting above the bust.
2. Now bring the back and front bodice side seams together.
3. Trace off your bodice trim:
▶ Measure from the neck to the center of the cleavage where you would like the center point of the dress to sit. Mark on your pattern point (a).
▶ Measure from the top of the shoulder along the line of your bra strap where you would like the top of the dress to sit. Mark on your pattern (b).
▶ With a French curve, the edge of a plate, or a steady hand, draw a curve from a to b.
▶ Measure .in. (13mm) down under the armhole (c). Continue the line from point b, under the armhole and across the back to the CB, skimming the top of the back waist dart (abcd).
▶ Draw a parallel line 2in. (5cm) below the top of the bodice (ef), following the curve you have just drawn. End the line .in. (6mm) from the CF and complete the shape with a small diagonal line (fa). Trace off as one piece.
4. Cut and separate the bodice into four panels along the waist darts. The top line of the panels should be the same as the top of the bodice trim (abcd).
5. On the back panels, trim down the waist darts by .in. (6mm) at the top on both sides of the
dart. This will help the dress fit closely and stay up.
6. On the front panels, curve the lines of the panel seam (ghi, jkl) into a princess seam: On
the front bodice center panel, trim down the top of the bust dart by .–.in. (6–13mm) and curve out liked an opening parenthesis “(“ (gh). Curve the waist dart section in like a closing parenthesis “)” (hi). On the front bodice side panel, do the same but invert the curves: The bust dart section of the seam (jk) should curve out like a closing parenthesis and the waist dart section (kl) should curve in
like an opening parenthesis. Measure along the curves to check they are the same length and will fit together. This all helps to give a good shape to the bodice. -
Step 2
Full Circle Skirt
Make sure the waist measurements of the bodice and skirt match.
This classic fifties silhouette will look great made up in a cotton print for summer. Alternatively, try making it with several layers of chiffon for a decadent evening skirt. If you cut one layer of lining fabric and several layers of net, this makes a great
petticoat to go under your prom dress, too.Creating the pattern
Starting with the front skirt section of the Darted Dress sloper, front only:
To create a quarter-skirt pattern
1. Decide on the length of your skirt.
2. Draw a line from the bottom of the waist dart to the hem and separate into two pieces.
3. Close the waist dart. Note: If you stop at this step, you will have a skirt with a nicely balanced flare.
4. Continue to pivot the side panel from the dart point (c) until it reaches 90 degrees from the
CF.
5. Square off the side seam dart (which will now be a horizontal line) so you have a 90-degree
angle at the waistline.
6. Turn this angle into a curve (ac+bc). Measure to check that it equals a quarter of your waist
measurement.
7. Curve off the hem between the two pieces.
8. Hang from a skirt hanger or dress stand for a couple of days to allow the bias sections of
the fabric to drop before you hem. You will be surprised how much it drops! To even out the
hem, either enlist a volunteer to measure up from the floor with a long ruler and mark with
pins, or lay the original pattern on top of your fabric and trim.CUTTING OUT
This pattern creates a quarter of a circle skirt. How you cut it out will depend on the length of your skirt and the width of your fabric. For a knee-length skirt in wide fabric, you may be able to cut it out as a complete circle and add to an elastic waistband (you may need to lower the waist slightly). Otherwise, cut as two halves or
four quarters and put a closure into one of the seams.
