


About
Adults and children alike will love this unique kaleidoscope, as Jennifer Perkins proves here.
-
 Toni V. commented on Stained Glass Kaleidoscope
23 Aug 12:58
Toni V. commented on Stained Glass Kaleidoscope
23 Aug 12:58
-
 lilcalcb@gmail.com added Stained Glass Kaleidoscope to Craftwork
25 Aug 14:57
lilcalcb@gmail.com added Stained Glass Kaleidoscope to Craftwork
25 Aug 14:57
-
 ivey.roubique favorited Stained Glass Kaleidoscope
10 Dec 06:39
ivey.roubique favorited Stained Glass Kaleidoscope
10 Dec 06:39
-
 WerewolfCas favorited Stained Glass Kaleidoscope
28 Aug 10:18
WerewolfCas favorited Stained Glass Kaleidoscope
28 Aug 10:18
You Will Need
-
Step 1
Always put on heavy cotton gloves and safety eyewear before handling flux and soldering.
-
 Step 2
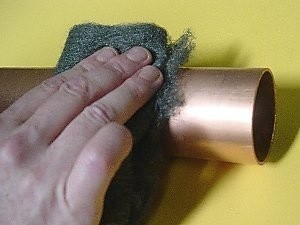
Clean the copper pipe thoroughly using steel wool and flux.
-
Step 3
Unwind solder from coil and twist strands together, forming a thicker solder "rope."
-
 Step 4
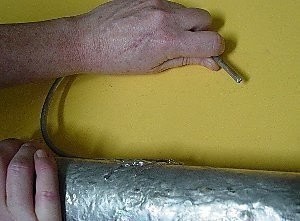
Slowly start heating the copper pipe with the propane torch. Set the soldering iron to the highest temperature and start adding solder by applying heat, but not a direct flame to the "rope." Move solder around the pipe as it melts, coating it in a similar fashion as putting icing on a cake.
-
Step 5
Continue this process until the 12" pipe is covered by solder and there are no sharp points in the solder.
-
 Step 6
Take a piece of clear glass and trace around the end of the 12" pipe to create a perfectly sized circle that will cover the end of the kaleidoscope. Cut to size with pistol grip cutter and running pliers. Lightly grind rough edges with a wet stone. (This will later be used as the eyepiece.)
Note: Be sure to wear safety eyewear to protect eyes from flying glass chips and debris as edges are smoothed down.
-
Step 7
Bend copper foil over the edges of the glass circle. Apply more copper foil to glass circle forming the outline of a 1.75" equilateral triangle. Use additional copper foil to cover the gaps left between the perimeter outline of the triangle and the edges of the glass circle. Burnish with fid.
-
Step 8
Add copper foil to the edges of the large glass nuggets. Brush with flux to clean. Decorative solder now can be applied to the large glass nuggets and they will be added as decorative embellishments later in the project.
-
 Step 9
Now add solder to the circle of glass that contains the outline of the triangle. Completely coat over the copper taped areas around the triangle perimeter. Adhere the glass circle to one end of the pipe (which will now be referred to as the bottom of the kaleidoscope) by first heating the end of the pipe with the propane torch under solder begins to melt slightly. Then place the glass circle on the end of the pipe and use soldering iron and torch to bond together the solder that encases the edges of the glass to the solder from the end of the pipe.
-
Step 10
Clean 12" heavy gauge wire with wool and flux. Secure in bench vice. Heat with torch and coat completely with solder the same way as when soldering the pipe. The two 2.5" medium gauge wire lengths can also be coated now as well using the same technique.
-
 Step 11
Attach the 12" heavy gauge wire (running lengthwise) to the mid-point of the pipe. Add lots of solder. Use the torch again to make sure solder melds together well. This serves as a built-in stand.
-
 Step 12
Allow to cool, then manipulate and shape the heavy gauge base wire to form a decorative and supportive stand for the piece.
-
Step 13
Shape the two 2.5" medium gauge wire pieces that were soldered earlier into an oval configuration and then solder both to the top, open end of the kaleidoscope (with one directly across from the other).
-
Step 14
Solder on the remaining decorative soldered glass nuggets to the front of the kaleidoscope.
-
Step 15
Use Cleaner and soft rag to clean the kaleidoscope thoroughly inside and out.
-
Step 16
When clean apply patina and polish to the outside of the kaleidoscope. Wipe excess away with a rag. Allow time to dry.
-
Step 17
Once fully cleaned and dried, insert the mirrors. Line up the three mirrored glass strips in a row, facing right side down on a table. Leave very small evenly spaced gaps between pieces and place long continuous strips of duct tape across the back loosely stringing the glass strips to one another.
-
Step 18
Turn the mirrors right side u and fold the three sides together, forming a triangle. Secure in place by wrapping with duct tape.
-
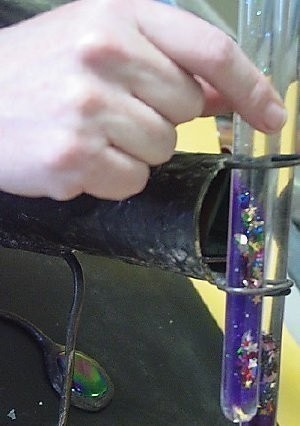
Step 19
Carefully slide the folded mirrors into the body of the kaleidoscope.
-
Step 20
Set the kaleidoscope up right. Adjust the mirrors to line up evenly with the triangular clear glass viewing port at the other end of the kaleidoscope body.
-
 Step 21
Insert oil filled wands through the oval shaped gauge wire pieces soldered to the top of the scope. To lock into place roll the black rubber "O" ring gaskets into place on both ends of each wand.


MAYBE thats why the show is not on TV anylonger.
A very short-lived show that was a bit...????
ANYWAY if anyone is interested in any of my other stained glass crafts, let me know and I will be happy to share the instructions with you :O)
have a good one and keep crafting,
Miss Holley King
to complicated for me