About
Instead of disappointing Santa with the same old Christmas cookies this year, impress him with stunning stained glass cookie ornaments!
Problem: You’re on the naughty list and you will be extremely embarrassed if your kids see you pull coal out of your stocking again this year.
Solution: Instead of disappointing Santa Claus with the same old decorated sugar cookies this year, impress him with stunning stained glass cookie ornaments.
Tags
-
 Rebecca M. favorited Stained Glass Christmas Cookies Edible Ornaments
20 Jun 02:32
Rebecca M. favorited Stained Glass Christmas Cookies Edible Ornaments
20 Jun 02:32
-
 Chaos favorited Stained Glass Christmas Cookies Edible Ornaments
14 Jun 15:31
Chaos favorited Stained Glass Christmas Cookies Edible Ornaments
14 Jun 15:31
-
 Sarah S. added Stained Glass Christmas Cookies Edible Ornaments to Food
19 Jan 00:40
Sarah S. added Stained Glass Christmas Cookies Edible Ornaments to Food
19 Jan 00:40
-
Lenny P. favorited Stained Glass Christmas Cookies Edible Ornaments
19 Dec 10:14
-
 Izzy and Emma's Channel xxx favorited Stained Glass Christmas Cookies Edible Ornaments
15 Dec 10:48
Izzy and Emma's Channel xxx favorited Stained Glass Christmas Cookies Edible Ornaments
15 Dec 10:48
-
 Crafterella added Stained Glass Christmas Cookies Edible Ornaments to Christmas Tree Ornaments
05 Dec 19:59
Crafterella added Stained Glass Christmas Cookies Edible Ornaments to Christmas Tree Ornaments
05 Dec 19:59
-
 Christie favorited Stained Glass Christmas Cookies Edible Ornaments
06 Oct 14:53
Christie favorited Stained Glass Christmas Cookies Edible Ornaments
06 Oct 14:53
-
 sheila.griffis.5 favorited Stained Glass Christmas Cookies Edible Ornaments
04 Aug 02:06
sheila.griffis.5 favorited Stained Glass Christmas Cookies Edible Ornaments
04 Aug 02:06
-
 Afilover47 favorited Stained Glass Christmas Cookies Edible Ornaments
01 Aug 19:50
Afilover47 favorited Stained Glass Christmas Cookies Edible Ornaments
01 Aug 19:50
You Will Need
-
 Step 1
What You Will Need To Make Stained Glass Cookie Ornaments:
Your favorite sugar cookie recipe
Holiday cookie cutters (This tutorial uses a candy cane, gingerbread man, Christmas tree, and mini Christmas tree.)
Green, red, and brown gel food coloring
Green and red hard candy (such as Jolly Ranchers or Life Savers)
Straws
String, twine, or thin ribbon
-
 Step 2
Since you will not be decorating these cookies with icing, you can add color to the design by dying your cookie dough.
Start by preparing your sugar cookie dough and separating it into three equal sections. Add a few drops of red coloring to the first section, green to the second, and brown to the third. To avoid making a mess, incorporate the coloring into the dough by making an indent in the dough with your thumb, squirting the food coloring into the indent, and folding the dough over the indent. Knead each section of dough until the coloring is spread evenly throughout. It is best to perform this step while wearing gloves unless you want you your lovely skin tone to be replaced with festive food coloring stains. -
 Step 3
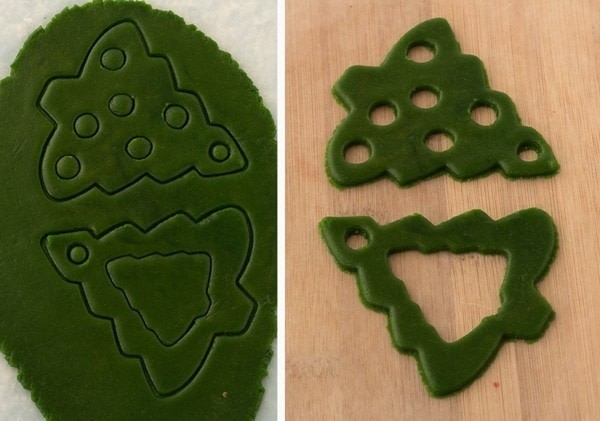
Next, roll out each section of dough to your desired cookie thickness. Use your cookie cutters to cut the dough into holiday shapes, removing sections from the center of each one where you want to have the stained glass effect. To remove a tree shaped center from your Christmas tree cookies, use a slightly smaller Christmas tree cookie cutter. To remove small circles from your Christmas tree and gingerbread men cookies, use a straw. To remove rectangle sections from your candy cane cookies, use a sharp knife to cut the shapes by hand. Also, use a straw to cut holes in the dough at the top of each cookie so you can string them up as ornaments later.
Place the cut dough on a parchment lined cookie sheet and set it in the freezer for about 15 minutes before baking.
-
 Step 4
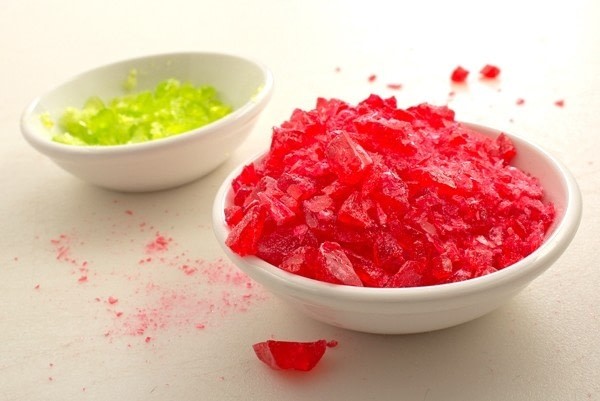
While your cut dough is chillin’ like a villain in the freezer, prepare your candy for the stained glass centers. Unwrap all of your green and red hard candy and place them in separate sealed Ziploc bags. Use a kitchen mallet or rolling-pin to crush the candy into tiny pieces. You may want to muffle the noise with a kitchen towel. Then again, you may just want to bang along to your favorite Christmas tune.
-
 Step 5
Remove your chilled dough from the freezer and bake until the dough is just set. This will probably be half the total baking time that your recipe calls for. (I bake mine for four minutes.)
Remove the cookies from the oven and carefully scoop a small amount of candy into cutout centers of each one. The candy will melt and spread so you do not need to completely fill the area. -
 Step 6
Set the cookies back in the oven to bake for the remaining amount of time. (I bake mine for an additional four minutes.)
Remove the cookies from the oven and use the pointy end of your boo boo stick, a toothpick, or sharp knife to pop any large unwanted bubbles in the candy. You will need to move quickly as the candy will start to harden and stick to anything it touches.
Let stained glass cookies completely dry before storing or stacking them. Keep in mind that the candy will be sticky.
To turn your cookies into ornaments, simply loop some pretty string, twine, or ribbon through the hole you created at the top of the cookies. And if you are having guests that you really want to impress, string the cookies together to make stained glass cookie garland.