About
Carving a soap ducky
Soap carving is often used as a precursor to carving wood—notably by the Boy Scouts of America, for whom it is a long-established tradition. Soap isn’t really
all that similar to wood, but it is cheap and readily available, and it offers a good way to introduce you
to handling knives and making some basic cuts. Use
a short-blade kitchen knife—the one you’d normally use for cutting vegetables is fine (but the blade should not be serrated).
TIP
Use straight pins with ball ends for the eyes—but if you use your completed soap ducky in the bathtub, remember to first take out the pins!
-
 Emma H. favorited Soap Ducky
27 May 13:18
Emma H. favorited Soap Ducky
27 May 13:18
-
 Irene H favorited Soap Ducky
06 Jun 16:52
Irene H favorited Soap Ducky
06 Jun 16:52
-
 Denise B. favorited Soap Ducky
02 Jun 21:00
Denise B. favorited Soap Ducky
02 Jun 21:00
-
 Alex Poser added Soap Ducky to Beauty
10 Jan 21:29
Alex Poser added Soap Ducky to Beauty
10 Jan 21:29
-
 Ichigo M. favorited Soap Ducky
18 Nov 18:37
Ichigo M. favorited Soap Ducky
18 Nov 18:37
-
 SugarNSpiceLily added Soap Ducky to simple gifts
15 Nov 00:34
SugarNSpiceLily added Soap Ducky to simple gifts
15 Nov 00:34
-
SugarNSpiceLily favorited Soap Ducky
15 Nov 00:34
-
 36 Green Ducks favorited Soap Ducky
14 Nov 15:20
36 Green Ducks favorited Soap Ducky
14 Nov 15:20
-
Alex Poser favorited Soap Ducky
14 Nov 04:29
-
 Eleanor favorited Soap Ducky
13 Nov 21:11
Eleanor favorited Soap Ducky
13 Nov 21:11
-
 Step 1
Your bar of soap should be convex, not concave: a nice fat one is best. You could etch the side profile of the duck onto the soap if you like, but it’s not really necessary.
-
 Step 2
Establish the back, removing the area behind the head. Start about halfway across the top and cut toward the back, making large paring cuts—or you can do it little by little if you prefer. Cut to about halfway down the bar, scooping out the whole
of the corner. -
 Step 3
Establish the beak by cutting a curved corner off the top and a larger one off the bottom, leaving a flat piece at the front for the beak. It’s starting to look like a duck already.
-
 Step 4
Scoop out a small piece from the tail end, curving the knife around as you cut. Leave the rest of the bottom completely flat.
-
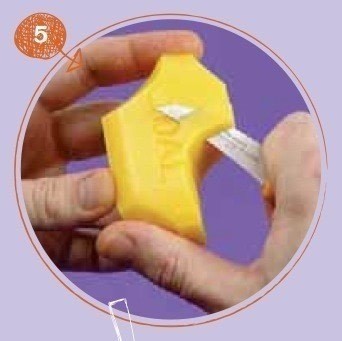
 Step 5
Narrow the head by paring 5 7 off the edges of the soap on
both sides. Cut from the back
of the head toward the beak,
then turn the figure around and cut from the top of the head toward the back—but leave the back itself as wide as possible. -
 Step 6
Make a paring cut to round off
the back of the head, curving
the knife around slightly as 6 8 you cut. Make a V cut at the
bottom of the neck to establish
a clear division between the
back of the head and the body
of the duck. -
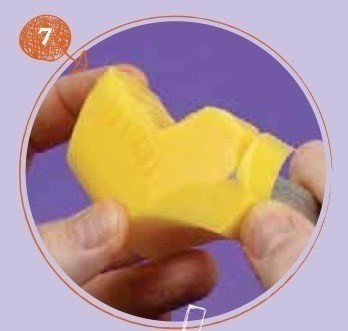
 Step 7
Establish the top of the beak and the front of the head. Cut a “ski slope” from the top of the head down toward the front in a smooth curve. Don’t cut too much off or your duck will be left with no beak.
-
 Step 8
Create the underside of the beak by cutting down in a curve toward the neck.
-
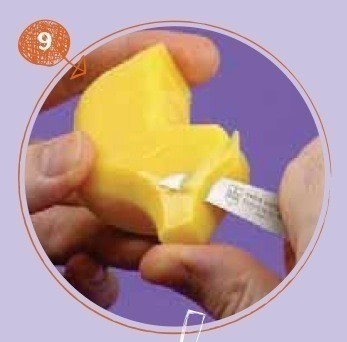
 Step 9
se paring cuts to slice off the sharp edges left by previous cuts and to refine the shape of the beak. This is the tricky part, so work slowly and look at the face carefully after each cut to make sure the shape is progressing as you want it.
-
 Step 10
Round off the remaining edges and tidy up the details, checking for balance and symmetry. Examine your duck from every angle and make small cuts, where necessary, to refine the shape until you’re happy with it.
-
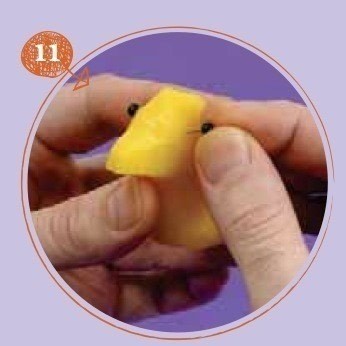
 Step 11
Carefully insert the pins for the eyes and you’re done.