


About
Renew the bottoms of your old houseshoes for longer life
Don't you hate throwing out your or your kids old houseshoes/slippers because the outer bottoms get worn out? especially if they are comfy, cute or your favs...
I have used several different bottoms for this idea in the past and dealt with slipping on wet or wood floors. I have found the perfect solution!
Also for inner sole wear I just buy insoles and replace them too! I get miles of extra wear from my slippers using these techniques.
-
 Mariah M. favorited Smart House Shoe Repair
10 Apr 03:46
Mariah M. favorited Smart House Shoe Repair
10 Apr 03:46
-
 GaKarma commented on Smart House Shoe Repair
02 Sep 03:19
GaKarma commented on Smart House Shoe Repair
02 Sep 03:19
-
GaKarma added Smart House Shoe Repair to Shoes/
02 Sep 03:12
-
GaKarma favorited Smart House Shoe Repair
02 Sep 03:11
-
 JudiMcGilvray added Smart House Shoe Repair to Clothing
19 Jan 17:22
JudiMcGilvray added Smart House Shoe Repair to Clothing
19 Jan 17:22
-
 badgerbadger commented on Smart House Shoe Repair
16 Sep 21:15
badgerbadger commented on Smart House Shoe Repair
16 Sep 21:15
-
 Step 1
Get you a good rug, not to thick but more like a doormat or car mat with a rubber backing. Preferably a clean new one as those old ones are full of nasty sand and won't stick well.
you will need really strong scissors to cut it.You will want the carpet side in against the shoe bottom and the rubber side out for traction. It will give your inner side a nice cush also ;-).
-
 Step 2
Turn the shoes upside down and carefully trace out the shape of the bottom. Most are fairly the same but some house shoes have a left and a right, make note of this.
Make the tracing a little bit bigger so you have room to trim instead of it turning out to small and a whole new one is needed. Mark the template as the right or left if needed and remember which side is the outer side and mark it so you don't make them backwards (in case you make 2 rights or 2 lefts for shoes that have that option...lol). -
 Step 3
Now hold it up to your shoe bottom and check for perfect sizing. trim where needed. I leave mine a little big so it not only sticks straight to the bottom but the fuzzy hair around the edge sticks and all seals nicely.
-
 Step 4
Lay your template mirror image on top and trace around it with your chalk.
-
Step 5
This is my white outline of where I need to cut and BOY is this stuff a bit hard to cut through since I am using a plush car mat.
-
 Step 6
I got it cut out and lined it up with my shoe to make sure it was going to fit properly. Now I'm smearing rubber cement(contact cement works better) all over it with an old butter knife.
-
 Step 7
Yum! N O T .... lol... keep your hands and work area as clean as possible. stray glue can ruin everything ;-)
-
 Step 8
Press it on real good covering the surface of the bottom...
-
 Step 9
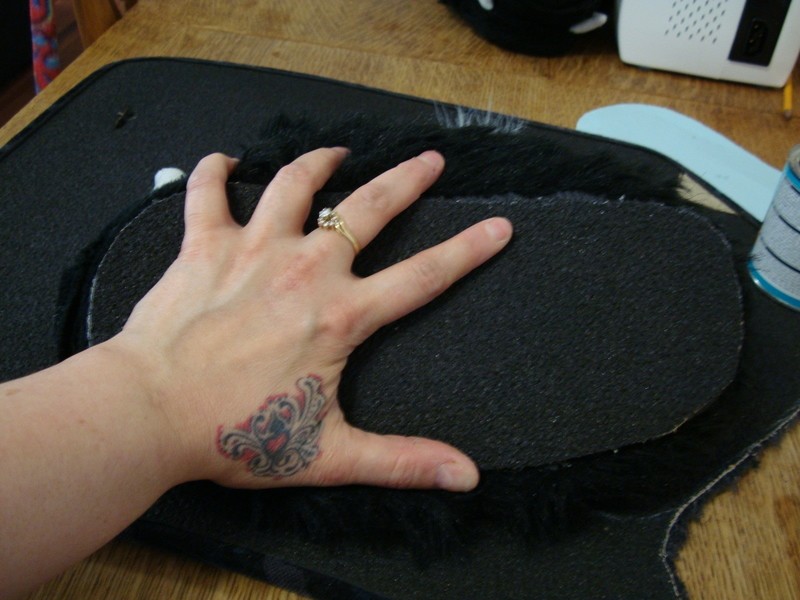
Squish all around the edges and make sure everything is sealing nicely
-
 Step 10
Squashing, more squishing and squashing the edges....
-
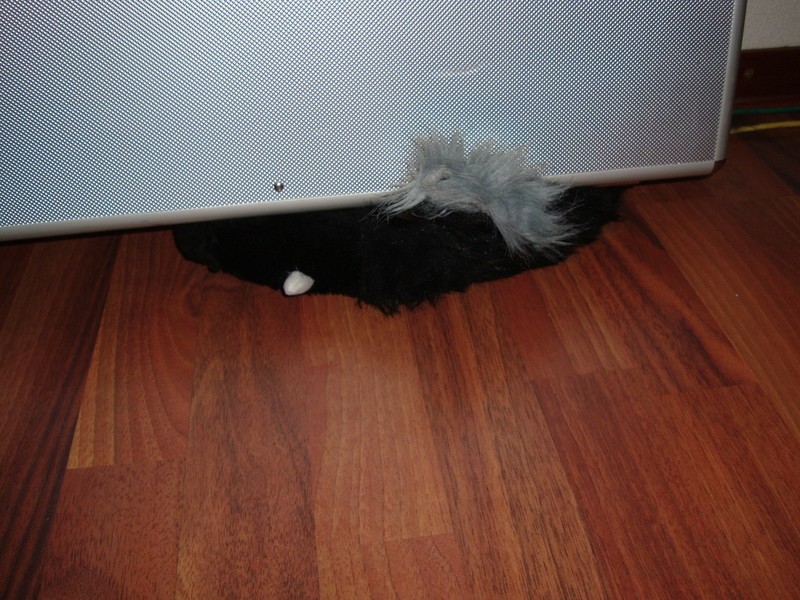
 Step 11
Now smash it under something heavy for an hour or so....
-
 Step 12
TaDaaaaa! 2 new super grippen non slip bottoms and a whole lotta miles left on these little monsters...hahaha.


CO + K User