

About
Based on Shrinky Dink Jewellery by anrose
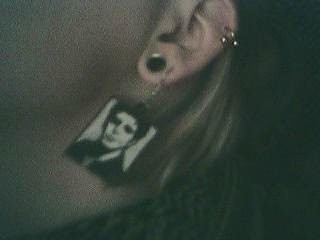
I am a Lou Reed fan, so i made this Lou Reed shrinky dink (shrunken plastic) earring! :D
Based on Shrinky Dink Jewellery by anrose
* You will need :
- Shrunken Plastic crafting material, commonly known as shrinky dink plastic.
- Scissors or crafting knife and mat.
- Supplies for the design, i would say permanent markers are the best (:. For white i used a gel pen and made sure it was relatively dry before going into the oven. Watch out with inks that don't dry easily, they can smudge! (:
- A needle/pin or hole puncher to prick a whole in your design to link with chain or something else to your jewelry.
- The string, chain, wire, or whatever else you are using to attach it to (:.
*NOTE* : YOUR DRAWING WILL SHRINK TO APPROXIMATELY ONE THIRD OF THE EXISTING SIZE!
* Instructions :
- 1) A design (unless you plan to free hand something you instantly come up with (;). It can be handy to trace an existing photo or drawing.
- 2) Place the shrinky dink sheet (shiny side down) accurately over your picture (if tracing), and start drawing. It might be handy to draw relatively close to the edge so that you can use the rest of the plastic sheet again for another project.
- 3) When you have finished drawing and colouring, cut out the design. If it is a simple shape, you might as well use scizzors. If however the shape is more complicated or has wholes inside you would like to cut out, i would suggest to go for a craft knife or something like that. Make sure you use a mat under your project so you don't carve into the table :p.
- 4) OKAY! So your design is cut out. Now, depending on how big or small you want your hole to be, punch or prick a whole into your design where you want the chain (or whatever else) to be attached. I have used pins before, but this can be a tricky job. You could also use sharp, craft scissors, but i would suggest (from experience) that a hole puncher is the best option for a general hole size (:. PUNCH!
- 5) Okay so now the design is ready to go in the oven! Erm... how long... i can't remember! LOL! I have to look this part up :p :D. I'll get back to you on that!
- 6) The design is ready in the oven and needs to be taken out. Watch out, it is warm (maybe quite hot) and delicate, take it out with care and make sure not to bend. There may be a few dents or waves in the plastic, this is where you flatten them. Grab a load of heavy books, and place this on top of your design. You will need to make sure your design is laying on something flat so the bottom doesn't get bumpy.
Leave it here for a good while, i'd say half an hour to be sure!
-7) Now the last part, link to your jewelry!! :D
TADAAAAAA!! :D
Tags
-
 Sarah Sylvia S. favorited Shrinky Dink Jewellery
22 Jul 20:48
Sarah Sylvia S. favorited Shrinky Dink Jewellery
22 Jul 20:48
-
 EarringsConfess favorited Shrinky Dink Jewellery
08 May 17:52
EarringsConfess favorited Shrinky Dink Jewellery
08 May 17:52
You Will Need
Death or Plumbing! posted this project as a creation without steps
Here are some similar tutorials to help you make this one!
Comments


