


About
A shoulder/tote bag made from a men's dress shirt
I live with just my father and brother so I have a lot of access to men's clothing, and I came up with this bag over the weekend. Make sure you use a long sleeved shirt.
How to make this is going to be hard for me to explain, but I will do my best. If there is something that you don't understand then don't hesitate to message me or comment and I will try to explain further.
-
 Martha M. favorited Shirt Shoulder Bag
24 Jul 13:26
Martha M. favorited Shirt Shoulder Bag
24 Jul 13:26
-
 jess l. commented on Shirt Shoulder Bag
09 Jun 19:08
jess l. commented on Shirt Shoulder Bag
09 Jun 19:08
-
 elarablair favorited Shirt Shoulder Bag
23 Feb 18:54
elarablair favorited Shirt Shoulder Bag
23 Feb 18:54
You Will Need
-
 Step 1
After washing and ironing your shirt, take the measurement of the collar and mark the center.
-
 Step 2
Button the shirt up and cut the collar (starting at the center mark) until you reach the button seam.
-
 Step 3
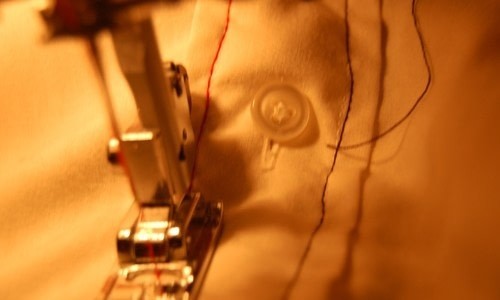
Find the smallest width across the front of your shirt (if it is at the arm holes, do not not include the seems) and mark three points down the front of shirt (on both sides of button seams), with the center of the width at the button holes. (It is very important that these markings are centered)
-
 Step 4
Connect the marks and cut out the front of your shirt (do not cut through both sides) so you have one rectangular piece.
-
 Step 5
Pin the collar across the shoulders (try to get them as straight as possible, but if they arch a little that is okay) and sew a straight stitch as close to the bottom edge of the collar as possible
-
 Step 6
This step appears to dislike me and won't let me delete it. Please ignore it for now and I will try again to delete it when it stops acting so silly.
-
 Step 7
Sew a straight stitch down both sides of button hem with the buttons buttoned. I used two different colours to make the bag more interesting, but you can just use a colour that matches the bag if you like.
-
 Step 8
Now is a good time to sew on your badge, or any other decoration you may like. But you can wait till the end if you are unsure about the placement.
-
 Step 9
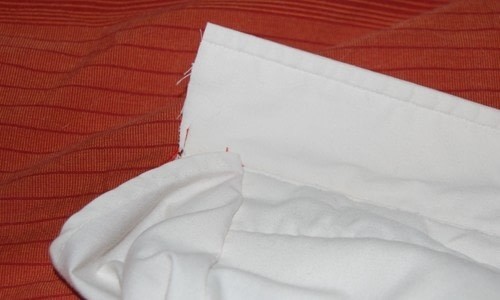
Now fold your shirt in half with right sides together and the bottom corners of the shirt against the top of the collar underfold (not the overlap). Zig zag stitch the sides together.
-
 Step 10
Most shirts have an uneven bottom so pin the back side of the bag straight and even with the front of the bag. Hem the bag with a 5/16-3/8 seam.
-
 Step 11
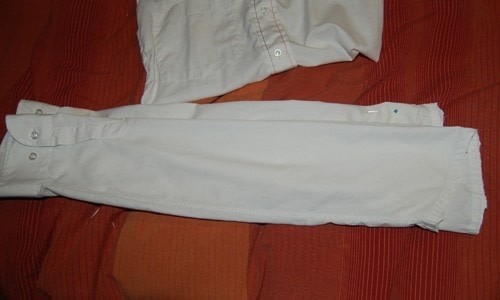
Cut off the arms of the shirt with the edge seam intact and fold the armhole together so it doubles on itself (this should not cause the cuff to fold in half). Now fold the entire arm in half with cuff buttons centered on one side.
(Picture is just of first fold) -
 Step 12
Sew bottom of each arm to opposite sides of the bag with cuff buttons facing out. Remove buttons on one cuff and place it about one centimeter inside the other. Sew a straight stitch along the edge/finishing seam of the outside cuff to connect the two arms.
-
 Step 13
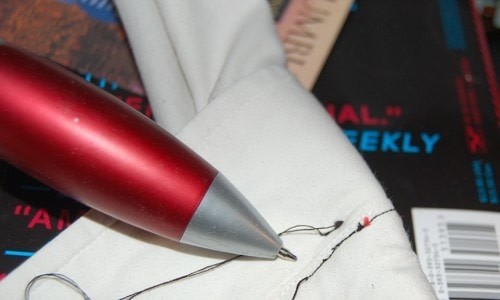
Turn up collar and sew a straight stitch along the back side hem through the bag, stopping at the end of strap. This should sandwich the strap between the front and back of bag and help keep the bag closed. Turn collar back over the seam.
(Ignore the other little seam/stitch in the picture, I was doing a trial and error process for a while until I got it right. The seam you are to make is the one indicated by my large novelty pen)
-
Step 14
Trim up all the loose threads and excess fabric, and enjoy your new bag.


Comments

