Shiraz Cushion
Extract from Stripy Blankets to Crochet • By Haafner Linssen • Published by Search Press


About
Stripy Blankets to Crochet
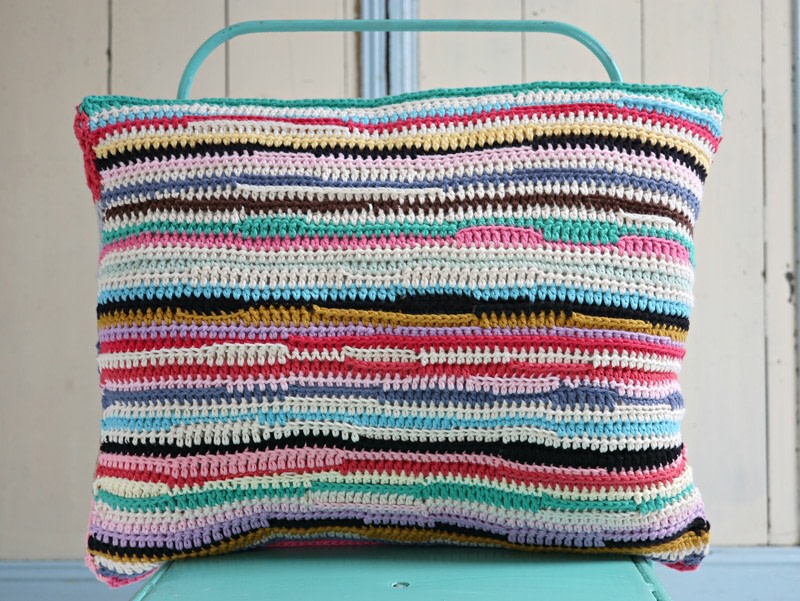
This cushion is the perfect companion for the Casablanca blanket. The front and back of the cushion are different from each other, but both are derived from the same blanket pattern. Like the blanket, the cushion has the advantage of very few yarn ends to weave in – plus it’s a pattern that just can’t go wrong!
Skill level
Intermediate
Size
Approx. 45cm (18in) wide x 40cm (16in) high
Tips
I have used a smaller hook for the front panel in order to create a dense fabric with minimal show-through of the cushion pad inside. I have used a larger hook for the back to maintain the ‘shabby’ boucherouite effect, but you can use the smaller hook if you prefer and adjust the pattern to match the size of the front panel.
-
 Alecia B. favorited Shiraz Cushion
21 Oct 13:36
Alecia B. favorited Shiraz Cushion
21 Oct 13:36
-
 Search Press published her project Shiraz Cushion
10 Aug 09:00
Search Press published her project Shiraz Cushion
10 Aug 09:00
-
 Step 1
Pattern
Starting and ending each row of a new colour with generous tails of yarn, use the Casablanca pattern (see below) with the following changes:
Front panel: Following the centre panel pattern, ch 72 and work 42 rows, changing colour for every row.
Back panel: Following the side panel pattern, ch 55 and work 25 rows, changing colour approx. two-thirds of the way along the first row (after 36 sts in the cushion shown). Match this colour change on each subsequent row – so two-thirds along each right-side row, and one-third along each wrong-side row. Change both colours after every 5 rows to make the horizontal stripes. -
 Step 2
Assembling the cushion
Side edges: Use the ends of yarn to tie the panels together. The front panel will have more ends than the back panel because you have changed colour on every row, so you will need to transfer half of these ends to the back panel in order to tie the panels together. Do this by using a yarn needle to thread the yarn end through the back panel where necessary. There should be sufficient ends for a sturdy join, but you can use extra yarn if needed. Make sure all the ends are tied on the same side and trim them to equal length. You can choose whether you want to have them on the outside, as part of the design, or tucked away on the inside.
Top and bottom edges: Join the top edges together with a simple double crochet seam. Either do the same along the bottom edge or use buttons. -
 Step 3
Casablanca pattern:
Note: The centre panel and side border panels are each worked separately. Start and end each new colour with a generous tail of yarn. You will need these to tie the panels together – only the outer ends will need to be woven in. After the centre and side panels have been assembled, the top and bottom border panels are crocheted directly on to the top and bottom edges to complete the blanket.Centre panel
Multiple: Any number of sts, plus 2 for foundation chain.
Foundation chain: Ch 60 + 2 (or adapt to desired width of blanket).
Row 1: Skip first 3 ch from hook (counts as 1 htr), 1 htr in each ch to end. (60 htr)
Row 2: 1 standing htr (or ch 2) in first htr, 1 htr in each st to end.
Rows 3–65: Repeat row 2, but vary as follows to create a rag rug effect:
• Substitute a group of htr from time to time with either dc or tr.
• Play with texture by working these groups of dc and tr in either back loops only or front loops only.
• To make sure the blanket retains straight edges and does not become wonky, if you have worked a group of tr on one row, work dc on top of them in the next row. Likewise, if you have worked a group of dc on one row, work tr on top of them in the next row. On the following row you can work htr as usual.
Fasten off but do not weave in ends.Side border panels
Multiple: Any number of sts, plus 2 for foundation chain.
Foundation chain: Ch 14 + 2.
Row 1: Skip first 3 ch from hook (counts as 1 tr), 1 tr in each ch to end. (14 tr)
Row 2: Ch 2 (counts as 1 tr), skip first tr, 1 tr in each st to end.
Rows 3–32: Repeat row 2.
Note: When changing colour at beginning of row, work 1 standing tr (or ch 2) in first tr, then continue as set.
Fasten off but do not weave in ends.Assembling centre and side panels
This could not be easier! Lay the three panels out in front of you and weave all ends on the side panels towards the inner edges that will be joined. Now gently tie the side panels to the centre panel, using the ends. There should be sufficient yarn for a sturdy join, but you can use extra yarn if necessary. Make sure all the ends are tied on the same side of the blanket (front or reverse, depending on how scrappy you want the blanket to look). Trim them if necessary, but don’t cut them off completely – they are part of the design.top and bottom border panels
Join yarn to top-right corner st of blanket.
Row 1: Ch 2 (counts as 1 tr), skip first st, 1 tr in each st to end.
Rows 2–6: Repeat row 1.
Fasten off and weave in ends.
Repeat along bottom edge of blanket.