Sew Tidy Sewing Machine Cover
Extract from Easy to Learn Hand Embroidery • By Chris Malone • Published by Annie's

About
Easy to Learn Hand Embroidery
Useful and pretty, this cover will keep harmful dust off your machine and brighten up your sewing corner at the same time. The embroidered sewing motifs decorate a pocket that can be used to store patterns, supplies or the machine cord. Cute little cross stitches fill in the background on the pocket.
Finished Size
Size of your machine
Measuring Your Machine
Note: Be sure to include any knobs or other features that extend out from the machine body when measuring.
1. Measure the width of your machine from side to side at the widest point.
2. Measure the height from the bottom to the highest point.
3. Measure the depth from the front to the back at the widest point.
Cutting
From green dot:
• Cut 1 (1 x 71/2-inch) pocket top border strip. • Cut 2 (1 x 9-inch) pocket side border strips. • Cut 1 (81/2 x 9-inch) pocket lining rectangle. • Cut 8 (41/2 x 3-inch) side tab rectangles.
• Cut 2 (11/2-inch-diameter) cover button circles.
From red dot:
• Cut 21/2 x 42-inch binding strips to equal the perimeter of your cover plus 10 inches when joined.
• Cut 2 (41/2-inch-diameter) yo-yo circles.
From multicolored print:
• Using the measurements taken for your machine, cut 2 [(machine width + 11/2 inches) x (height + height + depth)] rectangles.
From the batting:
• Cut 1 (81/2 x 9-inch) rectangle.
• Cut 1 rectangle the same size as the multicolored
print rectangles.
Downloads
- 111531_2F2015-10-16-111011-SewingMachineCover.jpg 62.4 KB [ Download ]
-
 Anne G. favorited Sew Tidy Sewing Machine Cover
06 Dec 07:06
Anne G. favorited Sew Tidy Sewing Machine Cover
06 Dec 07:06
-
 Ellen M. favorited Sew Tidy Sewing Machine Cover
16 Oct 16:09
Ellen M. favorited Sew Tidy Sewing Machine Cover
16 Oct 16:09
-
 lsg1378 favorited Sew Tidy Sewing Machine Cover
02 Mar 03:11
lsg1378 favorited Sew Tidy Sewing Machine Cover
02 Mar 03:11
-
 Sarah Y. favorited Sew Tidy Sewing Machine Cover
29 Feb 18:47
Sarah Y. favorited Sew Tidy Sewing Machine Cover
29 Feb 18:47
-
 Caron K. added Sew Tidy Sewing Machine Cover to Sewing Machine Covers
23 Dec 07:19
Caron K. added Sew Tidy Sewing Machine Cover to Sewing Machine Covers
23 Dec 07:19
-
 Emma H. favorited Sew Tidy Sewing Machine Cover
07 Dec 18:08
Emma H. favorited Sew Tidy Sewing Machine Cover
07 Dec 18:08
-
 Carla B. favorited Sew Tidy Sewing Machine Cover
07 Dec 02:39
Carla B. favorited Sew Tidy Sewing Machine Cover
07 Dec 02:39
-
 Annie's Publishing published her project Sew Tidy Sewing Machine Cover
04 Dec 09:00
Annie's Publishing published her project Sew Tidy Sewing Machine Cover
04 Dec 09:00
You Will Need
-
Step 1
Embroidery
Refer to Embroidery Necessities on page 2 for stitching tips and the Stitch Guide on page 6. Full- size embroidery design is included on the insert.
1. Fuse interfacing to wrong side of the white solid following the manufacturer’s instructions. Transfer the embroidery design centered on the right side using your preferred transfer method.
2. Stitch the embroidery design using 2 strands of embroidery floss as follows:Dress Form: Base
Body form
Scissors: Handles
Blades Screw head
Thread spools Thread
Needle Buttons
Buttonholes Background
black stem/outline stitch blue stem/outline stitch
orange stem/outline stitch gray stem/outline stitch gray backstitch
gray backstitch
red and green stem/
outline stitch
gray stem/outline stitch purple, light blue and green
backstitch
black knot stitch
dark pink cross stitches3. Complete pocket embroidery; press and trim to 71/2 x 81/2 inches with design centered.
-
Step 2
Assembly
Use 1/4-inch seam allowance and stitch right sides together unless otherwise indicated. Full-size templates are included on the insert.Stitch the top pocket border strip to the embroi- dered pocket; press seam toward the border strip.
-
Step 3
Stitch the pocket side border strips to opposite sides of embroidered pocket; press seams toward the borders.
-
 Step 4
Layer and pin the embroi- dered pocket and the pocket lining, right sides together, on the 81/2 x 9-inch batting rect- angle. Stitch sides and top, leaving bottom open. Trim batting close to seam and corners at an angle. Turn right side out; press. Baste bottom edges together 3/16 inch from the edge (Figure 1).
-
Step 5
Layer and pin together a cover rectangle, right side down; batting and second cover rectangle, right side up. Baste 3/16 inch from all edges.
-
 Step 6
Pin pocket to right side of cover, 2 inches from the right side edge, matching raw bottom edges (Figure 2).
-
 Step 7
Stitch-in-the-ditch along the side borders, back- stitching at top to secure (Figure 3).
-
Step 8
To make side tabs, use the tab end trimming template provided to round off one short end of each tab rectangle.
-
 Step 9
Position and pin two tabs, right sides together, to a scrap of batting. Stitch all around, leaving open at short straight end (Figure 4). Trim batting close to seam line and clip curves. Turn right side out and press. Repeat to make a total of four tabs.
-
 Step 10
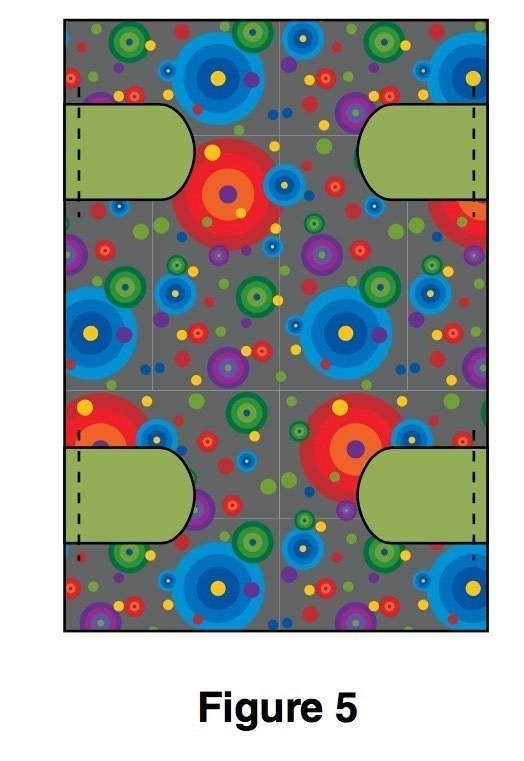
Pin the tabs to the lining side of the cover 41/2 inches from the bottom and top edges, matching raw edges (Figure 5). Stitch in place.
-
Step 11
Prepare and attach binding to cover rectangles referring to Mitered Corner Binding.
-
Step 12
Prepare yo-yo flowers using 41/2-inch-diameter circles.
-
 Step 13
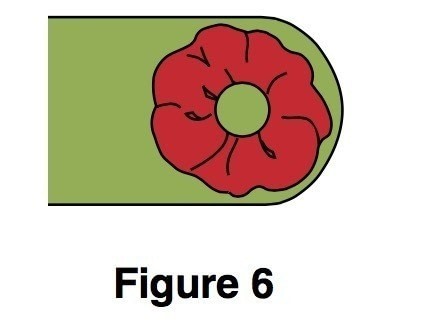
Follow the manufacturer’s directions to cover two buttons. Stitch a button to a yo-yo with the shank fitting into the center hole and then stitch the yo-yo to the right front tab end (Figure 6). Repeat with the second yo-yo and button, stitch- ing to the left front tab.
-
 Step 14
Sew a snap set to the ends of the tabs, about 1 inch in from the rounded end, referring to Figure 7.