Rustic Quilled Decorations
Extract from Scissors, Paper, Craft • By Christine Leech • Published by Quadrille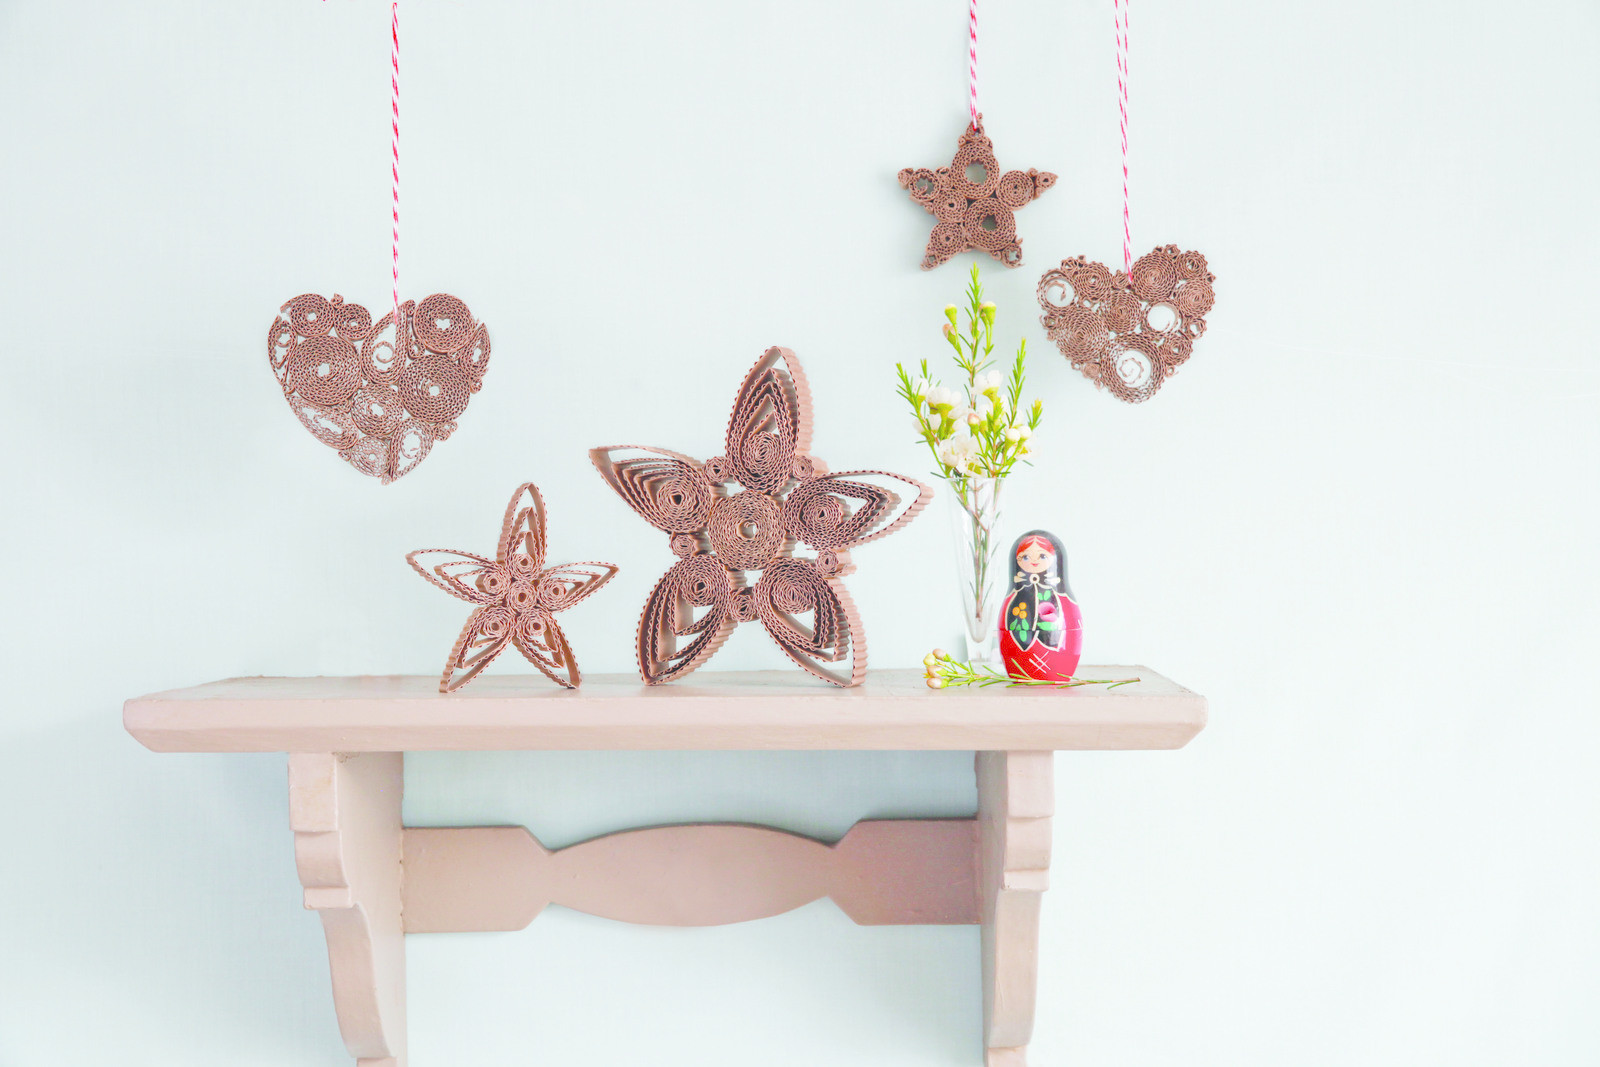

About
Scissors, Paper, Craft
Quilling is the art of rolling thin strips of paper into a variety of coils and shapes to make small intricate patterns. Using corrugated cardboard means you can supersize the quilled decorations, which are perfect for autumnal or winter festivities.
Makes 1 heart and 1 snowflake
-
 Paulida H. favorited Rustic Quilled Decorations
21 Jul 04:33
Paulida H. favorited Rustic Quilled Decorations
21 Jul 04:33
-
Rebecca M. favorited Rustic Quilled Decorations
20 Jun 00:59
-
Heidi S. favorited Rustic Quilled Decorations
04 Feb 02:00
-
 Suthrngal18 favorited Rustic Quilled Decorations
23 Aug 07:21
Suthrngal18 favorited Rustic Quilled Decorations
23 Aug 07:21
-
 Lynnski favorited Rustic Quilled Decorations
12 May 10:19
Lynnski favorited Rustic Quilled Decorations
12 May 10:19
-
 Pimke added Rustic Quilled Decorations to Deko
01 Feb 10:26
Pimke added Rustic Quilled Decorations to Deko
01 Feb 10:26
-
Chenna H. favorited Rustic Quilled Decorations
18 Jan 03:14
-
Jousie N. added Rustic Quilled Decorations to Paper Projects
13 Jul 20:15
-
arina m. favorited Rustic Quilled Decorations
08 Jan 22:35
-
Sophie L. favorited Rustic Quilled Decorations
14 Nov 09:06
-
 Step 1
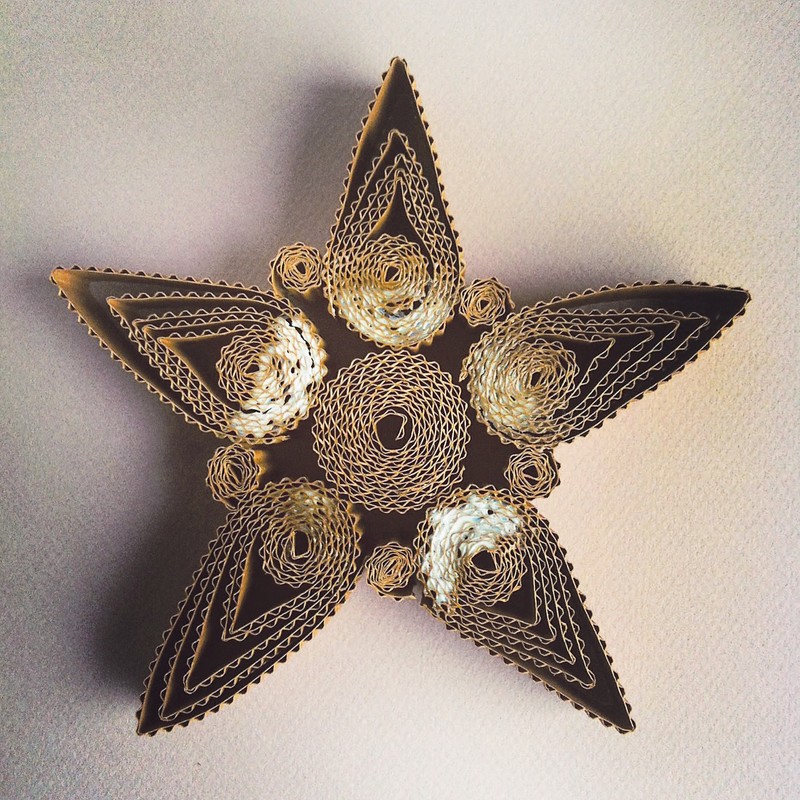
TO MAKE THE HEART SHAPE
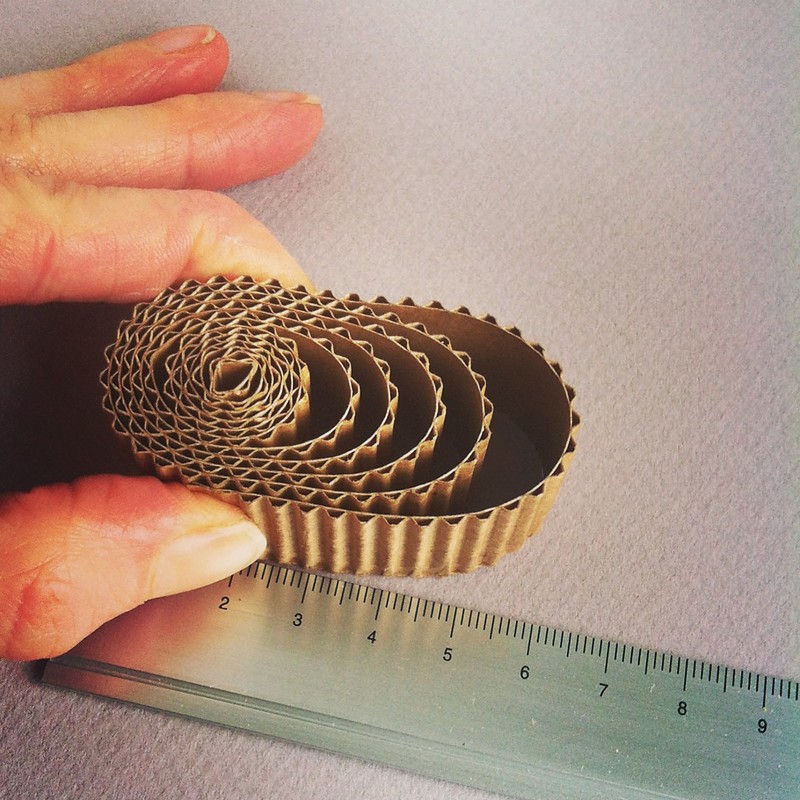
1) Cut several strips 1cm wide from the corrugated card. Cut these strips into various lengths; the length of the strip determines the size of the coil – the longer the strip, the larger the coil.
2) Place a heart-shaped cookie cutter on a clean, flat surface. Holding the knitting needle in one hand, start winding a card strip tightly around the needle to create a coil.
3) Once the coil is the desired size, use a glue dot to fix the free end of the card strip to the coil. Slip the coil off the knitting needle and place it inside the cookie cutter. To make a coil with a more open centre, slip it from the knitting needle before gluing the free end in place, allow the coil to unravel slightly, then glue the end. -
 Step 2
4) Make several different-size coils and place them inside the cookie cutter so it starts to fill up.
-
 Step 3
5) Once the cookie cutter is full of larger coils, start making smaller ones to fit into the gaps. Continue until the cookie cutter is completely filled.
6) Turn the cookie cutter over (the coils should be firmly held in place so they should not fall out) and place it back on your surface. Pat the coils down so they are level on the underside. -
 Step 4
7) Cover the top of the coils with PVA glue, spreading it evenly so it covers all the coils. Try not to get glue on the cookie cutter as makes it harder to get the finished decoration out later. Allow to dry overnight.
-
 Step 5
8) Once completely dry, remove the decoration from the cutter. Use a craft knife to loosen any glue holding the coils to the cutter. If any coils fall out, simply glue them back in place.
9) Thread a length of ribbon through one of the open coils to hang the decoration. -
 Step 6
TO MAKE THE SNOWFLAKE
These snowflake decorations do not rely on a cookie cutter to create the shape. Once you learn the basic shapes, you can create any pattern you like.1) Cut seven 2 x 70cm strips from the corrugated card.
2) Roll one strip into a tight, round coil to form the centre of the snowflake. This coil should be approximately 3cm in diameter. -
 Step 7
3) Make a crease in another strip, 20cm from one end. Roll a tight coil into this crease, then fix in place using a glue dot. Roll the rest of the strip into a relaxed
coil around it. -
 Step 8
4) Hold the coil tightly in one hand (between thumb and forefinger is easiest) and squash it into an oval shape approximately 6cm long (this may require a little adjustment of the relaxed coil to get the right size). Fix the free end in place with a glue dot.
5) Pinch the relaxed coil between your thumb and forefinger to create a teardrop shape. -
 Step 9
6) Coat one side of the rounded half of the teardrop with PVA glue and hold it in place until it is tacky (a hairdryer helps speed this up). To make the other points of the snowflake, repeat steps 3–6.
7) Cut one of your 2 x 70cm strips into five 10cm lengths and roll these into tight coils. On a flat surface arrange the coils and teardrops into a snowflake shape. -
 Step 10
8) Cover the snowflake with PVA glue, making sure you spread it over all areas where the coils and teardrops meet. Allow to dry overnight.
-
 Step 11
9) Once completely dry, thread a length of ribbon through the top point of the snowflake to hang or simply stand.
TOP TIP
Some of the decorations need cookie cutters to form their shape. As cookie cutters vary in shape and size, these instructions are general, but the basic rule is to keep filling the cutter with quilled coils until no more will fit.