


About
Create your own rubber stamps!
Learn how to create rubber stamps on any budget, inspired by any image or pattern you like.
-
 Kimya J. favorited Rubber Stamps
29 Oct 23:30
Kimya J. favorited Rubber Stamps
29 Oct 23:30
-
 Keith N. favorited Rubber Stamps
18 Aug 05:19
Keith N. favorited Rubber Stamps
18 Aug 05:19
-
 Spencer M. favorited Rubber Stamps
07 Jun 09:40
Spencer M. favorited Rubber Stamps
07 Jun 09:40
-
 arina m. added Rubber Stamps to Side Projects
09 Jan 02:17
arina m. added Rubber Stamps to Side Projects
09 Jan 02:17
-
arina m. favorited Rubber Stamps
09 Jan 02:11
-
 koalala o. added Rubber Stamps to Block Printing
13 Feb 06:42
koalala o. added Rubber Stamps to Block Printing
13 Feb 06:42
-
 cristinakilljoyway favorited Rubber Stamps
15 Jan 13:45
cristinakilljoyway favorited Rubber Stamps
15 Jan 13:45
-
 HiroLover favorited Rubber Stamps
17 Dec 08:20
HiroLover favorited Rubber Stamps
17 Dec 08:20
-
 forevshearteveryonewhogotswag favorited Rubber Stamps
09 Jul 12:52
forevshearteveryonewhogotswag favorited Rubber Stamps
09 Jul 12:52
-
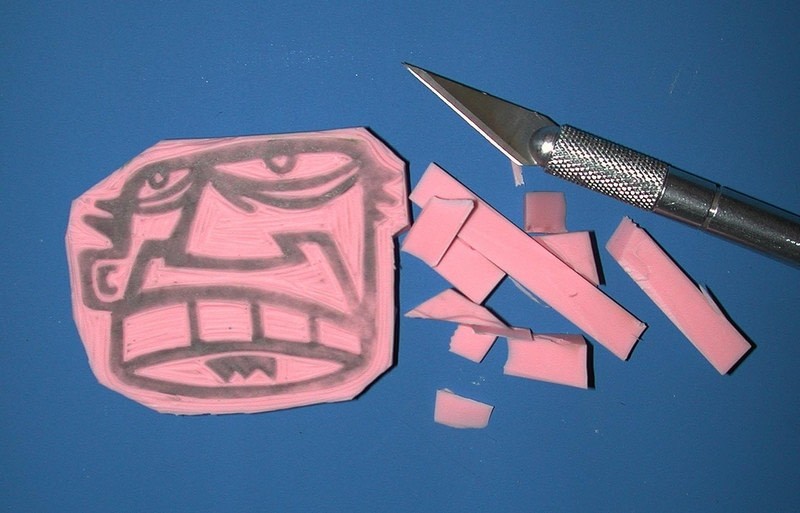
 Step 1
The great thing about making rubber stamps is that you can make them cheaply, out of items you probably have lying around: an exacto knife (pictured left) and a rubbery eraser.
As you get more detailed with your stamps, you may want to invest in a carving tool, like the Speedball brand shown. These are available at most art and craft stores, often with the lino cutting supplies.
As your stamps get bigger, you'll also want to buy some carving material. My favourite is the pink "Speedy-Stamp" made by Speedball. It's a little more expensive than the beige material shown (about $5 for a postcard-sized sheet), but is less likely to crumble.
-
 Step 2
If your stamp design is pretty simple, you can draw directly onto the rubber. Otherwise, it's best to draw your design onto a piece of paper first, remembering that WHAT YOU DRAW WILL BE REVERSED ON THE STAMP. Important to remember if you're carving text!
In this case, I was making a stamp for a friend based on one of his illustrations. I took the image into Photoshop, resized and lightened it. Next, I used a soft pencil to go over all the places I want to print in the final stamp.
-
 Step 3
Now place the image down on the stamping rubber, and affix in place with a small piece of tape. Transfer the image to the rubber by shading over the back of the illustration, or rubbing it with the back of a spoon.
Another technique, if you're using a photocopy, is to apply a small amount of acetone (nail polish remover) to the back of the paper. This does NOT work, however, with images printed by inkjet printers. (I learned that the hard/messy way!)
-
 Step 4
Remove the paper, and your image should be transferred! If the image isn't clear, try using a softer pencil.
At this point it's a good idea to roughly cut the stamp out of the rubber sheet so that you can rotate the rubber easily as you carve.
-
 Step 5
I like to start with the outlines of all sections. Run the carving tool away from you without pressing too hard or you'll end up gouging the rubber and taking out a chunk you don't want to. Remember that you can always take away more rubber later, so err on the side of taking less away.
When carving along curving lines it's best to keep the tool in one place and rotate the rubber.
If you're having trouble seeing where you have or haven't carved, try coating the whole piece of rubber with a thin layer of ink.
-
 Step 6
Once you've finished carving (remembering that the pieces you leave uncarved will appear in the final stamp), use your knife to cut away excess rubber around the edges.
-
 Step 7
Time for a test stamp (lower left) to check how you're doing. On the lower right you'll see the final version after some extra pieces were carved away.
And...you're done! Don't worry if there are a few wonky bits, it adds to the charm of hand-carved stamps :)
-
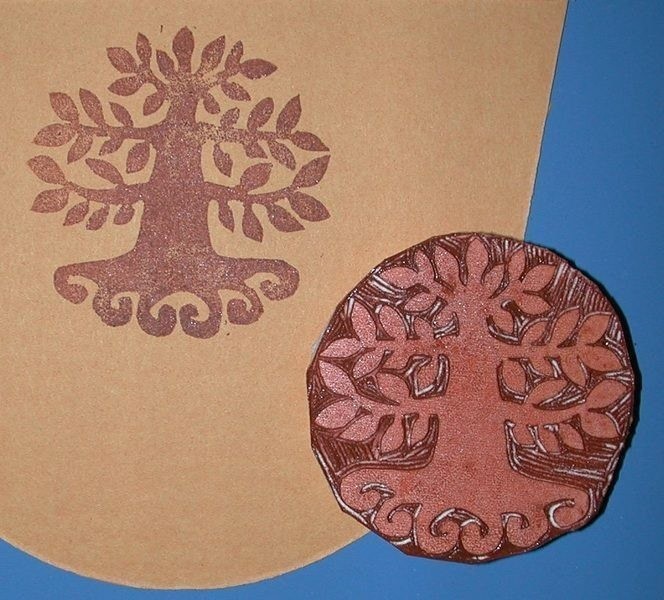
 Step 8
There are tons of designs you can use to make your stamps.
Whereas the stamp above is an outline of an image, this one is solid, inspired by a logo I saw on the back of an envelope.
-
 Step 9
You can also use a photo as the basis for your stamp, like this one.


Grace★♥
Great tutorial and I love the tree stamp!