


About
Bake and decorate your own royal wedding cake.
Tags
-
 SugarNSpiceLily favorited Royal Wedding Cake
20 Dec 21:07
SugarNSpiceLily favorited Royal Wedding Cake
20 Dec 21:07
-
 sharon l. added Royal Wedding Cake to baking and cookery
29 Jul 21:17
sharon l. added Royal Wedding Cake to baking and cookery
29 Jul 21:17
-
 AntiSoupMuffin favorited Royal Wedding Cake
08 Jun 01:17
AntiSoupMuffin favorited Royal Wedding Cake
08 Jun 01:17
-
 Birgit added Royal Wedding Cake to Dessert
06 Apr 17:00
Birgit added Royal Wedding Cake to Dessert
06 Apr 17:00
-
 rock3r1 favorited Royal Wedding Cake
04 Mar 23:33
rock3r1 favorited Royal Wedding Cake
04 Mar 23:33
-
 Heidi favorited Royal Wedding Cake
14 Nov 09:05
Heidi favorited Royal Wedding Cake
14 Nov 09:05
-
 Katharine C. added Royal Wedding Cake to niki wedding
14 Sep 13:11
Katharine C. added Royal Wedding Cake to niki wedding
14 Sep 13:11
-
Katharine C. favorited Royal Wedding Cake
14 Sep 10:10
-
 angel.hackney1978 favorited Royal Wedding Cake
12 Jul 14:49
angel.hackney1978 favorited Royal Wedding Cake
12 Jul 14:49
You Will Need
-
 Step 1
Buy cake dummies or bake your cakes. Your will need the following sizes:
Round cakes (12x3 inch, 10x3 inch and 8x3 inch)
Square cakes (12x3 inch, 10x3 inch and 8x3 inch) -
 Step 2
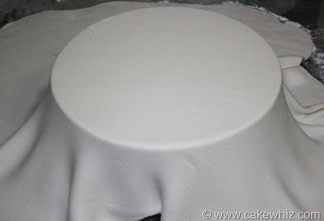
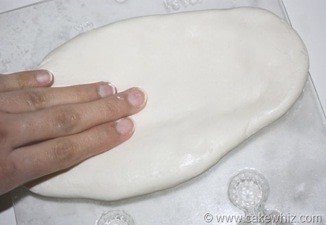
Roll out your white fondant.
Tip: - Make sure your table is sprinkled with lots of powdered sugar or else the fondant will stick to the table. -
 Step 3
Cover your cake dummy in shortening or cover your actual cake in frosting. Then, spread the rolled fondant on top of it.
-
 Step 4
Use a pizza cutter to trim the excess fondant around your cake.
-
 Step 5
Continue cutting until you get very close to the edge of the cake.
-
 Step 6
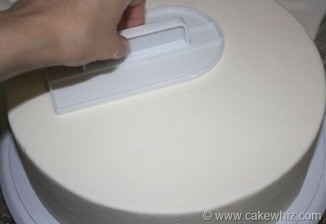
Now use a fondant smoother and press it all over your cake to smooth out fondant. This will give your cake a clean look.
Follow the same steps to cover the rest of your cakes or dummies. Also, don’t forget that if you are using real cake, each cake should be sitting on sturdy a cake board.
-
 Step 7
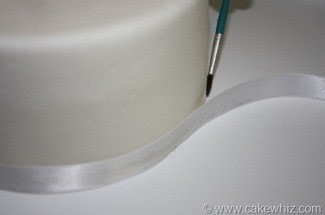
Once the cakes are covered in fondant, I like to give them a border. I find it very classy. Here are the steps:
Bring out your white satin ribbon. Brush some royal icing around the bottom of the cake and stick your ribbon along this area.
-
 Step 8
Since this cake is going to have a silver and white theme, use a glue gun to stick silver beads around the ribbon.
A few tips:
-Use a ruler to keep the distance between each bead consistent.
-You can omit this step ENTIRELY if you have fancy white and silver beaded ribbons. -
 Step 9
I wanted to try a different approach for cake separators. There are various separators sold online and in stores but it feels totally cool when you can take something as simple as a champagne glass and give it your own touch. Here is how I made these:
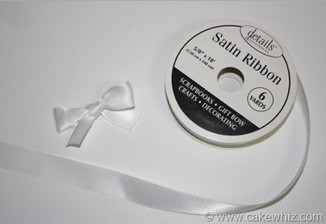
Make little bows out of white satin ribbon.
-
 Step 10
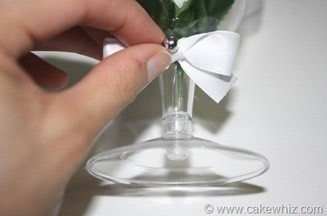
Bring out your champagne glasses and use a glue gun to stick the bow in place.
Tip: - I think crystal glasses would look so much better than that the plastic ones but I didn’t have as many crystal glasses so I used these plastic ones to give you guys an idea. Keep in mind that if you are using crystal glasses, you would obviously wrap the ribbon around the glass instead of gluing it. -
 Step 11
To complete the look, glue a single bead on the center of the ribbon.
-
 Step 12
Bring out your silk flower bouquet and cut out individual roses using scissors. I think using fresh roses would look even better!
-
 Step 13
Place each rose into an individual champagne glass and you have successfully made your own cake separators!
Looks beautiful …eh? It’s really all about the little details that takes a cake from looking ordinary to extraordinary!
-
 Step 14
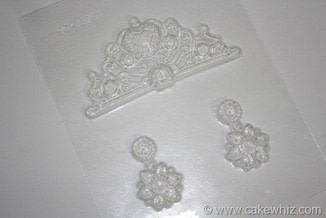
Bring out your crown chocolate mold and sprinkle some powdered sugar in the crown cavity. Sugar prevents the fondant from sticking to the mold.
-
 Step 15
Roll out some fondant pretty think and place it over the crown cavity and press gently.
-
 Step 16
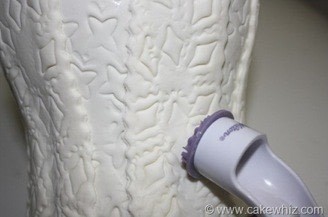
Then flip over your mold and the embossed fondant should fall out.
Here is a close-up…
-
 Step 17
Use a sharp exacto knife to cut out excess fondant until you are left with a smooth fondant crown.
-
 Step 18
Brush off all that powdered sugar. At this point, I placed this crown on a sheet of parchment paper/wax paper just so that it doesn’t stick to my table.
-
 Step 19
Brush silver pearl dust all over the crown to make it shiny.
-
 Step 20
Now, start painting on the crown. The mold has already embossed the entire design. You just need to paint on those bumps and cracks. To make gold paint, mix very little gold pear dust with vodka or clear vanilla extract and use this thick paste to paint. To make silver paint, do the same thing. Add silver dragees and small golden pearls around the crown and let it all dry.
Tip: -Practice on some scrap fondant before working on the actual crown. This will give you a chance to get used to the paintbrush. - To make the gold slightly deeper, I added some copper pearl dust to my gold paint. -
 Step 21
After I made the crown, I made the vase. I found this to be the hardest part of the cake. Here are my step by step instructions:
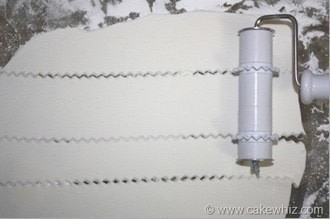
Mix some fondant with gum paste or you can use just gum paste too. Roll it out and use Wilton’s fondant cutter with the zigzag edges to cut strips that are 1 inch wide.
-
 Step 22
Use some shortening to hold these strips on a glass vase. After these strips dry, they would have the shape of this vase. I needed 12 strips to make this vase. So, I used 2 of these glass vases and let the strips dry. They took about a week to completely dry. I used Wilton’s decorative fondant punch to create these fancy impressions on my strips.
-
 Step 23
After a week, I removed all the strips from the vase and pasted them together with royal icing. Make sure to handle these trips gently or else they break or bend and lose their shape.
Tip: - Once these strips are dry, don’t try to use the decorative fondant punch again on these strips. I made this mistake (as seen in the picture) and that strip cracked and then completely broke -
 Step 24
Use royal icing to stick silver dragees randomly around this vase.
And your vase is now complete. Keep it in a dry place until you need it.
-
 Step 25
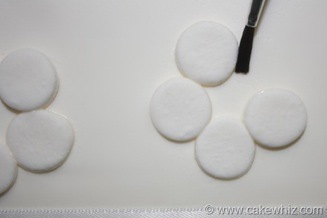
Decorating 6 tiers takes a long time but you can always divide your work over a few days. I did 3 tiers on one day and 3 tiers the next day. On each tier, I used a specific cutter to make a flower cluster arranged in a random manner. Here are the instructions:
Roll out fondant and cut out circle shapes.
-
 Step 26
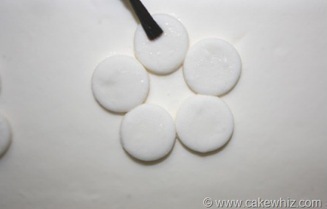
Arrange those circles into a flower cluster. Brush water where you want these clusters to be positioned.
….and stick them
-
 Step 27
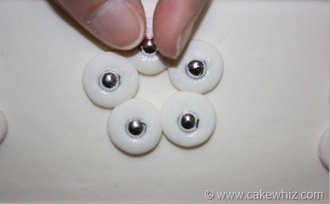
Brush some water on top of each circle.
-
 Step 28
Stick a silver dragee into each circle. The water helps to stick it in place.
-
 Step 29
Follow the same steps for the other shapes.
-
 Step 30
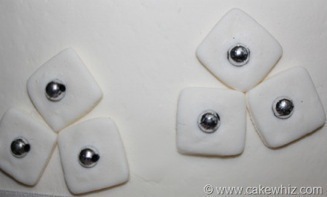
This is what the square flower cluster would look like…
-
 Step 31
And the heart flower cluster….
-
 Step 32
And the leaf flower cluster….
-
 Step 33
And the oval flower cluster….
-
 Step 34
And the basic flower cut out…I used this one on the very top tier so that the focus is on the crown and vase rather than flower clusters.
-
 Step 35
Time to put it all together.
Stick the crown on side of the 8 inch round cake with royal icing. It should stick within a few minutes.
Now, place the 12 inch square cake at the bottom and place the 10 inch square cake on top of that. Make sure your cakes are sitting on cake boards. Also, you need to use dowels in each tier to provide your cakes with support.
Next, place 4 champagne glasses on top of a silver cake board. Now place the 12 inch round cake on top of these glasses. Place 3 more champagne glasses and place the 8 inch square cake. Then, place the 10 inch round cake and 8 inch round cake with champagne glasses in between them. Finally, place the vase on the top tier. Fill it with red and yellow flowers.Give everything a steam with a steam iron. This makes the cake smoother and shinier. And you are done!


Beautiful and fun.