

About
LET’S SEW… A REVOLUZZZIONARY EASTER BUNNY
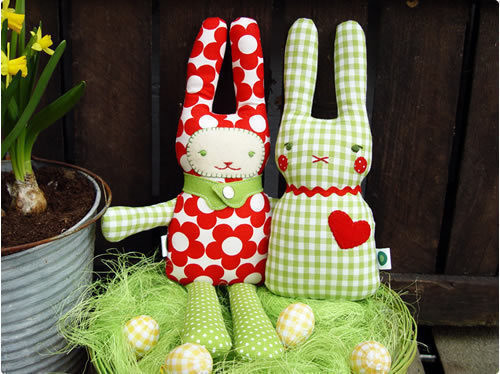
Last year I uploaded that pattern to create a simple Easter Bunny - and many of you made so wonderful and amazing Easter Bunnies! Some made them out of paper, many sewed really cute bunnies. And so I decided to take the bunny from last year (only made a few modifications) and sew two different versions by using the same pattern: a very simple version and another one with arms and legs and a more detailed face. The simple version is really very easy - absolutely perfect for beginners. And the other version is only a tiny little bit more fiddly - but not really difficult.
And hey, next weekend its already Easter - so hurry up
Tags
Downloads
- bunny.pdf 23.4 KB [ Download ]
-
 Ms Dorito added Revoluzzzionary Easter Bunny to Plushie
12 Jun 17:21
Ms Dorito added Revoluzzzionary Easter Bunny to Plushie
12 Jun 17:21
-
 Rebecca C. favorited Revoluzzzionary Easter Bunny
27 Jul 01:54
Rebecca C. favorited Revoluzzzionary Easter Bunny
27 Jul 01:54
-
 Neko-San K. favorited Revoluzzzionary Easter Bunny
31 May 20:32
Neko-San K. favorited Revoluzzzionary Easter Bunny
31 May 20:32
-
 katmacb favorited Revoluzzzionary Easter Bunny
29 Feb 03:25
katmacb favorited Revoluzzzionary Easter Bunny
29 Feb 03:25
-
 Xfluffy_unitatoX favorited Revoluzzzionary Easter Bunny
17 Nov 02:43
Xfluffy_unitatoX favorited Revoluzzzionary Easter Bunny
17 Nov 02:43
-
 Chachee.rayna added Revoluzzzionary Easter Bunny to Sew, Sew!
04 Apr 21:58
Chachee.rayna added Revoluzzzionary Easter Bunny to Sew, Sew!
04 Apr 21:58
-
 Anne G. favorited Revoluzzzionary Easter Bunny
26 Feb 04:03
Anne G. favorited Revoluzzzionary Easter Bunny
26 Feb 04:03
-
 BrickleBears favorited Revoluzzzionary Easter Bunny
02 Nov 16:38
BrickleBears favorited Revoluzzzionary Easter Bunny
02 Nov 16:38
-
 susisorglos added Revoluzzzionary Easter Bunny to Plushies nähen
30 Mar 07:53
susisorglos added Revoluzzzionary Easter Bunny to Plushies nähen
30 Mar 07:53
-
 Lara C. favorited Revoluzzzionary Easter Bunny
21 Mar 01:27
Lara C. favorited Revoluzzzionary Easter Bunny
21 Mar 01:27
-
 Step 1
First download the >>> RevoluzZzionary Easter Bunny pattern and print it - cut it out, chose your fabric, pin the pattern on the fabric and cut out:
-
 Step 2
Simple Easter Bunny:
When you want to stitch the face of your bunny on a fabric it’s good to iron some Vlieseline on the inner side of the fabric. I don’t know the proper English word for this: It’s something you use to make the fabric a bit thicker: -
 Step 3
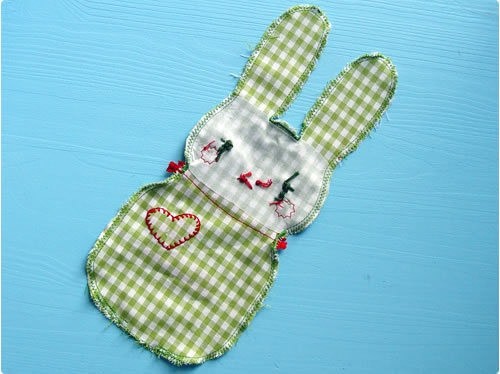
Now make your little bunny a unique face - maybe some cute cheeks, maybe Miffy-like pout. Whatever your like. And you could give your bunny a heart now
-
 Step 4
Before you sew the front and back of your bunny together, you serge the bottom of the bunny - where you will close it later with a blind stitch. And then: pin the front and the back together - of course the outside in. Sew the parts together and cut the parts between the ears and on the neck. Then serge everything:
-
 Step 5
And now the most exciting part comes: Turn your bunny inside out!
-
 Step 6
That’s it! Now you fill your bunny with doll wadding, use a shop stick for the ears and close your new friend with a blind stitch.
This cute bunny is perfect for Easter decoration - but it’s also perfect as a toy for babies. It’s perfect for little hands to grab it. And it gets even more exciting for babies when you put a rattle in the bunny tummy.
When I started sewing for kids about 3 years ago - my first best sellers were pretty simple bunnies (I called them Ladus) which were resembling this simple bunny. And I sewed to ribbons between the ears to tie them to a baby bed. And I filled the bunny tummy with lavender which has a very positive impact on babies. And you can even put a musical box inside this bunny and make it a wunderful and unique musical cuddly toy.OK, that was really easy. Now try the other version.


thanks for showing us this super cute rabbit!