About
A handy and simply tote to haul just about anything!
Download and print the attached pattern (included is a pattern for a kid-sized bag and an adult size...be sure to hide whatever layer you do NOT want to print!)
Supply note: You'll need 2 yards of fabric for the outside of the bag, and another 2 for the lining. (less so if using 60" fabric)
Downloads
- 115226_2F2016-10-22-220846-reversible+shopper+tote+tiled.pdf 998 KB [ Download ]
-
 Zacharie M. favorited Reversible Shopper Tote
01 May 17:54
Zacharie M. favorited Reversible Shopper Tote
01 May 17:54
-
C T. added Reversible Shopper Tote to Accessories! x
05 Aug 02:38
-
 Jessi favorited Reversible Shopper Tote
22 Apr 17:01
Jessi favorited Reversible Shopper Tote
22 Apr 17:01
-
 Crafterella featured Reversible Shopper Tote
11 Nov 23:00
Crafterella featured Reversible Shopper Tote
11 Nov 23:00
-
 Jdee M. favorited Reversible Shopper Tote
10 Nov 18:10
Jdee M. favorited Reversible Shopper Tote
10 Nov 18:10
-
 Melissa Beth A. favorited Reversible Shopper Tote
06 Nov 02:37
Melissa Beth A. favorited Reversible Shopper Tote
06 Nov 02:37
-
 BonnieWhiskem published her project Reversible Shopper Tote
31 Oct 09:00
BonnieWhiskem published her project Reversible Shopper Tote
31 Oct 09:00
You Will Need
-
 Step 1
Fold your fabric in half, place pattern on the foldline and cut out. You will need to cut out TWO pattern pieces of each fabric and TWO bottom rectangles (measurements on the pattern). You will have a total of FOUR tote pieces and TWO bottom pieces.
NOTE: If you’d like to add pockets, you can do that now! Simply cut out a rectangle or two of your preferred size, fold under the raw edges and topstitch to your tote pieces wherever your little heart desires! -
 Step 2
Beginning with one fabric, lay your two tote pieces right sides together and sew ONLY along the side seams on both sides. Press your seam allowances open.
-
 Step 3
Take your bottom rectangle piece and fold it in half lengthwise to find the center of the short sides. Mark with pins.
-
 Step 4
With right sides together (RST), match this pin up with the side seam of your bag you sewed in step 2. Pin bottom and side seam together; repeat with opposite side.
-
 Step 5
Begin sewing tote and bottom together at side seam. Before you get to the first corner, clip both fabrics at a 45 degree angle, about 1/4″. This will ensure that your corners lay flat when bag is turned right side out.
When you get to 1/4″ from the corner of your bottom piece (where the slit is), leave the needle in the fabric, raise the presser foot and pivot your fabric so that you can continue sewing the two fabrics together. Continue this way, clipping each corner, until you return to where you started. -
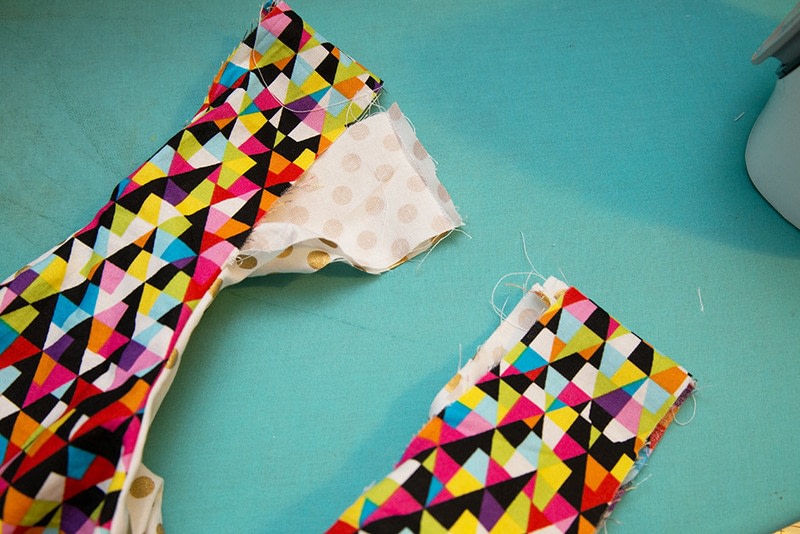
 Step 6
The bottom of your bag should look like this now.
Turn your bag right side out and press the bottom seams. Repeat steps 2-7 for the other (lining) fabric as well. -
 Step 7
Turn one of your totes inside out again. Insert one tote into the other so that right sides are together.
NOTE: your top curves and straps are still unsewn at this point! -
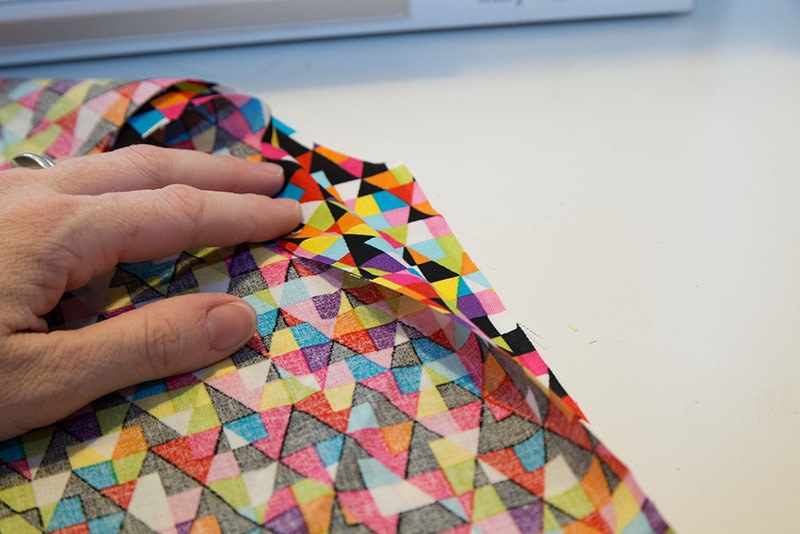
 Step 8
Pin the centers of each curve to the inside fabric. Beginning about 5 inches from the top of each strap, sew the outside fabric to the inside fabric. You will be sewing FOUR curves.
Clip each curve well. Turn bag right side out through an open strap. -
 Step 9
Lay your bag flat with a side seam in front of you.
Fold one strap half over on top of the other half so that they match, RST. Sew these together, with a 1/4″ seam allowance. Repeat with the lining on this side, and both lining and exterior on the other strap. (Be sure to not twist the straps before sewing!) Press seams open.
Begin pressing your curves well and continue until you reach the raw edges of the straps. Fold these edges under 1/4″ and press well. Do this to all 4 curves and both straps. -
 Step 10
Topstitch along all your curves and along the folded, pressed edges of your straps. This will close up your open edges and make the bag look nice and neat!