About
Because not all t-shirts come with extra oomph.
While rummaging through my dresser, I came upon a bunch of old camp t-shirts with fun logos. I hated to get rid of them, since I have some fond memories attached, but the fit was just a tad too large to be cute. So what to do? REFASHION!
Side note: I'm not going to include it in the instructions, but I highly recommend hemming as you go; it'll give your garment a nice, finished, I-totally-bought-this-from-a-trendy-store-doncha-know look.
Side side note: I didn't take pictures while making this, since I wasn't sure how it was going to turn out, so you get diagrams instead! :D
-
 Dawn C. added Retro Empress Refashion to T-shirt project
04 Jun 12:39
Dawn C. added Retro Empress Refashion to T-shirt project
04 Jun 12:39
-
notdeadredhead favorited Retro Empress Refashion
19 Jul 01:11
-
Dana M. favorited Retro Empress Refashion
26 Apr 07:19
-
 cristinakilljoyway favorited Retro Empress Refashion
25 Jan 18:19
cristinakilljoyway favorited Retro Empress Refashion
25 Jan 18:19
-
Amanda M. favorited Retro Empress Refashion
01 Jan 21:59
-
 debbie.pitts3 favorited Retro Empress Refashion
05 Jul 23:20
debbie.pitts3 favorited Retro Empress Refashion
05 Jul 23:20
-
 Step 1
First, select your weapon of choice. The logo can either be on the front or the back (mine was actually on the back of the shirt!). Doesn't matter; t-shirt anatomy is fairly universal.
-
 Step 2
Cut off the sleeves and the top portion of the shirt (as close to the top as you can get it, so you'll have more fabric to work with).
-
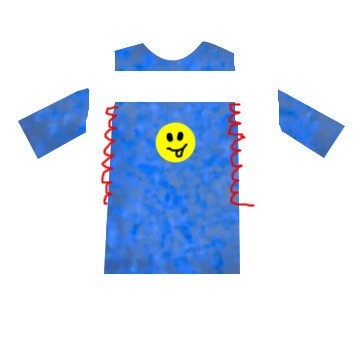
 Step 3
Sew up the open gaps where the sleeves once were. If your shirt is a bit large, this is the time to measure how much you want it taken in, and if necessary, sew all the way down to create a slimmer piece of fabric.
-
 Step 4
Cut along the underside of the sleeve, right along the seam, so you can open it up as shown. Repeat for the other side.
-
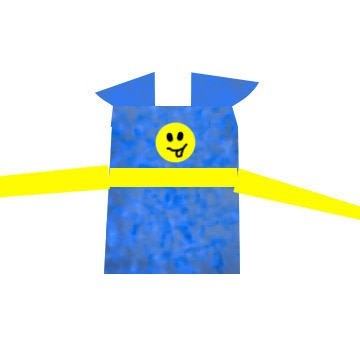
 Step 5
From your secondary shirt, cut three strips of fabric about 18" to 20" long each. One needs to be sewn, as diagrammed, wherever you'd like your bust line to be. You can either put it just beneath your bust, as I did, or cinch it down towards your natural waist for a more traditional look.
Be sure to only sew through the top layer of fabric! Otherwise, you'll end up sewing your shirt closed and have to rip it all out again (and that's NEVER much fun!).
-
 Step 6
Now sew the other two strips onto either side of the first strip, so as to make ties for the shirt. Again, be careful to only sew through one layer of fabric!
-
 Step 7
Using the t-shirt sleeves we opened earlier, arrange them so that the pre-hemmed edge (what was once the end of the sleeve) is facing inwards. The open, frayed ends that you cut off the shirt will be towards the exterior.
You'll need to measure to figure out where you want the sleeves to hit and end up (try on the shirt if you need to), but once you have it approximated, sew the edges of the sleeves to the top of the bodice to create new sleeves.
-
 Step 8
Once your sleeves are sewn in both the front and the back, you are finished!
Again, I'm very much a perfectionist, so after this step I went back around and either hemmed or sewed down loose edges. It really depends on the look you're going for.
Happy reconstructing!