About
How to make a retro inspired apron
I have to say it definitely is fun to cook with such a cute apron (I'm sure the food even taste better).
Let's make a cute and retro apron that Betty Draper would approve of!
Fabric (150 cm wide): 1 m. Fabric recommended: light to medium weight such as cotton, broadcloth, quilting cotton, linen... anything you can put directly in the washing machine to remove the tomato and chocolat stains! Matching thread. Optional: rick-rack, buttons or other adornments ...
Downloads
- 101793_2F2014-05-16-100619-PDF.pdf 4.13 MB [ Download ]
-
 Sterilyn favorited Retro Apron Tutorial
24 Jan 15:18
Sterilyn favorited Retro Apron Tutorial
24 Jan 15:18
-
 ellie j. added Retro Apron Tutorial to kate
13 Jun 22:20
ellie j. added Retro Apron Tutorial to kate
13 Jun 22:20
-
 RareJewel favorited Retro Apron Tutorial
02 Mar 11:11
RareJewel favorited Retro Apron Tutorial
02 Mar 11:11
-
 Pam added Retro Apron Tutorial to Curious Kitchen
08 Nov 20:32
Pam added Retro Apron Tutorial to Curious Kitchen
08 Nov 20:32
-
 Whitney I. favorited Retro Apron Tutorial
12 Aug 06:14
Whitney I. favorited Retro Apron Tutorial
12 Aug 06:14
-
 Rinchen favorited Retro Apron Tutorial
12 Sep 14:47
Rinchen favorited Retro Apron Tutorial
12 Sep 14:47
-
Rebecca B. favorited Retro Apron Tutorial
20 Jul 12:41
-
 IDreamOfArizona favorited Retro Apron Tutorial
11 May 14:46
IDreamOfArizona favorited Retro Apron Tutorial
11 May 14:46
-
 Lara L. favorited Retro Apron Tutorial
28 Feb 13:54
Lara L. favorited Retro Apron Tutorial
28 Feb 13:54
-
 Jenks added Retro Apron Tutorial to Sewing
24 Jan 23:05
Jenks added Retro Apron Tutorial to Sewing
24 Jan 23:05
-
 Step 1
Cut the pieces like on the following drawing:
1. SKIRT: cut 1 rectangle of 60 cm high x 80 cm long
2. SKIRT POCKET: cut 1 rectangle of 45 cm high x 35 cm long
3. TOP: cut 1 rectangle of 25 cm high x 30 cm long
4. TOP POCKET: cut 1 rectangle of 15 cm high x 20 cm long
5. WAIST STRAPS: cut 2 rectangles of 13 cm high x 90 cm long
6. NECK STRAPS: cut 2 rectangles of 10 cm high x 60 cm long
7. WAISTBAND: cut 2 rectangles of 7 cm high x 40 cm long -
 Step 2
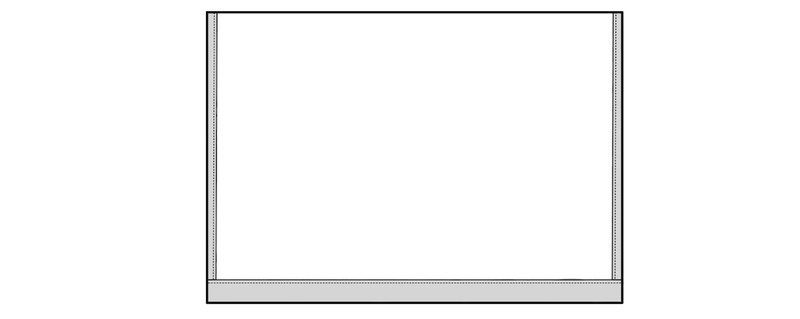
Hem the skirt:
Turn about 1 cm under the sides and 2 cm under at the hem. Press and stitch in place (in grey: right side of fabric). -
 Step 3
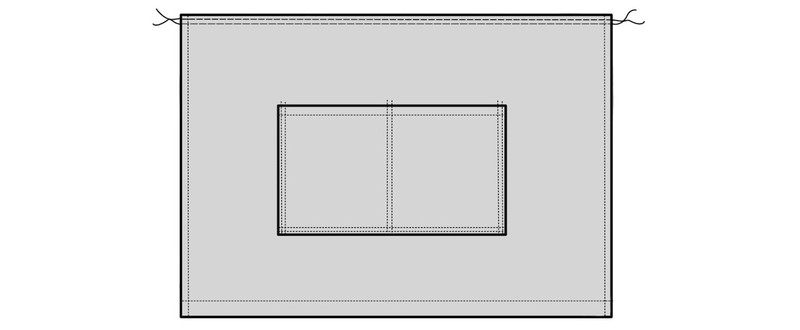
Skirt pocket:
Turn the pocket edges under (sides 1 cm, top 1,5 cm). Stitch the top fold in place.
Place the pocket at the center of the skirt and stitch two rows around the pocket edge and down the middle. -
 Step 4
Top pocket:
Proceed the same way to stitch the pocket to the top piece. -
 Step 5
Gather the skirt.
-
 Step 6
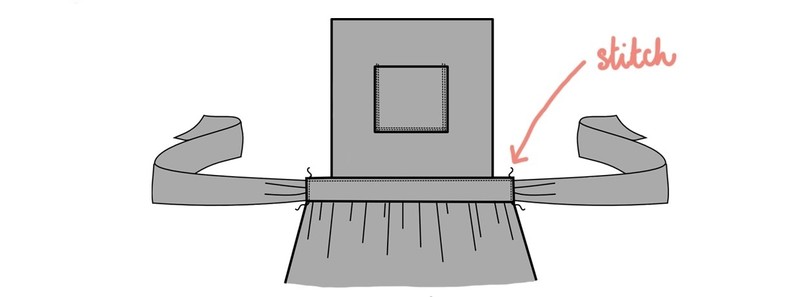
Stitch the waistband:
Place the gathered skirt between the two waist pieces, matching the centers. Stitch the three layers together at 1,5 cm from the edge, leaving about 1 cm at the beginning and at the end. Press the seams toward the waist piece. -
 Step 7
Stitch top to waistband:
Stitch the top to the first layer of the waist, matching the center. Press seam down. -
 Step 8
Topstitch the waistband:
Press the seam allowance of the inside layer of the waist to the inside. Topstitch both layers together to close and form the waistband. The ends are still open, turn the remaining edge in and press. -
 Step 9
Stitch the straps:
Fold the strap in two with right sides together. Stitch the edge with an angle at the end. Trim the corners and seam allowances. Turn inside out and press flat. -
 Step 10
Insert the straps inside the waistband opening. Gather slightly the straps. Topstitch to close the waistband.
-
 Step 11
Neck straps:
Stitch the neck straps as the waist ones. Stitch them to the top (you can secure them with a cross stitch).You're done! Now let's make some cake with style!